I migliori consigli per fotografare un'auto straordinaria
Ti mostriamo come ottenere le tue migliori foto di auto con questi fantastici suggerimenti e trucchi, dagli epici scatti all'aperto delle auto, agli scatti perfetti degli interni, questa guida sulla fotografia delle auto è per te. O forse stai cercando di vendere la tua auto il più rapidamente e facilmente possibile, con il più grande ritorno possibile e, in tal caso, sono essenziali scatti di auto eccezionali!
Benvenuto nella serie AP Migliora la tua fotografia – in collaborazione con MPB – Questa serie è progettata per accompagnarti dagli inizi della fotografia, introdurre diverse abilità e stili di ripresa e insegnarti come crescere come fotografo, così puoi divertirti a produrre fotografie (e video) sorprendenti da realizzare tu al livello successivo, sia che si tratti di fare soldi o semplicemente di padroneggiare la tua forma d'arte.

Ogni settimana troverai un nuovo articolo, quindi assicurati di tornare per continuare il tuo viaggio e divertirti lungo la strada, creando fantastiche immagini. Se hai trovato utili questi articoli, non dimenticare di condividerli con persone che conosci e che potrebbero essere interessate ad apprendere nuove abilità fotografiche. Troverai tutta una serie di altri articoli in questa serie.
Preparati a mettere in pratica del tempo per affinare la tua tecnica di panoramica. Foto di Phil Hall e Andrew Sydenham
Anche se hai solo un interesse passeggero per le auto, probabilmente hai sfogliato le pagine di riviste automobilistiche patinate e hai guardato con invidia alcune delle straordinarie fotografie di auto in mostra.
Naturalmente, non tutti noi avremo accesso a un'Aston Martin o una Ferrari, ma ciò non dovrebbe scoraggiarti dal provare tu stesso la fotografia dell'auto. Ti mostreremo come è possibile ottenere ottimi scatti in macchina, indipendentemente dal motore che hai. Non dimenticare inoltre che ci sono anche una serie di eventi che ti permetteranno di avvicinarti a una miriade di veicoli impressionanti per provare alcune di queste idee per la fotografia di auto.
Ex redattore tecnico presso AP, Phil Hall è ora editore presso heycar e Honest John e spiega tutto.
Come catturare il movimento nelle foto dell'auto
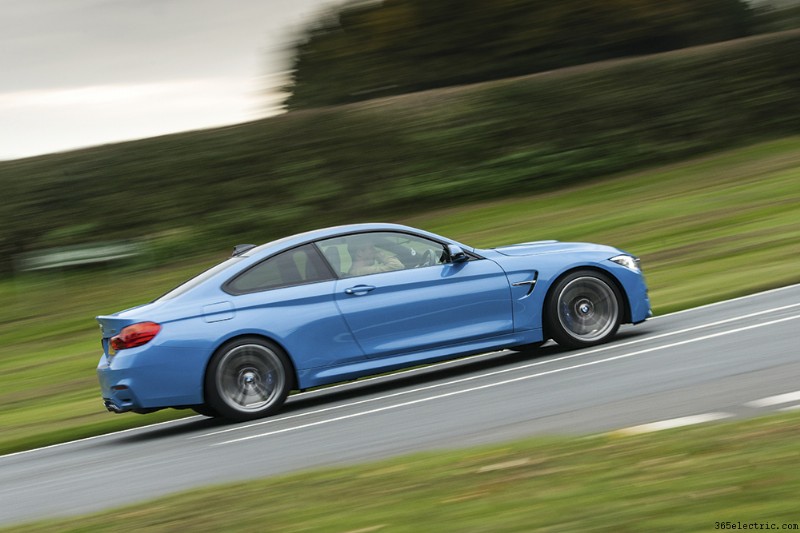
Per creare un senso di velocità e movimento in una ripresa di un'auto, il panning è inestimabile. È uno dei modi migliori per trasmettere il movimento e non sei limitato a un'auto specifica, poiché puoi applicare questa tecnica in occasione di eventi automobilistici o semplicemente sedendoti vicino a un tratto di strada adatto.
Fare i conti con il panning per la fotografia di auto
Potresti aver provato a fare una panoramica in passato, ma vale la pena ricapitolare. Il panning è il modo in cui segui il soggetto con una velocità dell'otturatore ridotta per sfocare lo sfondo, ma mantieni nitido il punto di interesse mentre il soggetto passa davanti a te.
Impostazioni della fotocamera per la panoramica
La velocità dell'otturatore che scegli dipenderà dalla velocità dell'auto, quindi preparati a un po' di tentativi ed errori. Un buon punto di partenza per un'auto che viaggia a 30-40 mph è di circa 1/80 di secondo, anche se scattare in condizioni di luce diurna spesso significa abbassare l'ISO a 100 o 200 e fermare l'obiettivo a f/11.
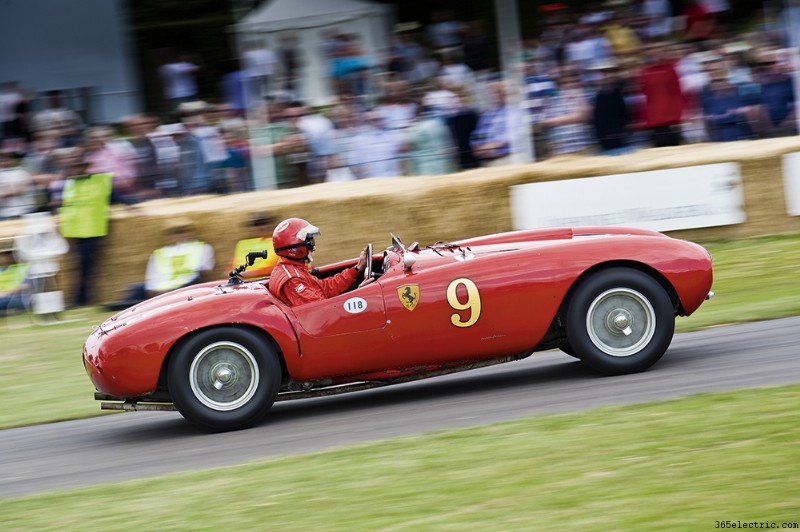
Eventi come il Goodwood Festival of Speed sono luoghi ideali per provare a fare una panoramica.
La scelta di utilizzare l'AF della fotocamera può produrre risultati contrastanti – se funziona bene, non si può criticare, ma potresti scoprire che la tua fotocamera può mettere a fuoco male o fermarsi nel punto sbagliato dell'auto. Un'alternativa è concentrarsi su un punto della strada in cui sai che l'auto passerà, quindi passare alla messa a fuoco manuale. Poiché probabilmente scatterai a una profondità di campo relativamente ampia, puoi assicurarti che la tua messa a fuoco sia perfetta e concentrarti completamente sul tuo posizionamento rispetto all'auto.
Come posizionarsi durante la panoramica
Ove possibile, vuoi allontanarti il più possibile dall'auto che passa, assicurandoti anche di avere molto spazio nell'inquadratura mentre passa:questo sarà utile anche in seguito durante il ritaglio poiché potresti voler inclinare leggermente l'immagine per accentuare il senso di velocità. Un teleobiettivo zoom è l'ideale per questo.
Cerca di evitare di muovere i piedi durante la panoramica, quindi posizionali leggermente divaricati rivolti in avanti, usando il busto per ruotare da sinistra a destra mentre segui il soggetto. Quando l'auto si avvicina, seguila con un movimento fluido e fluido, facendo scattare l'otturatore solo quando l'auto è abbastanza vicina. Non scoraggiarti se non lo capisci al primo colpo:il panning richiede molta pratica e pazienza. Fallo bene e sarai ricompensato con splendide foto dell'auto.
Fai una marcia in più con la fotografia in auto con una carrellata
Sebbene il panning richieda di muovere l'obiettivo alla stessa velocità di un veicolo in movimento che passa davanti a te, un'alternativa è sparare accanto ad esso in un'auto secondaria in movimento.
Come per il panning, dovrai scattare con una velocità dell'otturatore sufficientemente lenta per introdurre quella sensazione di movimento, ma abbinando la velocità dei due veicoli, l'auto che stai riprendendo rimane nitida. Piuttosto che utilizzare un teleobiettivo zoom, potresti provare uno zoom standard o anche un grandangolo. Ricorda però, questo non dovrebbe essere provato su strade pubbliche.
Il monitoraggio da un'altra auto può fornire risultati eccellenti.
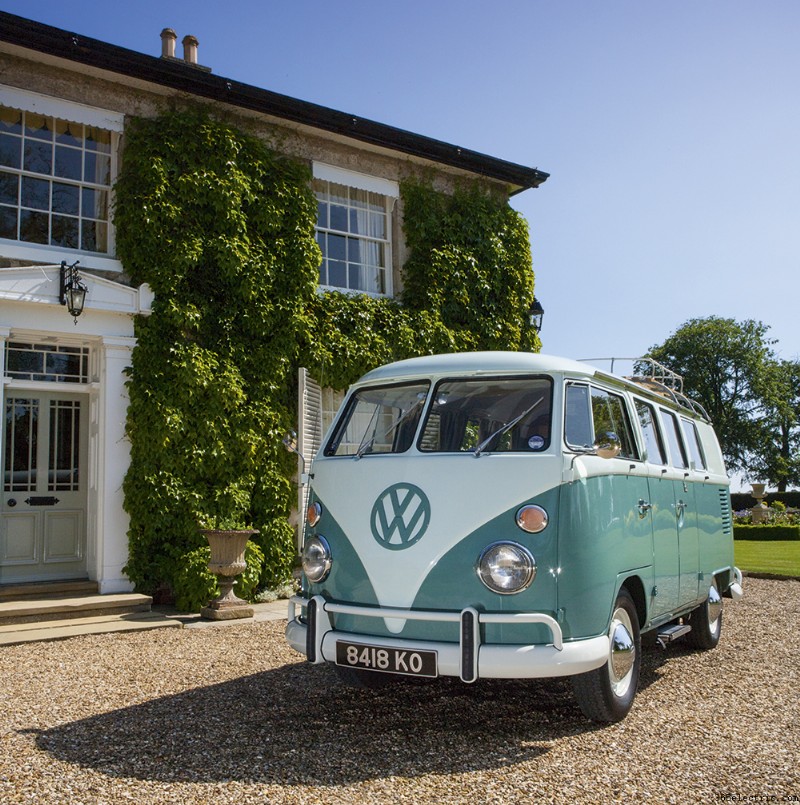
Come fotografare le auto sul posto
Le auto non devono sempre essere in movimento per una fotografia automobilistica di successo:una ripresa statica della posizione di un'auto può essere altrettanto sorprendente.
Scegli la tua posizione
La posizione che scegli dipende molto dall'auto che hai, quindi, sia che tu scelga per una città urbana e industriale o rurale e pittoresca, deve essere complementare o in contrasto con lo stile e l'età dell'auto che stai girando. Ovunque tu decida di scattare, però, è importante verificare se sei autorizzato a farlo.
Pensa a come illuminerai la tua auto
Una volta che hai ordinato la posizione, devi pensare all'illuminazione. Se stai lavorando da una posizione drammatica o quando il sole è un po' più basso nel cielo, allora potresti optare per la luce naturale.
Alcune posizioni funzionano davvero bene se si inietta un'illuminazione aggiuntiva e si fa davvero risaltare la propria auto. Sebbene l'illuminazione della posizione dedicata sia utile, sarai comunque in grado di farlo in modo efficace con uno o due flash, insieme ad alcuni stand di illuminazione e modificatori. I risultati possono essere davvero impressionanti, soprattutto se sottoesponi di proposito lo sfondo di un paio di stop ed esponi correttamente per l'auto, una combinazione che crea una straordinaria foto dell'auto.
Scegliere l'obiettivo giusto per fotografare l'auto in esterni
Mentre puoi scegliere una visuale più ampia quando fotografi le auto sul posto, anche una lunghezza focale del teleobiettivo può essere un'opzione utile:un obiettivo da 85 mm su una fotocamera full frame funziona bene o uno zoom da 70-200 mm. Scendi a terra, prova anche a sdraiarti, poiché la prospettiva compressa produrrà un'immagine drammatica. Qui è dove potresti voler capovolgere lo schermo e utilizzare Live View per comporre lo scatto.
Lo sfondo che scegli giocherà un ruolo cruciale nell'immagine finale.
Come comporre le foto della tua auto
Quando si fotografa un'auto sul posto, è importante pensare al posizionamento dell'auto. Preparati a spostare un po' l'auto per ottenere l'inquadratura corretta, mentre potresti pensare di trasformare le ruote anteriori nel telaio:se sono rivolte in avanti, può togliere un po' di dinamismo dall'inquadratura.
Anche le riprese da un'altitudine più elevata funzionano bene, poiché è un angolo da cui non vediamo spesso un'auto. Potresti riuscire a trovare un punto più alto da cui sparare, ma poiché ciò non è sempre possibile, vale la pena portare con te una piccola scala a pioli.
Dettagli e interni dell'auto
Piuttosto che provare a riprendere l'intera macchina, adotta un approccio diverso e concentrati su dettagli interessanti, poiché il più delle volte questi sono ciò che rende un'auto unica. Armati di uno zoom standard o di un primo veloce come un 35 mm o 50 mm se ne hai uno, e spostati gradualmente all'interno dell'auto alla ricerca di punti di interesse. Potrebbe essere un badge, una griglia del radiatore o semplicemente una curva nella carrozzeria, ma una volta che i tuoi occhi sono attratti da un punto, cerca di ottenere l'angolazione migliore, sia in basso che di lato.
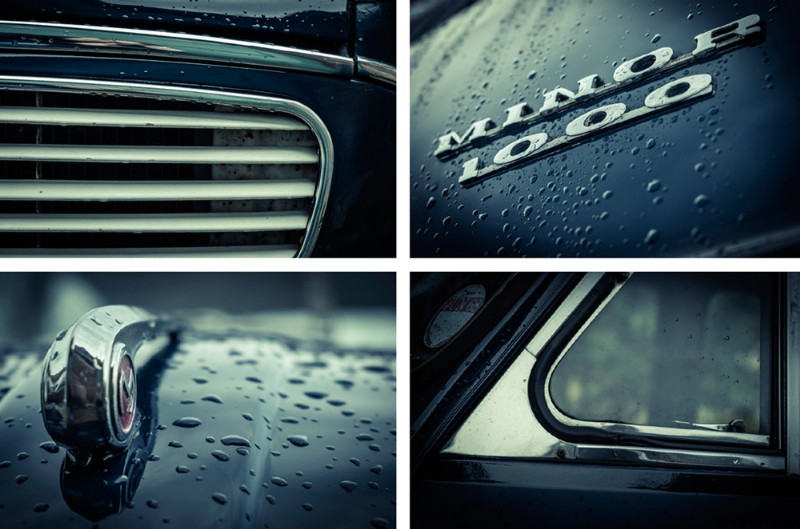
Fai il giro dell'auto alla ricerca di punti di interesse
Anche l'auto che scatti non deve essere in ottime condizioni (sebbene debba essere pulita):il più delle volte un'auto che sembra aver avuto un uso fedele renderà i soggetti migliori. Fai solo attenzione quando lavori vicino all'auto perché dovrai tenere d'occhio i riflessi, specialmente se l'auto è punteggiata di cromature. Anche il tempo gioca un ruolo importante:una giornata nuvolosa può funzionare molto bene poiché la luce soffusa e diffusa significa che eviterai le ombre dure, mentre il caldo bagliore del primo mattino o alla fine della giornata può aggiungere un elemento in più al tuo scatto.
Come scattare buone foto degli interni dell'auto
Proprio come l'esterno, quando si tratta di foto degli interni di un'auto, potresti voler concentrarti su dettagli specifici. Prova a utilizzare un obiettivo con apertura relativamente "veloce":un obiettivo a focale fissa standard con un'apertura massima di f/1.8 o superiore sarà l'ideale in quanto non solo ti consente di mettere in rilievo lo sfondo, ma significa anche che puoi scattare con un otturatore funzionante velocità durante le riprese a mano libera.
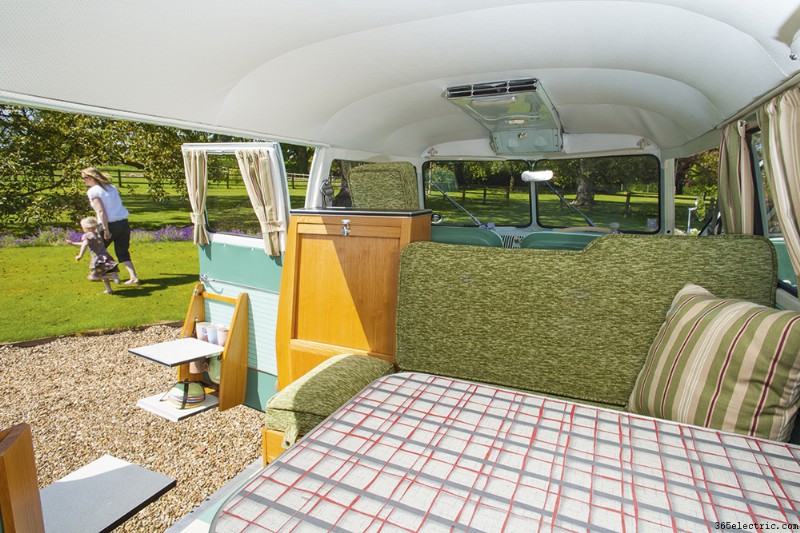
Sarà necessario un obiettivo grandangolare per le riprese di interni
Come fotografare le auto in vendita
Se stai cercando di fotografare la tua auto in vista dell'inserzione su un sito web come www.carsite.co.uk, allora ci sono un paio di cose da considerare prima di iniziare.
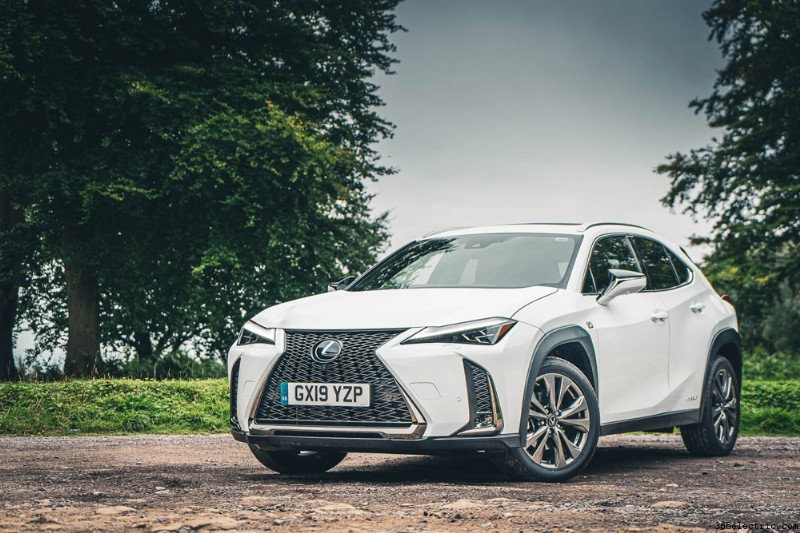
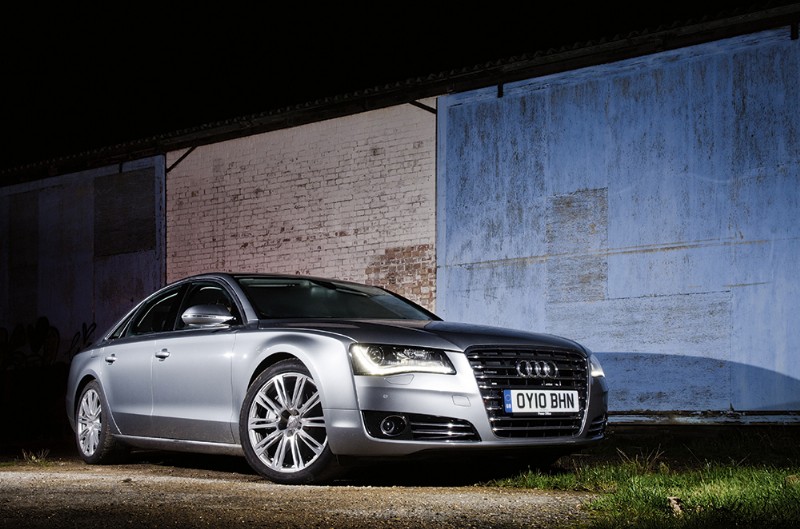
Phil Hall, Lexus, Car photography, taken with the Sony A7 Mark III
The car needs to be centre stage, so rather than looking for a dramatic landscape for the car to sit in, you want a fairly unobtrusive background that isn’t a distraction from your car. A quiet car park in the countryside can be a great spot.
It might sound obvious, but before taking any photos, make sure your car is clean. Give it a thorough wash before you shoot and take some cloths with you to get rid of any dirt that might have built up on the journey to your location.
For the exterior shots of your car, try and get as many shots as possible – take front, back and side profiles, as well as a three-quarter shot of the car that you can use as the main image. Get some close-ups of each wheel to clearly illustrate the alloy wheel condition, before moving to the inside.
You don’t need moody details of the interior – instead, you want to achieve a brighter, airier look. A large piece of white card (A1 or A0 size will do the job and can be found in art shops) is perfect for lighting shadows, while a wide-angle lens will let you cram in as much as possible and make the car’s cabin appear nice and large.
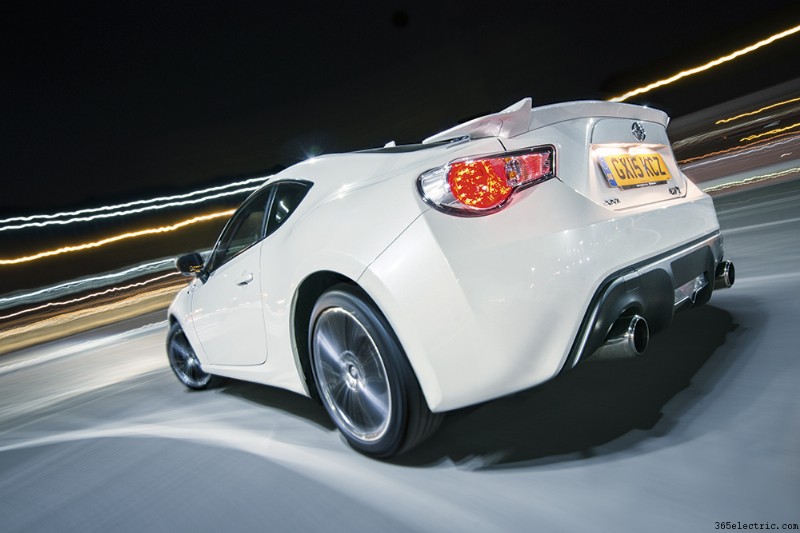
How to photograph cars at night
Introducing a car into your low light photography can work really well. Taking your car into the city at night can provide loads of excellent locations (provided you have permission to do so), while light trails can really add some energy to a shot. Another technique to try when photographing a car at night is light painting.
Painting with light
Almost like modern-day pieces of sculpture, cars lend themselves perfectly to painting with light, as it really allows you to reveal the shape and form of the bodywork. You don’t need a huge amount of expensive kit, either, as a flashgun or torch will do a decent job to get the ball rolling. For more control, though, you can look at using an LED panel. For this shot we used the Gloxy Power Blade that has 298 LEDs grouped together in a strip, but there are a range of options to suit all budgets. While different light sources will produce slightly different results, the principles for a successful shot remain the same.
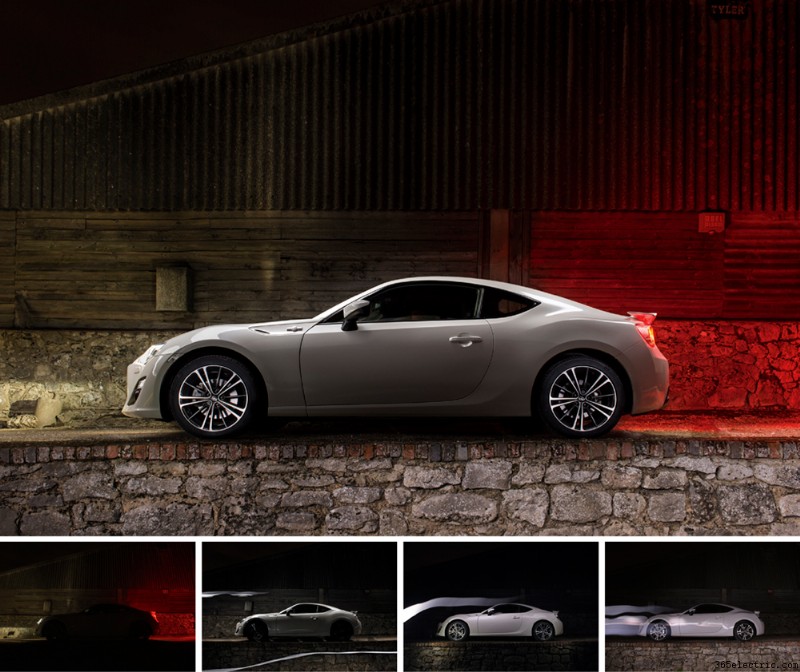
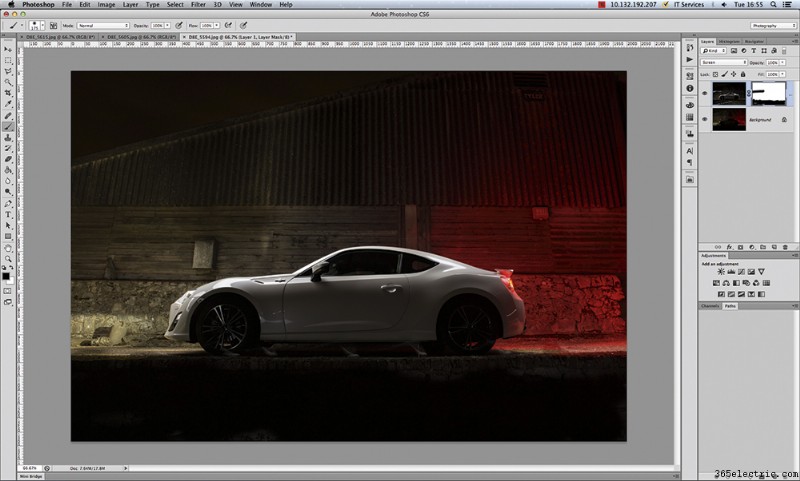
Work on individual elements of the car for each shot, then merge the image into a single photo. The final composite image is made up of the four separate shots. Car shown (GT86) kindly supplied by Toyota GB
Light painting basics
Pick your background. In this case we opted for an old farm building to contrast with the clean, defined lines of the car, but an urban background could work just as well. Also remember that you need to consider the amount of ambient light in the area – you want as little as possible, otherwise it risks encroaching on the scene and ruining the image.
Once you’ve got your location sorted, it’s time to set up. If you can, bring a friend to help out. Not only can they collaborate on the shoot (life’s a lot easier with someone firing the shutter), but it’s always good to have some company if you’re working in the dark at night.
Camera settings for light painting
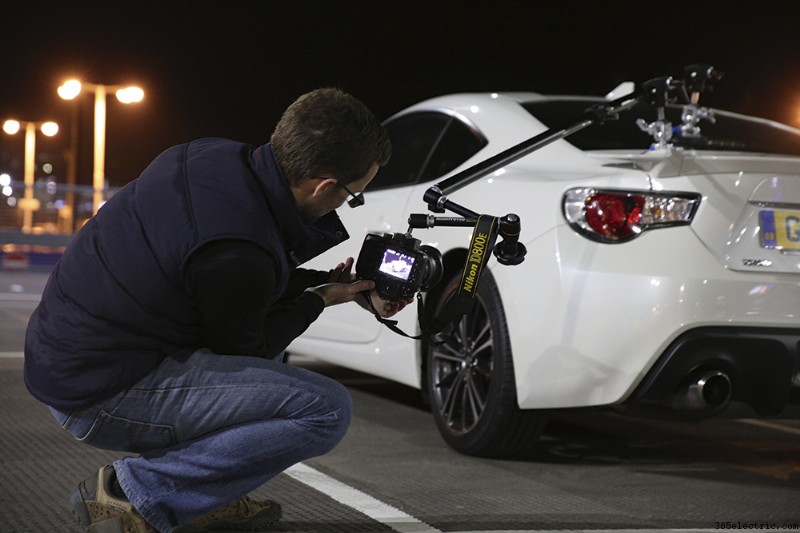
With your camera placed on a tripod, working in the dark can make focusing tricky, so get your friend to throw some light on the car while you set the focus. Once you’re happy, lock it off and then dial in the exposure. Set the ISO at 100-200 and then, as a starting point, set the aperture at f/11 and an exposure at 30secs.
This shot was constructed from multiple images lit with a single flashgun
Unless you’re extremely lucky, you’re not going to get the perfect shot in a single capture. Instead, you want to build up elements of the shot that can then be merged later in Photoshop, so it makes sense to pick out the elements you want to work on. One could be the cabin, another could be the side panels and another the wheels, while you might also want to bring in elements of the background. If you want to include the head and tail lights, do this separately first. Then switch them off and start your light painting. Try to keep your movements as smooth as possible and shield them from the lens. Once you’ve taken a variety of shots, it’s time to pack up and head home to blend them together.
Car Photography – Top tips
When shooting in some locations, make sure you get permission first
Keep it clean
When shooting cars, the most important thing to do is to make sure the car is clean. However good you are at Photoshop, you’ll struggle to ‘clean’ a car digitally. Get it cleaned thoroughly before you shoot and take some cloths with you to get rid of any dirt that might have built up on the journey.
Cleaning up an image – Step by step guide
1. Select images
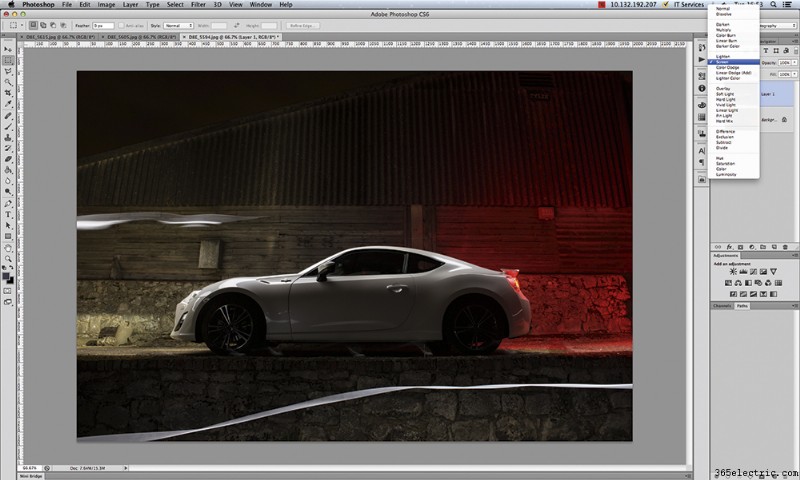
Once you’ve selected the images you want to use, batch convert the raw files in Lightroom or Photoshop. Then, with an ambient headlight shot working as your background layer, paste in another image and change the Blending Mode to Screen.
2. Layer mask
You may want to hide some elements of the image, so with Layer 1 selected, create a new Layer Mask and with a black Brush, run over the areas to you want to remove. You can then look to add your next layer.
3. Fill to black
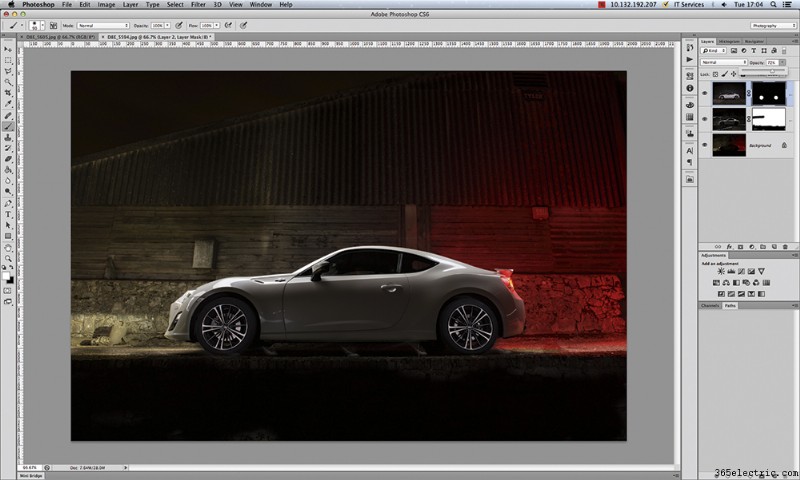
Some layers don’t need a Screen Blending Mode. Instead, apply a Layer Mask filled Black before using a White brush to reveal certain areas – in this case we only wanted to have the wheels show in this layer. Continue until you’re happy with the look.
Car photography kit list
- Gloxy Power Blade – With a long beam of solid and neutral light, this is a great piece of kit to use for illuminating a car.
- Flashgun – While not quite as precise as an LED light, your humble flashgun can still deliver decent results.
- Torch – If you don’t have any LED lights, try using a torch for a similar effect, although be prepared for a slightly warm result.
How to use a car mount for car photography
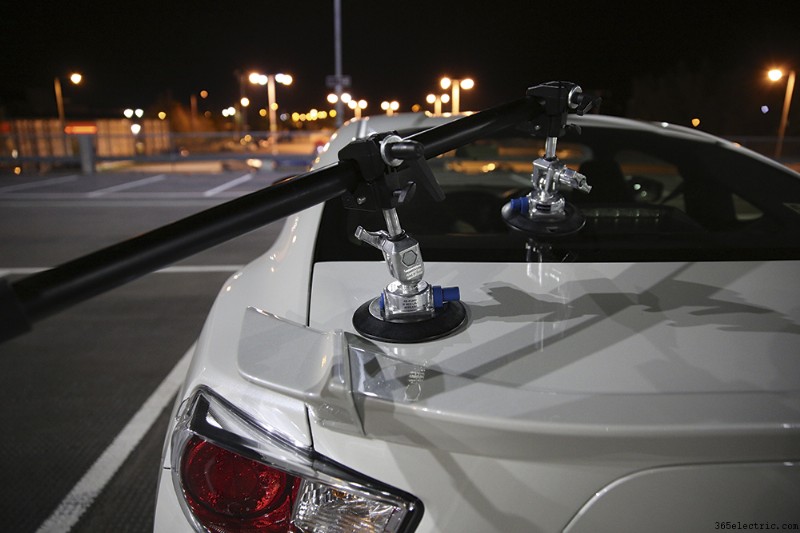
The car mount uses suction cups to form a bond with the car
If you want to take things a little further, you can look at using a camera rig. By temporarily fixing a rig to the car in this way, you’re allowing the camera to move at an identical speed to the car, introducing motion blur into the shot while keeping the car pin-sharp and adding a real sense of movement to the image.
You’ll find camera rigs in all shapes and sizes, but a popular choice is to use a couple of Manfrotto pump cups, Manfrotto super clamps and a telescopic pole with a Manfrotto magic arm attached, onto which you can then lock the camera. Because you’re shooting relatively close to the car, you’ll need a fairly wide focal length – something like a 16-35mm on a full-frame DSLR fits the bill perfectly. That’s not forgetting a whole lot of faith as you let your camera kit dangle from the car as it moves along. But don’t worry, it won’t actually be travelling that fast. More on that in a moment.
In use
When setting up a shot with a rig, front or rear three-quarter images tend to work best, although you should discount detail in front or rear shots. Just remember that there is no getting away from having the rig appear in your shot and it’s going to have to be removed later in post-production. One thing you can do to make life easier in Photoshop is to position the camera upside down so the telescopic arm is rising from the camera, as it’s much easier to clone a pole out against a sky or background than it is to have to rebuild sections of the bodywork.
This can make composition a little tricky, especially as you’ll potentially be working at awkward angles. However, this is where live view becomes extremely useful, as it makes it much easier to frame your shot. Once you’ve got your focus, it’s best to lock it off in manual to avoid the camera’s AF shifting focus inadvertently when shooting.
The final shot, once the car mount has been cloned out in post-production
Shutter speeds
Just like panning, getting the right shutter speed is the real key to the success of the final image. You need to be slow enough to introduce blur into the shot, but not so much so that you risk compromising image sharpness.
If you’re shooting in daylight, start by dropping your ISO down to 100-200 and in shutter priority mode, experiment with shutter speeds of 1/15-1/60sec as a starting point. You’ll find that the car only needs to be moving at around 5-10mph to introduce blur and make it appear as if it’s travelling much faster. If you’re struggling to achieve a balanced exposure – it may be too bright, for instance – pop a neutral density filter on the front. When it comes to night shooting, try a shutter speed of around 1-1.5sec as this will render lights as long light trails.
Avoiding vibration
With a long telescopic arm protruding out from the car, it will be no surprise to hear that vibration can become an issue, introducing loss of sharpness in the image. Some photographers like to attach guide lines from the telescopic arm to the corners of the car for extra stability, but simply holding the camera as the car moves can help. It is important to look for smooth roads and make sure the car maintains a consistent speed.
Alternatively, rather than shooting with the engine on, you can simply push the car to minimise the effect of engine vibration. If you try this and you’re still having trouble with unwanted vibrations, one trick is to shoot a static shot and then blend it with the moving image later.
Finally, triggering the shutter. You can use a remote trigger such as PocketWizard Plus IIIor, if your camera has one, you can use its intervalometer to fire a series of shots in quick succession as the car moves along.
Rather than shooting with the engine on, you can push the car to reduce vibration
Car mount – kit list
- Hague SM11 telescopic mount rig – You can build your own rig from individual parts, but Hague’s all-in-one solution is a great option at £276.
- Manfrotto Magic Arm – The Manfrotto Magic Arm with a super clamp (£112) offers a bit more flexibility when it comes to framing your shot.
- Remote Trigger – To fire the shutter as the car moves along, a remote release is essential. Happily there are numerous options available on the high street.
Now you’ve learnt some of the best methods for improving your car photography, why not share some of your images with us on Facebook, or Twitter.
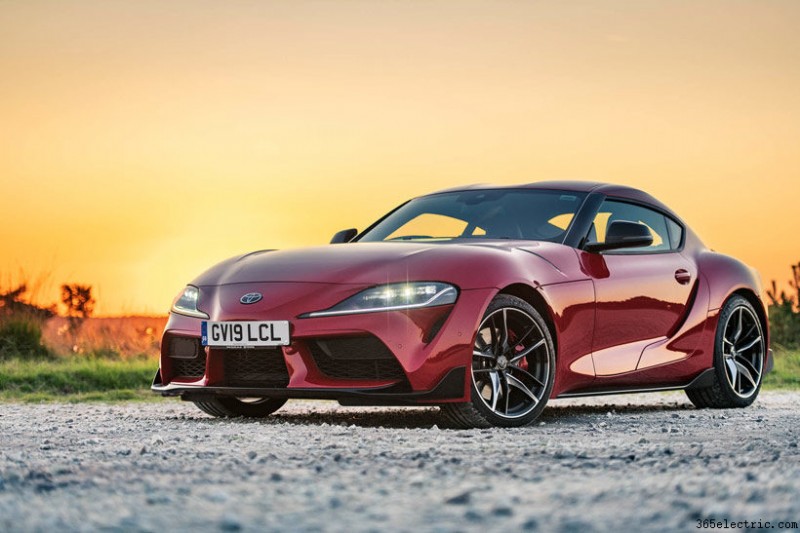
Featured image:Phil Hall, Toyota Supra, taken with the Nikon D850.
Tune in next week, for the next article in the series of the AP Improve Your Photography Series – in collaborazione con MPB.
- Parte 1: Guida per principianti ai diversi tipi di fotocamere.
- Parte 2: Guida per principianti ai diversi tipi di lenti.
- Part 3:Beginners guide to using a camera taking photos.
- Part 4:Beginners guide to Exposure, aperture, shutter, ISO, and metering.
- Part 5:Understanding white balance settings and colour
- Part 6:10 essential cameras accessories for beginners
- Part 7:Beginners guide to the Art of photography and composition
- Part 8:Beginners guide to Photoshop Elements and editing photos
- Part 9:Beginners guide to Portrait Photography
- Part 10:Beginners guide to Macro Photography
- Part 11:Beginners guide to Street Photography
- Part 12:Beginners guide to Landscape Photography
- Part 13:How to shoot Action and Sports Photography
- Part 14:How to shoot wildlife photography
- Part 15:Raw vs JPEG – Pros and cons
- Part 16:How to create stunning black and white images
- Part 17:How to photograph events and music
- Part 18:Pet photography – how to photograph pets
- Part 19:The ultimate guide to flash photography
- Part 20:The ultimate guide to tripods
- Part 21:Create awesome photos with light painting
- Part 22:Beginners guide to file and photo management
- Part 23:How to shoot food photography
- Part 24:Complete guide to outdoor light
Find the latest Improve Your Photography articles here.