Come installare un'autoradio | Guida facile alla sostituzione dell'unità principale
L'installazione di un'unità principale o la sua sostituzione possono avere difficoltà. Personalmente, ho impiegato solo 30 minuti per sostituire un'unità principale, fino a 4 o 5 ore per lo stesso lavoro su un'auto diversa. Esistono numerose variabili che possono determinare quanto sia difficile e dispendioso in termini di tempo l'attività:
- Componenti del cruscotto e dell'assetto – Secondo la nostra esperienza, le auto più difficili sono tipicamente tedesche. Audi, BMW, Mercedes, Volkswagen. I componenti del cruscotto e dell'assetto sono molto resistenti, stretti e difficili da rimuovere.
- Cablaggio:il cablaggio può variare da auto a auto. Questo dipende davvero dal numero di funzioni che l'auto ha. Ad esempio OnStar su auto GM o solo uno stereo amplificato OEM. Queste sono le cose che devi sapere prima di cablare la tua auto e ordinare i cablaggi di adattamento (ne parleremo più in dettaglio a breve).
- Montaggio della nuova unità principale – Questo può essere particolarmente difficile se scegli il fai-da-te. Tuttavia, nella maggior parte dei casi scoprirai che ci sono "Dash Kit" adattati da fornitori come Metra e Scosche che semplificheranno il montaggio e l'installazione dello stereo.
Alla fine, ci sono macchine che consiglierei di aggiornare o sostituire uno stereo e macchine che non consiglierei. In questa guida, non solo ti guideremo attraverso il processo per decidere se aggiornare l'unità principale della tua auto, ma ti guideremo attraverso il processo se decidi di farlo!
Devo aggiornare l'unità principale dell'autoradio?
Prima di acquistare e installare uno dei migliori autoradio o unità di navigazione GPS consigliati, è necessario porsi le seguenti domande per determinare SE è necessario aggiornare o sostituire lo stereo e con quale tipo di stereo è necessario aggiornarlo.
- Prima domanda:la tua auto ha già un'unità principale aftermarket? Se questo è il caso, l'installazione è notevolmente semplificata perché il cablaggio e il montaggio sono già stati eseguiti. Tutto quello che devi fare è sostituirlo. Si noti che potrebbe essere necessario sostituire il cablaggio che si collega alla parte posteriore dell'unità. In questo caso, basta tagliare e abbinare i fili colore per colore.
- L'aggiornamento della mia unità principale causerà la perdita di caratteristiche/funzionalità del mio veicolo? Molti dei nuovi veicoli hanno sistemi interdipendenti che si basano sullo stereo. Ad esempio, il mio Ram 1500 ha le impostazioni per stabilire se il clacson emette un segnale acustico quando lo chiudo a chiave, se le serrature si bloccano automaticamente dopo un certo periodo di tempo, se le luci rimangono accese dopo aver bloccato il camion. Tutto questo è controllato attraverso la mia unità principale di fabbrica. Molti veicoli hanno questo. Se la tua auto ha caratteristiche come questa che dipendono dall'unità principale, ti consiglio di mantenere lo stereo di serie. Se stai cercando più suono, puoi farlo senza aggiornare il tuo stereo.
- Il mio veicolo ha più schermi? In alcuni casi le auto hanno più schermi collegati tra loro. Ad esempio, su molte Honda c'è un'unità principale, quindi c'è uno schermo che mostra le informazioni dall'unità principale come la stazione radio o il CD. La sostituzione dello stereo potrebbe rendere inutilizzabile il display. Ci sono casi in cui sono stati realizzati adattatori, ti consigliamo di ricercare se lo è stato prima di decidere di sostituire l'unità principale. Oppure, se non ti interessa, vai avanti!
- Perché sto aggiornando l'autoradio? Se desideri un subwoofer o altoparlanti più potenti, un'unità principale non è l'unica opzione. Se desideri funzionalità che al momento non hai, come Bluetooth o un ingresso AUX, ci sono anche adattatori per questo. Capire se uno stereo sostitutivo è l'opzione migliore per le tue esigenze è fondamentale.
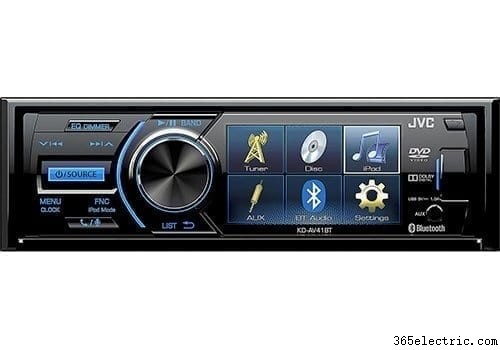
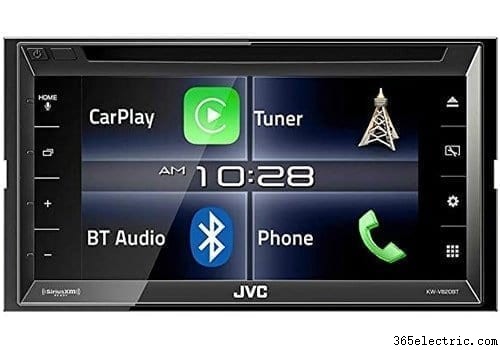
- Quanto è grande l'apertura del mio stereo? Ci sono due dimensioni principali nelle unità principali:1DIN e 2DIN. 1DIN è il più piccolo dei due. Può adattarsi sia alle aperture 1DIN che 2DIN. 2DIN è più grande ed è in genere dedicato alle unità con touchscreen e schermi più grandi. Ecco un esempio dell'aspetto di 1DIN (sinistra) e 2DIN (destra):
Se, ponendoti tutte queste domande, ritieni ancora necessario acquistare e installare una nuova unità principale, ecco i prossimi passi!
Strumenti consigliati per l'installazione di un'autoradio
- Set di cacciaviti a croce e a testa piatta
- Pinze
- Splacavi
- Chiavi o bussole (di solito 8 mm, 10 mm)
- Strumento per fare leva sul cruscotto
- Chiave di rimozione stereo (se necessaria)
- Voltmetro
- Saldatore o torcia
- Saldatura
- Nastro termoretraibile o nastro isolante
- OR Wire crimps/clamps (if you don't want to solder)
1. Removing The Car Stereo
Well, the first step to installing your new head unit is to remove the old! To do this, we recommend you pop the hood and disconnect your battery before anything. This way, you don't short any fuses. Finding a blown fuse can be time consuming and frustrating so take our word that this will save you time in the long run. Once you have done this, start to remove the trim from around your stereo to access the mounting screws. I've found the trim removal instructions from Metra to be very helpful when you do this. In many cases, trim needs to be pulled in a certain direction to prevent cracking or breaking it. Metra does a great job at helping you visualize how to pull your trim off and where. Go to http://metraonline.com/, scroll down to the vehicle fit guide and enter your car. Once you've done this, click on one of the dash kits (this is the piece of plastic that you'll mount your head unit into. It replaces many parts of your trim to make a seamless fit for your new stereo). If you haven't already bought one of these dash kits, we HIGHLY recommend you do. It will simplify your install by 10 fold. Once you've selected one of the dash kits, click on the PDF link under the “Documents” on the left. You'll find full instructions for removing your trim step by step!
Your head unit will be mounted in one of two ways:
- Bolted to the dash with brackets and screws. This is the more difficult option to removing and where the Metra instructions will be extra helpful.
- Secured with mounting sleeve and spring clips. For this type, you'll want to purchase our recommended stereo removal keys.
Sticking and Stubborn Dash Trim
It's worth noting that removing trim is probably one of the more difficult tasks in removing your car stereo. You're going to be lucky if you don't hit at least one trim piece that isn't a pain. In these cases, you really want to use a trim removal tool to wedge in between the gaps and gently work your way around the trim piece. Patience is key because once you break a trim piece, there's no turning back. Start in a corner and work your way around the piece.
Once you've removed your trim according to the instructions, dismount your factory stereo and disconnect the wiring on the back of the unit.
2. Wiring Your New Car Stereo
If Metra or Scosche carries a wire harness for your vehicle, we highly recommend purchasing one along side the dash kit. Again, you can use the same link from Metra (www.metraonline.com) to find the one for your vehicle. In the case that you can't find one, you'll need to do a little research on the web to find a list of stereo wire colors on your harness and match them up with the corresponding ones on the car stereo harness. You can find a diagram here of aftermarket car stereo wires. This will help you match the aftermarket up with your factory ones.
If you find that there is a custom wire harness for your car, it's very simple, just match up color for color the wires from your aftermarket head unit harness to your custom wire harness for your car.
Connecting the Wires
There's two options for connecting the wires that you can use:
- Soldering – For all of the professional installs that I have done I would solder the two together. This ensures a permanent connection that will never short over time. It's more time consuming though. Here's how you do it:
- Strip the two wires 1/2 inch back.
- (Optional) Place 1 1/2 inch of shrink wrap on one side at least 4 inches behind the end of the wire.
- Overlap the two exposed wires and twist the two together until they are interconnected.
- Using a soldering iron or a soldering torch, heat the wire and feed in your solder slowly until it absorbs into the wire.
- Let cool and test the solder job by tugging on the two wires.
- After the wires cool, move your shrink wrap back over the soldered area. If you didn't use shrink wrap, apply electrical tape.
- Do this for each wire until all have been connected.
- Connectors – You can use butt connectors or crimp caps as well. This is a much more efficient way to connect the wires but in many cases I've seen these fail after a few years on the road. In any case, you'll either crimp the two wires together in a clamp by placing the wires in and clamping down on the crimp clam. Or your use but connectors to insert both ends into the connector and clamp both sides.
3. How to Install the New Stereo
Now that your wires are all completed you're ready to install the head unit. Connect all of the wires first. Ensure that there are no exposed wires that may be in contact with any part of the vehicle. We recommend connecting your battery and testing the stereo out prior to fully installing it back into the dash.
Once you've tested it (and it works!) you'll want to add the mounting brackets to your new head unit. If you have a dash kit, use the ones that come with the kit. If not, use the ones off of your factory stereo. If you have the dash and mounting kit, follow the instructions in the manual. If not, you'll need to test where the new head unit sits, and adjust your factory trim to make it fit. This is normally a difficult task. I'd recommend using a Dremel to make cuts and adjustments to the plastic.
Slide the stereo into the opening in the dash, ensuring that the wires behind are tucked and not pinched. Sometimes this may take a few times when the vehicle has a tight dash opening. Tuck the wires back into an opening behind the unit.
Congratulazioni! You're done! Let us know you you did and if you have any questions in the comments section.
Also be sure to check out our top rated lists:
Best Single Din Car Stereo
Best In-Dash GPS Navigation Unit
Best DVD/Multimedia Head Unit
Best Digital Media Receiver