Guida al rack per amplificatori per auto fai-da-te:come costruire il tuo rack per amplificatori per auto in un giorno
Realizzare il tuo rack di amplificatori per auto fai-da-te può sembrare qualcosa che è fuori portata. O forse non sai da dove cominciare e sei preoccupato di dover pagare un molto a qualcun altro di soldi per farne uno.
Ecco un modo conveniente per costruire un rack per amplificatori per auto fai da te (fai-da-te) in un giorno.
Uso ancora questi stessi piani per rack di amplificatori per auto non solo nei veicoli dei clienti ma anche nei miei! Adoro quanto siano semplici ma dall'aspetto professionale. È fantastico ricevere complimenti per quanto sia bello e di livello professionale.
Ora tu puoi costruire il tuo rack per amplificatori per auto che abbia un bell'aspetto e sia anche conveniente!
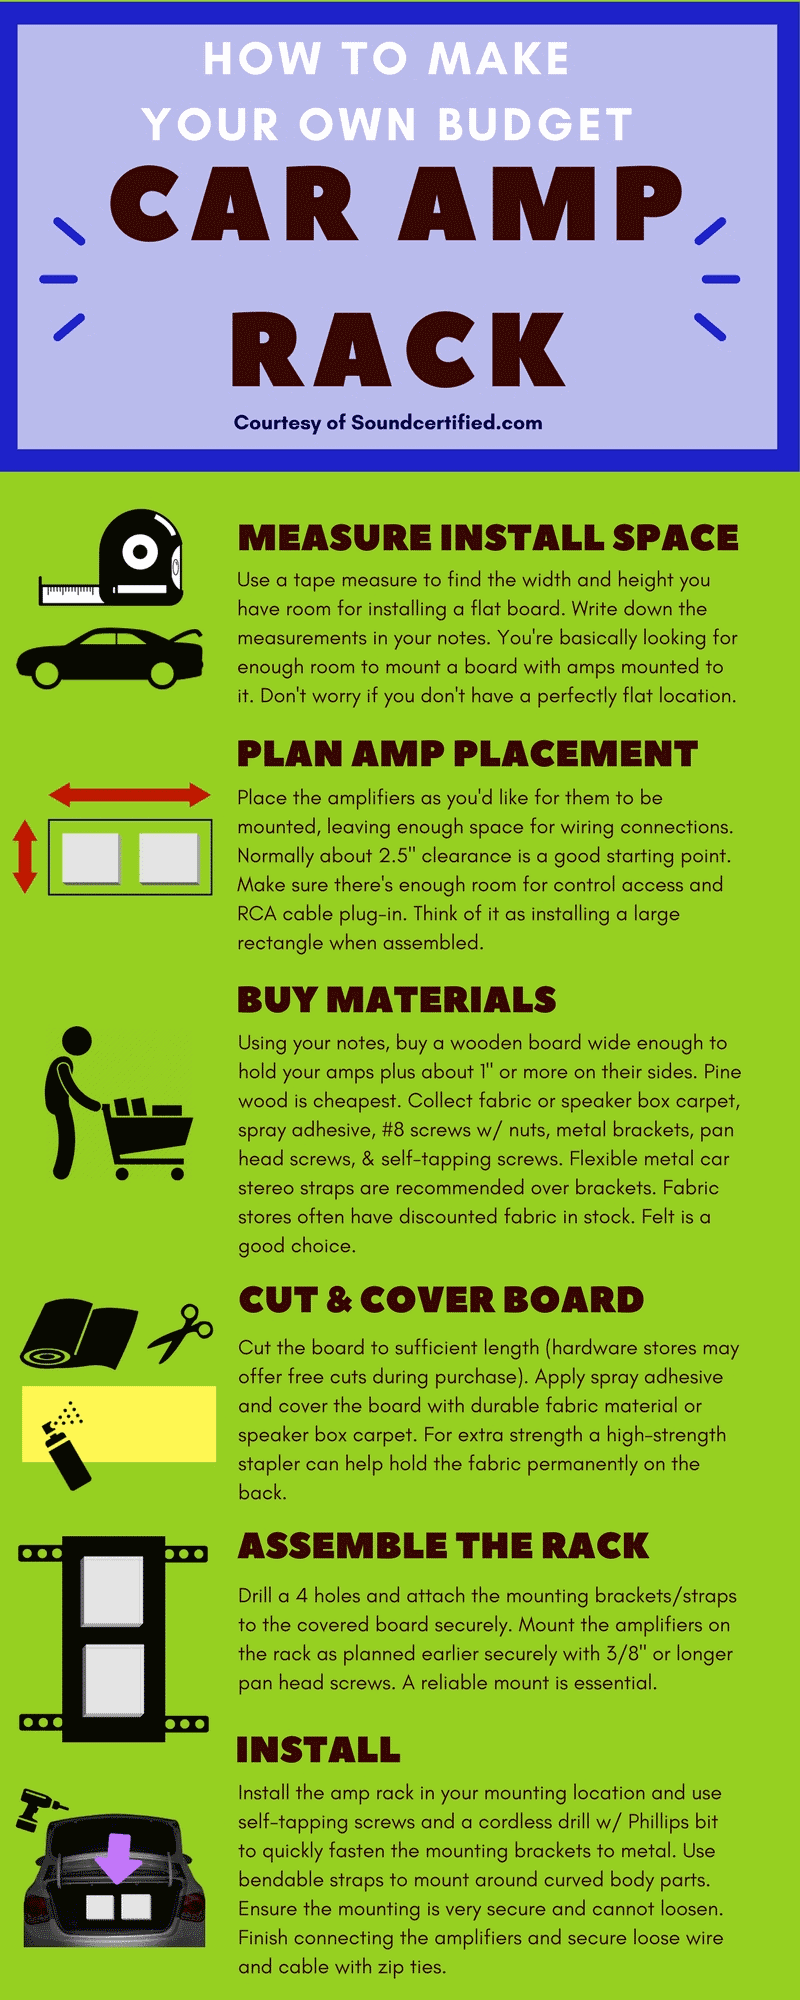
Infografica:guida pratica su rack di amplificatori di base
Preparare strumenti e forniture:cosa sapere prima

Strumenti di cui avrai bisogno
Avrai bisogno di una serie di strumenti per svolgere bene il lavoro:
- Cacciavite Phillips
- Trapano a batteria + punta Phillips (non indispensabile ma altamente consigliato) o trapano elettrico standard
- Pinze – Raccomando a ganascia quadrata, di bloccaggio o di altro tipo, ma anche la punta dell'ago può funzionare
- Forbici per tagliare materiale + rasoio multiuso (opzionale)
- Pinzatrice (opzionale)
- Punta da 1/8″ adatta per metallo
- Misuratore di base o metro a nastro
- Qualcosa con cui prendere appunti
- Segnalino permanente
Come puoi vedere non avrai bisogno di molti strumenti. Questo è parte del motivo per cui questo approccio funziona bene. Spero di aiutarti a portare a termine questo compito con il minor denaro e la seccatura possibile.
Se puoi, prendi in prestito tutti gli strumenti che non hai da altri per risparmiare tempo e denaro.
Per molti articoli di base puoi ottenere ottime offerte in negozi come Harbour Freight Tools, Wal-Mart o persino il negozio Dollar Tree $ 1. Se fai acquisti con attenzione, puoi trovare cose come le pinze per circa $ 2 al paio.
![]()
Una pistola per punti metallici può essere acquistata quando vai a fare la spesa per i materiali di cui hai bisogno, ma è completamente opzionale. Possono inserire punti metallici robusti nel legno a differenza di una cucitrice standard e sono ottimi per pinzare il tessuto in modo sicuro. Puoi prendere una pistola per punti metallici per quasi $ 15 circa.
Avrò bisogno di una motosega?
Fortunatamente, molto probabilmente non avrai bisogno di una sega. Nelle sezioni che seguono dovrai acquistare legno, ma se la tua città ha un Home Depot o un negozio di ferramenta Lowe's, la grande notizia è che offrono il taglio del legno gratuito quando acquisti il legno! E questo è anche molto meno lavoro che devi fare.
Parti da ritirare prima dell'installazione
Staffe di montaggio in metallo (cinghie)
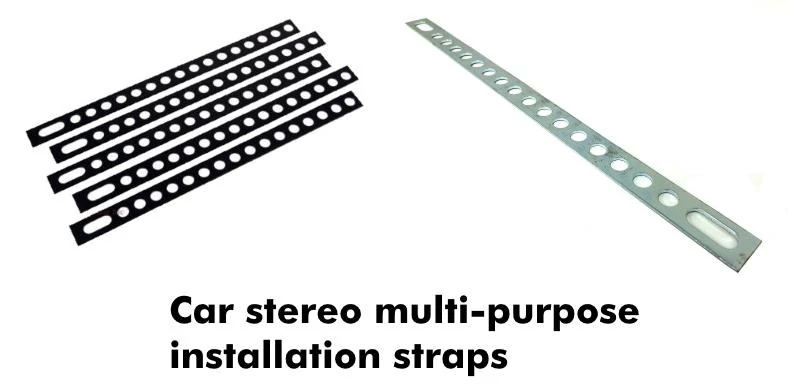 Le cinghie di montaggio in metallo dell'autoradio sono fantastiche per installazione e renderà la costruzione e l'installazione di un rack di amplificazione molto più semplice. Puoi acquistarli rifiniti in nero, che consiglio vivamente, o con la finitura standard in metallo. I cinturini da 9″ vanno bene nella maggior parte dei casi e puoi acquistare un pacchetto da 5 o simili per risparmiare denaro. Avrai bisogno di almeno 4 cinturini se li usi.
Un elemento che altamente consiglio sono eccellenti cinghie di montaggio in metallo come queste Metra BS9BK. Sono FANTASTICI per molti tipi di impianti audio per auto e sono utilizzati molto spesso da installatori professionisti.
T sono abbastanza robusti per montare un rack di amplificatori in modo sicuro, ma sono abbastanza flessibili da piegarsi in forme strane per installazioni più impegnative.
Li uso da anni per installarli quasi qualsiasi cosa in posti in cui penseresti sia impossibile installare un sistema audio!
Potrebbe essere o meno possibile trovarne alcuni nel tuo negozio di stereofonia locale o negozio di elettronica che trasporta accessori per autoradio, quindi devi davvero controllare in anticipo. Aspettati di pagare $ 10 o meno inclusa la spedizione, anche se alcuni possono essere trovati per circa $ 7-8 per 2-4 cinturini.
Nota: Un'altra opzione consiste nell'utilizzare staffe metalliche standard come "piastre di riparazione" che vengono fornite nei negozi di ferramenta locali. Spiegherò di più sui pro e contro di quelli più avanti.Tappeto per altoparlanti vs. tessuto

Il tappeto per altoparlanti nero di qualità automobilistica (a sinistra) è bello da vedere e resistente. Non c'è supporto su di esso, quindi può essere allungato e tagliato facilmente. Tuttavia, potrebbe essere necessario ordinarlo e potrebbe costare più dei normali tessuti come il feltro nero (a destra) che puoi trovare localmente.
Per rifinire il tuo rack di amplificazione avrai anche bisogno di un materiale bello e resistente con cui coprirlo.
La moquette per auto senza schienale (spesso chiamata moquette per altoparlanti) tende ad essere molto resistente e offre un bell'aspetto. Sono spesso disponibili colori come carbone, grigio scuro o nero misto.
In caso contrario, consiglio di acquistare un buon tessuto nero come il feltro. Puoi aspettarti di spendere circa $ 10 in quel caso, poiché di solito viene venduto in 1 o 1/2 iarde (1 iarda =36 "). Mentre sei lì, potresti anche trovare un panno nero morbido diverso in offerta.
Il tessuto adatto può essere acquistato spesso a un prezzo scontato a livello locale da negozi di artigianato come Joann, Michael's e talvolta Wal-Mart.
Misurazione dello spazio di installazione
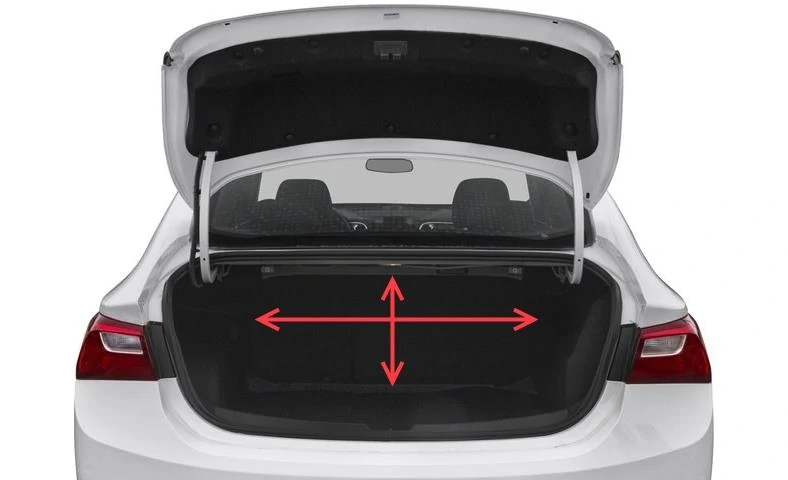
Ottieni le misure di base per il posto migliore che trovi per l'installazione di un rack per amplificatori nel tuo veicolo. Pensa in termini di montaggio di un grande rettangolo lì, anche se non pensi che un rack per amplificatori piatto possa essere montato su alcune aree che sono curve o sporgono. Non stressarti se non c'è un perfetto area pianeggiante disponibile – in realtà è molto comune! Tratteremo più avanti la gestione delle superfici curve o insolite.
Inizia usando il tuo metro a nastro per scoprire quanto spazio hai nel bagagliaio (o nell'area di carico, a seconda del tuo veicolo) dove puoi installare una tavola rettangolare.
Le misurazioni non devono essere super esatte ma una stima ravvicinata di quanto spazio hai a disposizione orizzontalmente e dall'alto verso il basso. Ad esempio, misura da diversi pollici sotto il ponte posteriore del bagagliaio a circa 1 pollice alla base del bagagliaio vicino alla moquette o alle finiture interne.
Questo dovrebbe darti una buona stima di cosa lavorare. Assicurati di salvare negli appunti le misurazioni che hai preso.
Non dimenticare il peso
Poiché un rack assemblato sarà pesante, quindi devi accertarti di misurare lo spazio disponibile come se il rack assemblato fosse appoggiato sul fondo del veicolo. T
Verifica la disponibilità di posti adatti per montare le staffe del rack dell'amplificatore
Mentre stai misurando, cerca dei buoni posti dove puoi fissare le staffe di montaggio quando il rack dell'amplificatore è installato nell'auto.
Cerca una sezione della carrozzeria in metallo dell'auto dove:
- È sicuro praticare un foro senza danneggiare nulla sotto (controlla sempre!)
- Il metallo è sufficientemente spesso e abbastanza resistente.
Nella maggior parte dei veicoli, la lamiera nella parte posteriore ha lo stesso spessore, quindi di solito non è un problema.
Pianificazione della configurazione del rack dell'amplificatore
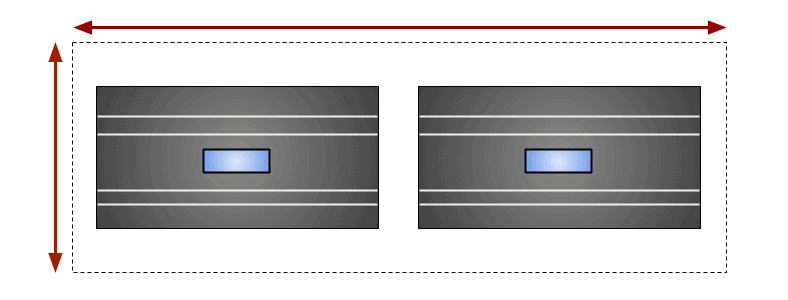 Pianificazione della configurazione del rack dell'amplificatore:posiziona gli amplificatori sul pavimento e usa il tuo metro a nastro per stimare quanto spazio avranno bisogno i tuoi amplificatori per spazio con cablaggio e cavi installati. Consenti anche un po' di spazio accanto agli amplificatori (la parte superiore e inferiore del rack dell'amplificatore).
Metti i tuoi amplificatori sul pavimento e allineali come vorresti che fossero posizionati sul tuo rack di amplificatori. Posizionali uno accanto all'altro con spazio sufficiente in modo che ci sia spazio sufficiente per collegare il cavo di alimentazione, il cavo degli altoparlanti e i cavi RCA secondo necessità.
Se hai poco spazio, potresti dover considerare l'utilizzo di curve a 90 gradi per il cablaggio e adattatori ad angolo retto per le connessioni RCA.
Quando hai allineato gli amplificatori con spazio sufficiente, misura un rettangolo con spazio sufficiente prima e dopo le estremità degli amplificatori e un po' di spazio extra dall'alto verso il basso.
Tieni spazio a sufficienza!
Non ridurre la spaziatura del rack dell'amplificatore:non lo vuoi a contatto con i lati degli amplificatori.
Ti consigliamo di lasciare 2 pollici di spazio o più ai lati degli amplificatori se le misurazioni dell'installazione precedenti lo consentiranno.
Annota le misure nelle tue note come hai fatto prima.
La tua lista della spesa e suggerimenti

Potrai acquistare quasi tutto ciò di cui hai bisogno in pochi viaggi, ma pianificare il più possibile in anticipo farà risparmiare denaro e ridurrà al minimo i problemi.
Concediti abbastanza tempo durante il giorno per correre in città e affrontare il traffico per ottenere ciò di cui hai bisogno. Inizia a fare acquisti presto nel giorno o prima se desideri costruire e installare il tuo rack di amplificazione lo stesso giorno.Odio essere stressato e incontrare problemi nel bel mezzo di un progetto o di un'installazione, quindi segui il mio consiglio e cerca di ottenere ciò di cui hai bisogno il giorno prima, se puoi.
Sii organizzato e scrivi o stampa ciò di cui hai bisogno prima di partire. Non essere sciatto e costa tempo extra, benzina e stress.
Elenco materiali
Hardware:
Con i tuoi appunti, vai al tuo negozio di ferramenta locale per quanto segue:
- Adesivo spray
- Staffe metalliche (se non si utilizzano cinghie metalliche per autoradio)
- Viti a testa cilindrica Phillips n. 8, confezione da 4 o simili
- Rondelle n. 8, confezione piccola
- Dadi a macchina n. 8
- Viti a croce Phillips da 3/8″
- Viti autofilettanti lunghezza 3/8″
- Tavola in legno
3M Super 77 è un ottimo adesivo spray. Sono disponibili adesivi a basso costo, ma nella mia esperienza ho avuto problemi con l'adesivo debole e il tessuto può staccarsi da solo. Super 77 di solito costa vicino a $ 10.
 Consiglio questo per i progetti di car audio. Fornisce un adesivo forte ed è affidabile a differenza dei marchi più economici che falliscono o non sono molto forti. Tuttavia, devi stare attento a non metterlo su di te o sugli oggetti vicini quando lo usi. Puoi 3M Super 77 Colla Adesiva Spray Permanente Multiuso, Carta, Cartone, Tessuto, Plastica,...
Scegliere una tavola di legno
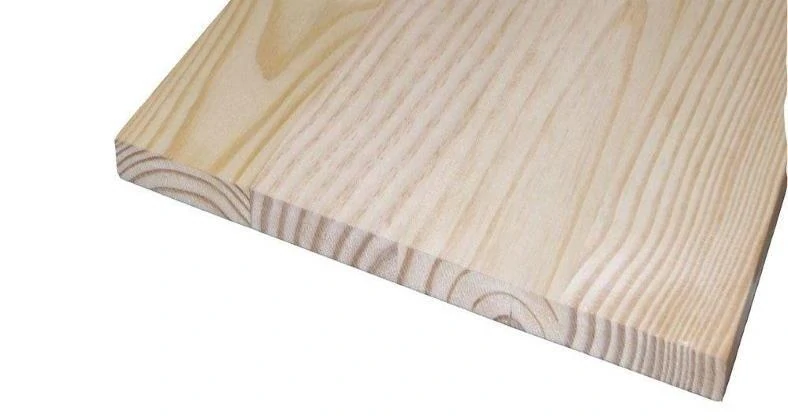 Avrai bisogno di una tavola di legno come questo per costruire il tuo rack di amplificazione. Nella sezione dei materiali da costruzione del tuo negozio di ferramenta troverai tavole di legno che sono spesse circa 1/2 "o così e di solito hanno lunghezze di 4 piedi o più. Il pino è il più economico ma è più soggetto a deformazioni ed è più debole di altri, ma è adatto se hai un budget limitato. Non è adatto per installazioni esposte a molta umidità o umidità.
Usando le misure che hai annotato durante la pianificazione del tuo rack di amplificazione, acquista una tavola di legno della stessa larghezza o simile a quella che hai misurato. Per risparmiare sui costi, acquistane uno con lunghezza vicina alle tue misure di lunghezza per ciò di cui hai bisogno.
Suggerimento rapido: Per risparmiare tempo e fatica, prova ad acquistare le tue forniture da Home Depot o Lowe's se ne hai uno nelle vicinanze. Offrono il taglio del legno gratuito ai clienti nella sezione delle forniture per l'edilizia, quindi sarai in grado di dire loro la lunghezza di cui hai bisogno e lo faranno per te.Ulteriori informazioni sulle staffe metalliche
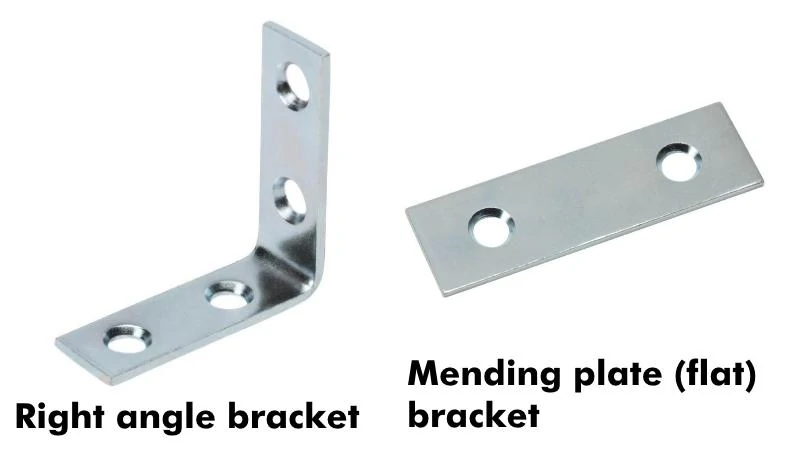 Piastre di riparazione e altre staffe metalliche sono vendute in coppia o 4 confezioni per le taglie più piccole e singolarmente o in coppia per le taglie più grandi.
Come accennato in precedenza, se non sei in grado di utilizzare (o acquistare) cinghie di installazione in metallo per autoradio potresti essere in grado di ottenerle ma con staffe da negozio di ferramenta.
Right-angle brackets and “mending plate” (flat) brackets are also helpful for assembling and installing your amp rack.
Unlike metal car stereo straps, mending plates are nearly impossible to bend. They’re very strong but the drawback is that they’re fixed in length and not suitable for curved or more difficult installation needs.
You can usually find them sold in packs of 2, 4, or 8 for a few dollars.
Fasteners
 Self-tapping screws (left) make mounting brackets fast and easy if you have a cordless drill as they simultaneous drill a hole then screw into metal quickly. Regular pan-head screws (right) will work well for mounting your amps to the amp rack. Use #8 machine screws (below) and nuts with washers to fasten your mounting brackets to the rack securely. They’re better suited for this than using only pan head screws.
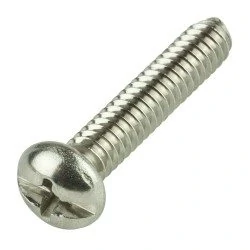
Machine screws work with nuts and washers. They’re great for attaching brackets to your amp rack board, for example. They come in packs with standard sizes. I normally use #8 machine screws for many projects.
Fabric/covering material
If you’re going to get fabric locally instead of ordering it, arts &crafts stores are where I’ve often found discounted black material I could use for building amp racks.
Ideally, try to get a material with a dark color that’s durable and stretchy. I recommend a strong felt material or similar basic fabric.
Be sure to ask the cashier or attendant for suggestions about what you’re planning to build. Honestly, sometimes they’re helpful and other times they’re fairly clueless when it comes to good suggestions, but at least if something is on sale they’ll normally let you know.

If you’re planning to buy fabric instead of backless speaker box carpet, try checking the clearance tables while you’re shopping. I’ve often gotten fabrics at a MUCH lower price by doing this. There’s a good chance you’ll find a deal! Black fabric is very common and should be easy to find.
Remember that fabric is normally sold in units of 1 yard (36″ in length) or 1/2 yard (18″ length) in many craft stores.
You’ll need to do just a bit of math to figure out how much you need. Try not to get exactly the same length as your measurements.
I strongly recommend you have a bit extra if it’s your first time working on a project involving fabric and a spray adhesive. Typically I use about 2 yards of material and have a small amount left over when I’m done.
The height is nearly always much more than I need.
Making your amp rack – covering the board
After having your board cut to the length you need and planned for its time to put the finishing touch on it and assemble the amp rack.
Now that the board is a length that will fit into the installation space you have and that will allow enough space for your amp wiring &cables its time to cover it and make it look nice.
Find a good place to work where glue overspray won’t get on surrounding things indoors.
Place your board on the fabric and trim it to a good size, allowing several inches past the board of extra fabric on each side. I recommend allowing at least 6″ or so, which you’ll trim as needed.
Follow the rest of the steps in the diagram below.
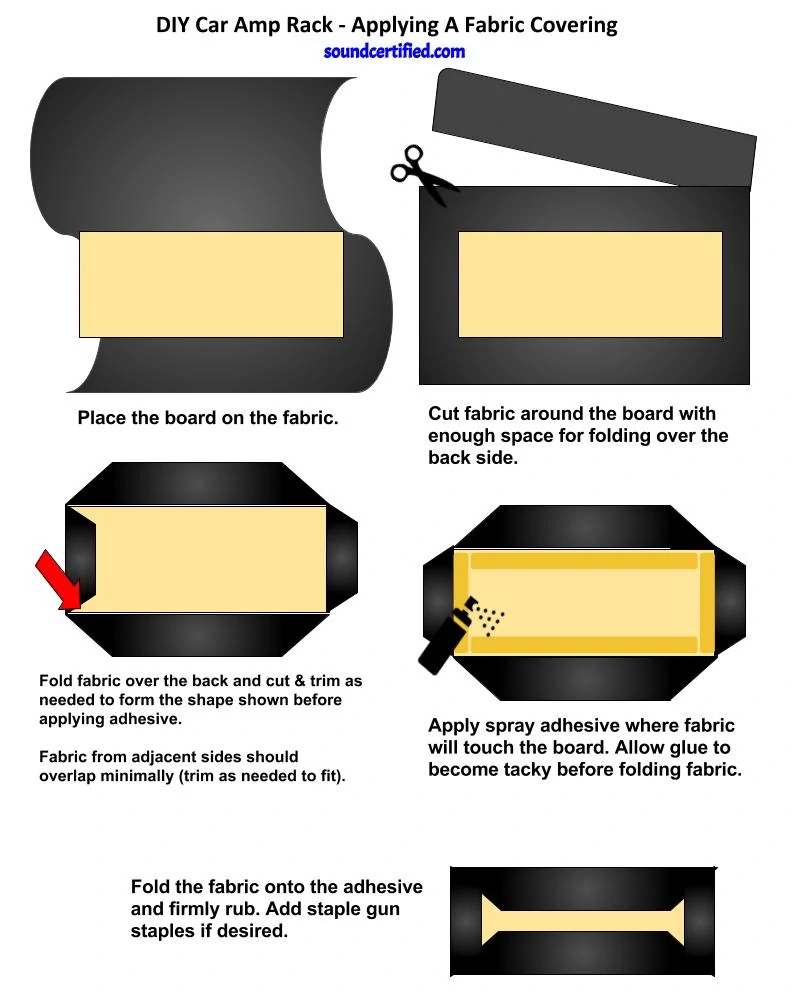
Spray adhesive is very hard, if not impossible, to remove from your clothes and other materials so be very careful when using it. Use light, consistent spraying strokes. You don’t need to use a tremendous amount, but it does help to spray some on both the wood surface as well as the fabric you want to glue.
Using adhesive on both surfaces gives an even stronger bond. After spraying, waiting about 15-30 seconds and lightly touch the glue to see if it is tacky.
If so, tightly pull the fabric over and onto the wood area you sprayed. Then rub the fabric firmly with your palm for a few moments to make sure there’s good adhesion.
The fabric, no matter how well you tried to trim it, will likely overlap each other a lot. If you have a utility knife with a sharp blade that makes trimming a bit easier than using scissors.
Otherwise, slightly pull up edges where needed, cut with the scissors, and place it back into place.
You may need to reuse the adhesive spray on some parts. It’s a bit tough to do in small sections but by quickly and gently tapping the spray nozzle you should eventually get the hang of it.
Putting it all together
Now that you have the board covered it’s time to assemble it.
Drill a 1/8″ (or close) hole in each corner and mount a bracket/strap to each hole using a #8 machine screw + washer on the top (amp) side and on the backside use a washer and nut.
Tighten securely using pliers while keeping the machine screw from turning by holding a screwdriver.
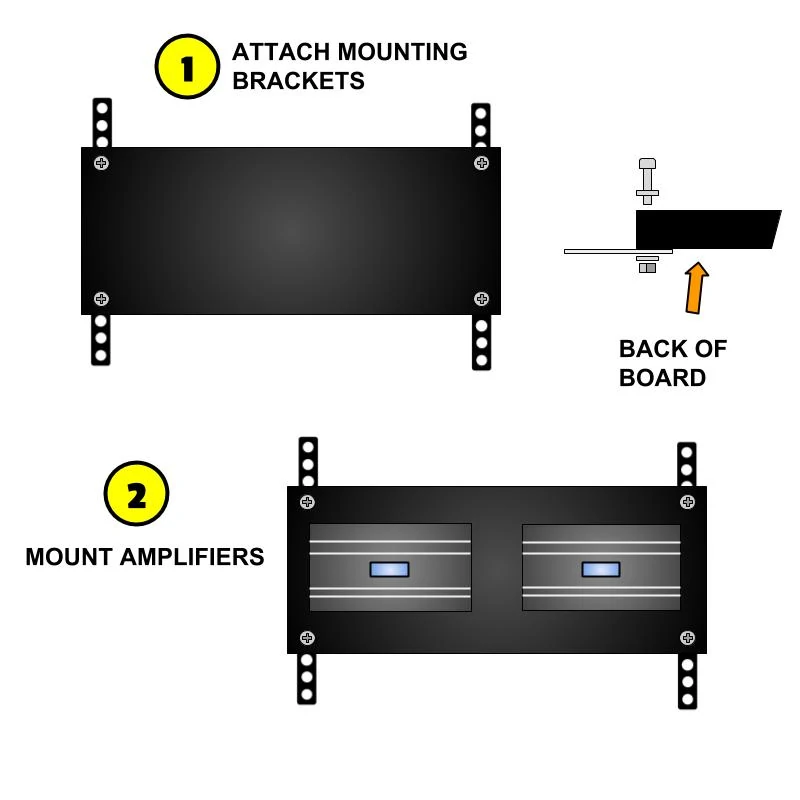 Once all the mounting brackets are in place and facing the direction you need them to be, place the amps on the board and mount them using the measurements for spacing you wrote down earlier.
Be sure to leave enough length for the mounting brackets to reach the mounting points in your vehicle that you found during the first steps.
Excess bracket length can remain hidden behind the amp rack for less hassle when installing and for a neater appearance.
Installation – Mounting your rack
Ok, it’s time for the “fun” part! Carefully put your assembled amp rack in the vehicle and begin the “fitting” process.
If you’re mounting it vertically, put as much of the weight at bottom of the vehicle and begin seeing how your brackets will fit to try to get the brackets parallel to sheet metal for mounting.
If you’re using bendable metal straps as I recommended, bend those such that they will allow the amp rack to rest on the straps when in the car.
When that’s done, hold the amp rack in place and begin doing the same for the top. Keep using trial and error until you have a pretty good way for the amp rack to rest securely in the vehicle and to have enough attachment points for the mounting brackets.
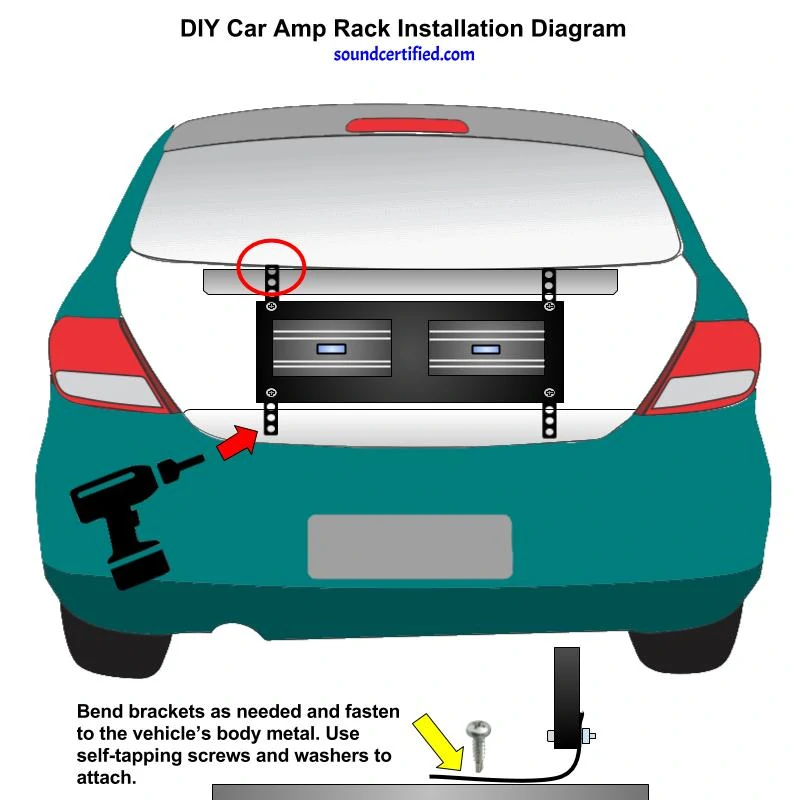
Once that’s finished, begin trying to use your cordless drill to drive the self-tapping screws through the brackets and into the body.
I highly recommend using washers on the screws to fit well over the bracket’s hole and keep the fit very tight . This is especially important in a moving vehicle as they vibrate quite a bit and screws may loosen over time.
If you’re having difficulty doing this step while holding the amp rack in place, then use a permanent marker to mark the bracket holes where you’d like to use the screw, remove the amp rack, then drill the screw holes alone.
Then you can return to place the amplifier rack and more easily fasten the screws either with the cordless drill &bit or with a screwdriver.
Taking your amp rack to the next level…on the cheap!

Want something truly unique? You can use an LED light kit (often below $20) to add accent lighting to your cool amp rack. It’s pretty simple to do and will really get compliments from anyone who sees it.
A fantastic idea is adding accent lighting to your sweet-looking new car amp rack.
No products found. mounted above the amp rack in order to glow down on them will give an incredible look and really make it shine.I’ve done this several times (including putting an acrylic clear window in front) and people gave me lots of compliments!
Neon and LED lighting systems are lightweight so you should be able to install them using only zip ties. Overall, it’s usually very easy and it can be done on a budget if you shop carefully.
Wiring is simple as many kits can be powered by +12V directly and wired to a relay to switch on and off with your car stereo using the remote-on wire.
DIY car amp rack plans cost estimate
Here’s a good estimate of what you can expect to pay for all materials (not counting tools) depending on where you shop. Don’t forget to check your amplifier packages for screws you can use, as some include a 4-piece set.
| Item Est. | Cost |
|---|---|
| Wood | $10.00 |
| Fasteners | 6.50 |
| Metal straps | 9.50 |
| Fabric | 12.00 |
| Spray glue | 9.75 |
| TOTAL: | $47.75 |
Additional info
Take my guide and give it a try! It feels awesome when you get it all together and see how great it looks. Your friends and other people you meet will give you compliments and that’s a fantastic feeling, believe me.
Thinking about adding LED lighting? Be sure to check out my detailed car interior LED light kit installation guide.
If you’re still deciding what to do about buying amps and you’re on a budget, have a look at my great budget amplifier guide here.