Come configurare un Patchbay in uno studio
Cos'è un Patchbay?
Un patchbay funge da hub per collegare insieme tutti i componenti del tuo studio, inclusi microfoni, preamplificatori, effetti esterni, mixer, cuffie o qualsiasi sorgente o destinazione audio nel tuo sistema.
Prima di avere un patchbay, scollegavo e ricollegavo costantemente i cavi dagli ingressi e dalle uscite della mia attrezzatura. Ma ora posso lasciare tutto collegato al patchbay e utilizzare semplicemente un cavo patch per creare connessioni personalizzate secondo necessità. Questo mi fa risparmiare un sacco di tempo di configurazione, evita errori di patch che costano ancora più tempo e protegge anche la mia attrezzatura e i miei cavi dall'usura costante.
Sul retro di questo patchbay TRS da ¼” troverai 24 jack di ingresso nella riga superiore e 24 jack di uscita in quella inferiore. Quei 48 jack sul retro corrispondono ai 48 jack sulla parte anteriore del patchbay. Quindi, puoi tenere tutta la tua attrezzatura collegata ai jack sul retro e impostare flussi di segnale personalizzati collegando i jack anteriori insieme ai cavi patch.
Come configurare un Patchbay
Quando configuri il tuo patchbay, è importante pensare al flusso generale del segnale del tuo studio. In questo modo, puoi disporre il tuo patchbay in modo che le funzioni di base del tuo studio siano impostate di default, senza bisogno di cavi patch. Ciò è possibile grazie a una funzionalità integrata nella maggior parte dei patchbay audio, chiamata normaling.
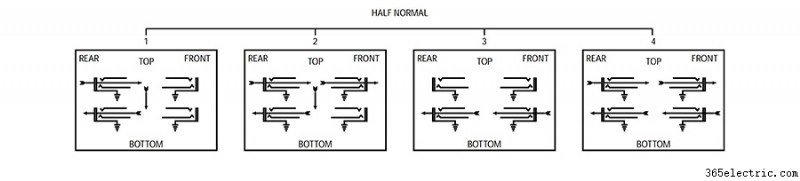
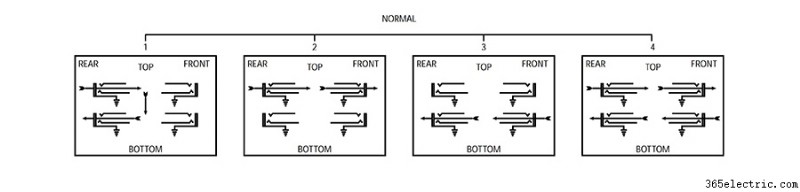
Pensa a ciascuna coppia verticale di jack sul tuo patchbay come a un modulo. Ci sono tre modalità generali e la modalità scelta determinerà come funzionerà quel modulo.
Attraverso la modalità
La prima e più semplice modalità è la modalità "Attraverso". Ciò significa che il jack superiore sul retro scorrerà semplicemente verso il jack superiore sulla parte anteriore e il jack inferiore sulla parte anteriore scorrerà semplicemente verso la fila inferiore sul retro. In questa modalità, i jack superiore e inferiore funzionano in modo indipendente.

Seminormale
La seconda modalità è chiamata seminormale. In modalità seminormale, i jack sul retro corrispondono ancora ai jack sul davanti (proprio come nella modalità "Thru"), ma il segnale dal jack superiore scorre automaticamente verso il jack inferiore per impostazione predefinita quando non è presente un cavo patch è connesso. In modalità seminormale, questa connessione predefinita viene interrotta quando si collega qualcosa al jack inferiore sul pannello anteriore. In altre parole, il jack di uscita in alto scorre verso il jack di ingresso in basso a meno che qualcos'altro non sia collegato a quel jack di ingresso.
Normale
La terza modalità è chiamata completamente normale. In modalità completamente normale, la connessione predefinita dall'alto verso il basso verrà interrotta quando un cavo viene collegato al jack superiore o inferiore sul pannello anteriore. Quindi, il collegamento di un cavo patch all'uscita o al jack di ingresso interromperà la connessione predefinita.
Layout Patchbay
There are lots of uses for each of these modes and the possibilities are endless, but here are some examples of how I have set up my patchbay to meet the needs of the various devices in my studio.
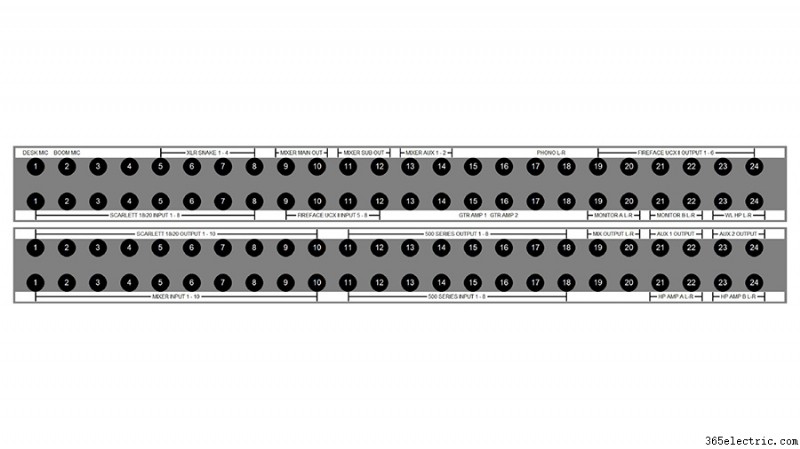
The top left corner of my patchbay is where my microphones come in. Some of my microphones (like this boom mic) are directly wired into the top row of jacks on the back of my patchbay. Alternatively, I could have an XLR panel in the back of the room that connects to the top row of jacks on the back of the patchbay. That way, I could connect a microphone to that XLR panel which would then be available on the top row of my patchbay.
I will almost always want my microphones to connect to the microphone preamps on my audio interface, so I’ve set these jacks up in full-normal mode. This means the mics will be connected to my interface by default without any patching. But if I want to patch the microphone to a different mic preamp I can simply do so with a patch cable.
I chose to use full-normal instead of half-normal, because I don’t want to accidentally connect my microphone to two preamps that are both supplying phantom power. When I connect a patch cable to the top jack, it automatically breaks the connection to my interface. This also prevents me from connecting two microphones to the same audio interface preamp.
The other essential connections for my typical workflow are set up using half-normal mode. For example, my interface outputs flow directly to the input of my monitors. If I want to patch my turntable directly into my monitors for a pure analog connection, I can patch from my phono output jacks to the monitor input jacks and bypass the other components of the system. Given that this is set up in half-normal mode, the default connection from the interface outputs will be broken when I connect to the monitor input jacks.
Half-normal jacks also provide a way to split a signal. Let’s say I want to send my interface output to the input of my monitors while also sending that output to my wireless headphones. I just patch the output of my interface to the input of my wireless headphone transmitter and the signal still flows down to the speakers, because nothing is connected to the bottom jack. Remember – in half-normal mode, the connection is only broken when there is a plug in the bottom jack.
I use ‘Thru’ mode for my outboard effects and preamps because I don’t want the outputs of my compressor or outboard preamps to feed into their own inputs and create a feedback loop. Setting these modules to ‘Thru’ mode keeps the top jack and bottom jack independent from one another, meaning I need to manually patch these devices anytime I want to use them.
Which Patchbay Should You Use?
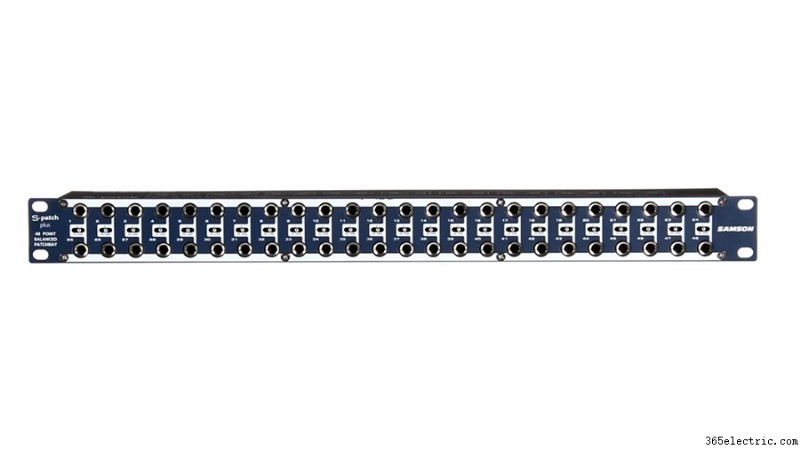
I have two 48-point ¼-inch TRS patchbays. One is a Neutrik, which costs about $100. The other is a Samson S-Patch Plus, which is a little more expensive. I’ve had some time to compare these two options and I think the Samson is well worth the extra money.
If I want to change the mode on any module in the Samson S-Patch Plus, I just need to toggle the switch between the top and bottom jack.
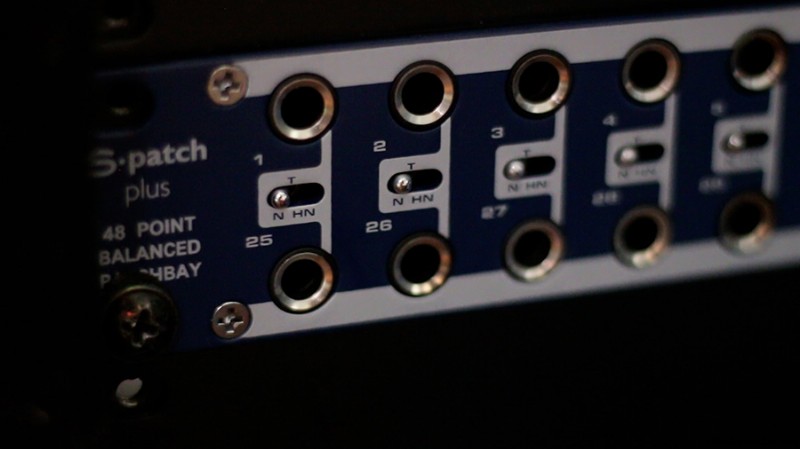
In order to switch the mode on one of the Neutrik modules, I need to disconnect the jacks from the front and back, remove the front panel of the entire patchbay, take the module out, flip it around, and reassemble everything.
This has caused me a few headaches as I have continued to add components and shift things around on the patchbays, so I would definitely recommend going with the Samson S-Patch Plus if you’re on the fence.
You should also consider how much space you have and how many connections you’ll need. These two 48-port patchbays take up 1RU of rack space each, which can really add up…
If you’ve got a larger collection of components or less rack space to work with, you may want to look into a TT (or tiny telephone connector) patchbay instead. These will be more space efficient, as the density of connection points is much greater with these smaller connectors.
You will also find patchbays that have multi-channel connectors in the rear rather than the same connection type on front and back. This can make for a cleaner setup, utilizing multi-channel fanouts rather than an individual cable on the rear panel for each connection.