Linee guida per la riparazione e la risoluzione dei problemi di Roomba nel 2021
Il robot aspirapolvere Roomba rende le pulizie di casa molto più facili e veloci. Ma chi cerca un robot aspirapolvere Roomba o Deebot, è importante sapere che la vita non diventerà magicamente e costantemente più facile.
Il problema con Roomba potrebbe ancora verificarsi, soprattutto se non pulisci tutti i giorni. Di seguito sono riportate alcune linee guida relativamente semplici per la risoluzione dei problemi e la riparazione di Roomba, ovvero rimettere in funzione il tuo piccolo robot domestico robotizzato.
Il problema più comune indicato dai proprietari di Roomba è la sua batteria. Potrebbe arrivare un punto in cui l'unità non sembra in grado di sostenere alcuna carica. Alcune persone consigliano di ripristinare e riavviare l'unità, operazione che viene eseguita rimuovendo la batteria, premere il pulsante di pulizia per 5-15 secondi, ripristinare la batteria e caricare Roomba fino a quando la spia luminosa di alimentazione torna verde. Una volta che ciò accade, mantieni Roomba in carica per altre 72 ore, senza ostacoli. Tuttavia, in questo caso di DEEBOT N79 , la spia emette una luce BLU fissa.
Successivamente, Roomba dovrebbe funzionare sempre fino a quando la batteria non si esaurisce. Il processo dovrebbe quindi essere ripetuto un paio di volte fino a quando non si vede un miglioramento. Se non succede nulla, devi acquistare una nuova batteria.
Altri problemi più comuni con Roomba includono fibre o capelli aggrovigliati all'interno, che ne riducono le prestazioni. In tal caso, si consiglia di pulire l'unità con aria compressa. Se l'unità continua a non funzionare correttamente, la seguente guida ti insegna come riparare e risolvere i problemi di Roomba.

Roomba non si aggancia
Il tuo Roomba non tornerà alla Home Base una volta completato il ciclo di pulizia? controlla quanto segue:
- Ispeziona bene il cavo di linea del caricatore e cerca eventuali danni.
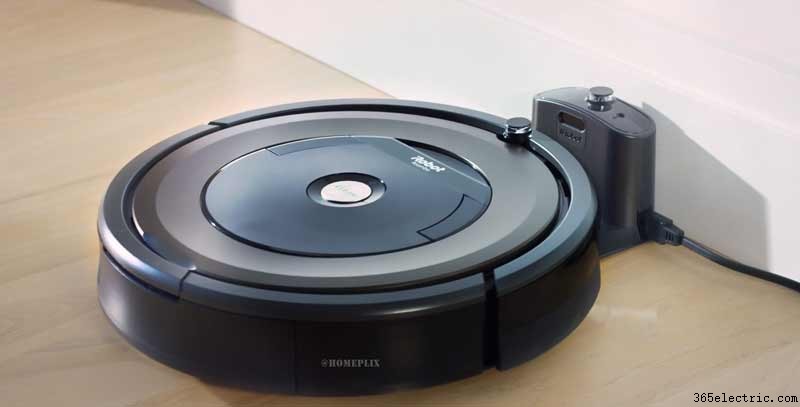
- Collega il caricabatterie a una presa a muro e verifica che l'indicatore di alimentazione si illumini in verde fisso.
- Collega il caricabatterie alla base domestica per assicurarti che sia completamente inserito con una presa salda. Verificare che l'indicatore di alimentazione inizi a lampeggiare in media una volta ogni 4 secondi e quindi si spenga. Questa è una caratteristica comune, pensata per risparmiare energia.
- Assicurati che non ci siano pareti virtuali, fari da parete virtuali o altre basi domestiche che si trovano entro 2,4 m (8 piedi) dalla base che potrebbero produrre ostacoli ai raggi infrarossi.
- Impianta la Home Base in un'area aperta.
- Assicurati che non ci siano oggetti esotici sul paraurti o sulla base.
- Pulisci i contatti di ricarica sulla Home Base e sul robot con un panno asciutto per rimuovere eventuali detriti.
- Confirm Roomba can come-back to its Home Base manually by placing Roomba within 6 ft of the Home Base and pressing Dock.
If Roomba is going departed Virtual Walls, confirm that the Virtual Wall is turned on and the beam is facing the exact approach of the aimed area to block.
What’s the difference between a traditional vacuum and the best robot vacuum for hardwood floors ? Basically, their docking and charging system must be different.
Because In one cleaning cycle Roomba needs to clean multiple hardwood floors, Roomba may not be able to end up a mission complete, that’s why Roomba introduces an auto docking technology.
Roomba Won’t Turn On
If your iRobot vacuum facing any of the following problems, let’s check if it is not turning on, not charging, or is not responding in any way.
If this is happening with a Just unboxed robot that has never been activated, the battery may have displaced during shipment. We suggest taking off the battery and placing it back in the robot to confirm the proper contact.
Plugin the Home Base and verify indicator light on Home Base starts flicking near about once every 4 seconds, or expose solid for 4 seconds and then go away.
If the light does not fire, try charging in a second outlet, and test the charger or Home Baseline cable for any damage. If the charging base still does not open, you may need a replacement.
If the Home Base light illuminates but the robot is not yet charged, check if there has been any debris or dirt on the charging communications. If available, use a soft dry cloth to remove any debris from the charging contacts.
Please remove the robot from the charging base. Turn over the robot and remove the caster wheel. Make sure that there is no debris in the caster wheel since it cannot reach robots for charging contacts. If debris found please watch the caster wheel.
Place the Roomba on the home base, and charge Roomba for at least one hour. If the troubleshooting indicator begins to flicker and Roomba creates an error message while charging, please monitor the charging error messages chart.
If your Roomba will not be charged on base and won’t hold a charge anymore, potential problems include.
- Contact dust
- The wrong type of battery
- Power source problems
Roomba will notify an error code about the error, and you can easily solve the problem without a lot of trouble.
On the other hand, Deebot is another robotic vacuum like Roomba, encountered the same charging error. When it occurs Deebot will notify that the Deebot not charging .
Make sure the base connected to the power
You see that the home base is plugged and Roomba is not charging, then there will be a light of electricity. If it does not, then make confirm that, it has its power.
You may have plugged the home base into a Ground-Fault Circuit Interrupters (GFCI) outlet, which has been moveable. Maybe that due to the break of a circuit, dislocated can be done for any reason. If the GFCI outlet has the power, the plug is tightly sealed in the outlet. You need to plug the home base to another outlet, to verify that this is working.
Learn about Error Code
If the Roomba is Correctly charging, you won’t notice any lights. These are intentionally closed to conserve energy.
Anyway, if there is a problem, the Roomba will say “uh-oh,” and a troubleshooting light will flicker. The number of times it blinks gradually alarms you to the error. The device will also say the error code.
You should know, there are eight such error codes. You can get support from this most solution by opening the iRobot application on your mobile device or PC.
Error Code 1 :Code 1 error occurs when the base station and battery cannot communicate. You may forget to disconnect the yellow pull-tab before placing the Roomba on the home base. This can also happen because the battery is not installed correctly. Eject it, and reconnect it.
Codes 6 and 7 :If you notice that the Roomba battery is too hot or too cold, it won’t charge. If the battery will produce too heat Roomba will speak Code 6 and a Code 7 if it’s too warm or too cold. Disconnect Roomba from the home base and allow it to rest at room temperature for half an hour before trying to reconnect it again.
Codes 2, 3, 5, 8 and 9 :Five of the error codes inform either a contact problem between the home base and the battery or a difficulty with the battery itself. You can fix this error by cleaning the contact on the home base on the i-Robot Roomba. After unplugging the home base, massage it with damp cloth or alcohol mixed cloth.
Try a Hard Reboot
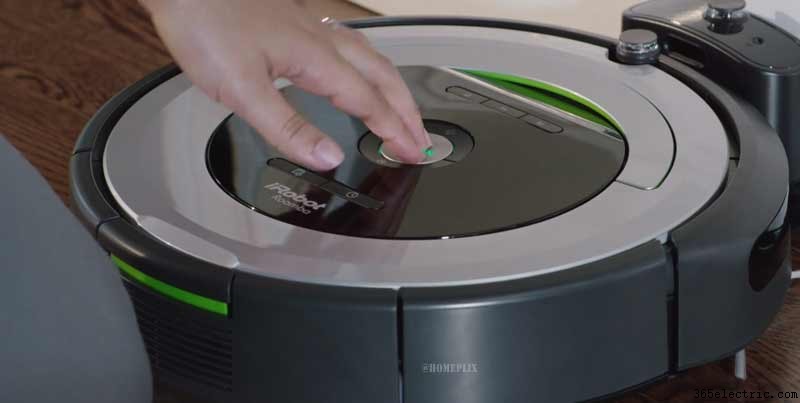
Charging errors can occur due to corrupted memory in Roomba’s processors. You can solve the bugs by rebooting the device. For this, press the CLEAN button down for 10 seconds. Release it when all the indicator lights will float. The device will then restart. It will not save schedules and other settings, so you have to reorder them.
Be Patient When Charging a New Battery
A fresh lithium-ion battery won’t work until you wake it up. Set the home base station on a level floor and plug in the socket, and see that the light comes on.
Place Roomba on the home base station and wait for few seconds until the battery wakes up. When it does, the light on the base station will go out, and the battery indicator on Roomba will begin flickering. It too will go out after a minute.
Battery Status
- CLEAN button indicates how much charge battery has.
- Red that means the battery is hungry.
- Flashing amber indicator that the charge is in progress.
- When charging is complete indicates green.
- If Roomba rapt the 15-hours charging condition, a quickly flickering amber light indicates, which it does Consistently to lengthen the life of the battery.
Roomba Errors
| Roomba Error | Possible Problems | Possible Fixes |
|---|---|---|
| Roomba Error 1 | Battery | Clean Battery Contacts &Reset |
| Roomba Error 2 | Brushes | Clean Brushes |
| Roomba Error 3 | Stalling | Reset &Recharge |
| Roomba Error 5 | Charging | Remove Yellow Pull-Tab |
| Roomba Error 6 | Sensors | Clean Sensors &Reset Roomba |
| Roomba Error 9 | Bumpers | Clean &Reset |
| Roomba Error 10 | Wheels | Clean Wheels |
| Roomba Error 17 | Geographical Difficulty | Remove problem areas, Increase Lighting, Clean |
Roomba Brush Not Spinning
Does your iRobot side brush does not spin? What are you afraid of using the right method to solve the problem? Well, if you are struggling with these problems, then you have come to the right place. You can follow the steps below. Handle the problem fast.
Step 1
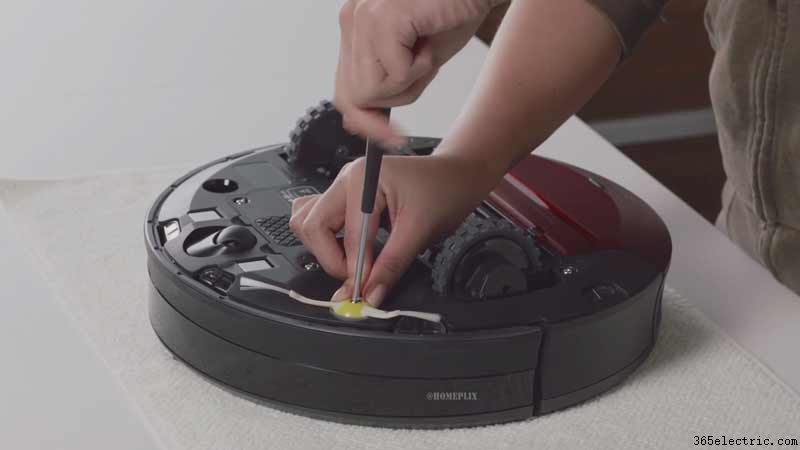
The first step to take is to turn the i-robot on its side. Go ahead and Take off the side brush by removing the center screw with a flat head screwdriver. The bottom panel holds four screws, try to take off.
Step 2
The side brush motor and blue housing are occupied in the chamber by two screws at the edges and there is a slit head third screw. Take the engine out upon loosening the two bolts. Electricity is provided by two spring controls below the engine chamber because there is no concern.
Step 3
Take off the third screw. Then the third bolt comes with a triangular slot. You should know a simple flat-head screwdriver will not work to loosen it. You have to be cautious at this point not to harm the head. The third slit screw comes with a little plastic part that keeps the motor in its chamber.
Step 4
Blue motor housing comes in two pieces. A snap-latch is visible at one end. While following the edges around and supervising it cautiously.
You will detect that a thin flat head screwdriver can be placed on the other side of the housing. You can carefully prise up one part of the motor housing off! Be sure to complete this task mildly to prevent the harm of the snap-latch. One section of the housing contains some gears and an electric motor. The other part of the housing contains a metal axle and one wide gear.
It also discloses a hexagonal piece protruding from the other portion of the housing where the side brush mounts.
You can first google it with your hand and later pliers, to find out if the axle will turn within the housing. When this task is complete, the axle will not rotate within the housing. You will detect that the axle will spin once freed from the other stuck gear when testing the motor with a 9-volt battery.
Step 5
You can give some WD-9-0 to lose the stuck gear. Try to crack the stuck section. After some time, you will discover it’s possible to turn the stuck gear in the housing.
It will be hard to pop the gear out in any way. Even, you can continue twisting and turning it incessantly. With exact inspection, you will find in between the blue housing and the white part some fine broken stuff. The housing cleaned and the motor can be changed to get your Robot Roomba brush working back. The problem is solved.
How to Reset Roomba
Reset the Roomba
If you have marked that your robot was not cleaned during the same time if you have observed that it has reduced the performance, you have to reset your Roomba.
Do not change the battery of your Roomba, before a reset, to be sure that the problem is the battery.
To do a hard reset, you must follow the steps.
Step 1
Place on the charge of your robot. Place it on the Home base. or connect the charger directly to the Robot.
Step 2
Press the button ‘CLEAN’, for approximately 10 seconds and keep hold until the blue text ‘r 5Y’ is displayed.
Step 3
When displayed ‘r 5 P’ leave ‘CLEAN’ then your Roomba turns off and you will hear a ‘BEEP’ tone. These tones are sure that the reset was successful.
Step 4
Prevent from loading Robot for 16 hours and start it. It is possible that it improves performance and your Roomba to return as earlier.
It is important to keep in mind that with this operating your Roomba is with the factory settings. You will need to reprogram it again, Task Scheduler, clock, and language.
Roomba Bumper Stuck
I’m awaiting that someone has run into the Roomba bumper stuck problem shown as Roomba error 9 before and I can tell you what you need to do to solve those issues.
What happened in my case? When I get the Roomba to clean it starts walking around in large range as it’s supposed to, and then starts to wander. The problem is that the front bumper claps something it gets stuck and just spins and jerks back and forth.
If I try and operate it with the remote once this has happened I find I can turn left or right without any difficulty, but I try and move forward it just spins to the left to left.
If I shut it off, also from the Power button or the remote, and then start it back, it runs fine until once again the bumper is triggered. I think that it’s not Contact isolation or something grating lose since turning it off via the remote or application and then back on wouldn’t cause the Roomba to be pushed at all. If I press the bumper very mildly with my finger the same thing happens.
I can fix that and I don’t have to send it off somewhere for service. Now I will tell you, how is that possible.
The above scenario shows a Roomba with a stuck front bumper sensor. As you can see, the robot keeps backing up and trying to turn away from it.
The penumbra interruption it thinks is in front of it. This specific bumper sensor was triggering because lint had stuck into the optical beam path and that was blocking light to the photodiode detector even when the bumper was not being zapped.
I am able to fix the bumper cover by removing four screws and its vacuuming where the bumpers to the plastic poles go through IR diodes and the phototransistor.
I found the following guides to be very useful to you when debugging the sensors on your Roomba to a condition in which the front bump detectors were malfunctioning.
Short Brief
Hold the spot and ‘Clean’ buttons down together. Push the power switch. Keep pressing spot and clean buttons down while the robot sounds five ascending beeps and five descending beeps. Release spot/clean and you are in diagnostic mode.
How to Clean a Roomba
Sometimes your cleaning equipment needs to be cleaned. This is surely true of your Roomba. With just a bit of daily maintenance.
What needs to be cleaned
- Tray
- Filter
- Side-sweeper
- Brush
- Rubber roller
- Underside
- Motor
Empty your Roomba
On the backside of your Roomba, there is a tray that fills with dirt and dust as it vacuums. Press down the button on top of this tray and take it out. Dump the dust off this tray into the dustbin.
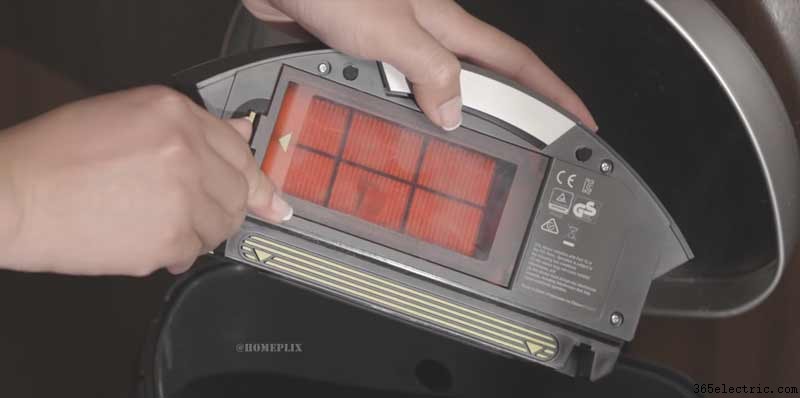
Remove the filter
Inside the tray, you will be able to see a red semi-circle. That may be dressed with gray dirt and dust. This is a Roomba filter, this filter will without difficulty take out of the tray while remaining attached on one end. Slide this out, and throw out any loose dirt/dust off into the dustbin.
Vacuum the tray and filter using a regular vacuum and the crevice tool
Attach the fracture tool to the hose of a vacuum cleaner. Then turn the vacuum on and use this attachment to remove dirt and daub from the Roomba collection tray and filter.
Switch to the brush tool
Attach the brush tool instead of the crevice tool from your vacuum hose. Restart your vacuum and once again go over the filter and tray. At this moment, pay attention to the rubber seals, the surface of the filter and the vents on the back of the tray. When you are finished, snap the filter back into place.
Remove the side-sweeper
Down the Roomba Downward, and Marked the side-sweeper. A circular on the top left of your Roomba, three marginal plastic pieces. Using your Phillips screwdriver remove the side-sweeper. Using your fingers or your crevice tool, clean off any hair/debris or dust that is attached to the side.
Remove the front wheel
The front-wheel- Located front and center on the bottom of the Roomba. You can easily pop it out. Use your fingers to remove any hair or string attached to the wheel itself. Then use your vacuum with the crevice tool to vacuum the opening where the wheel goes.
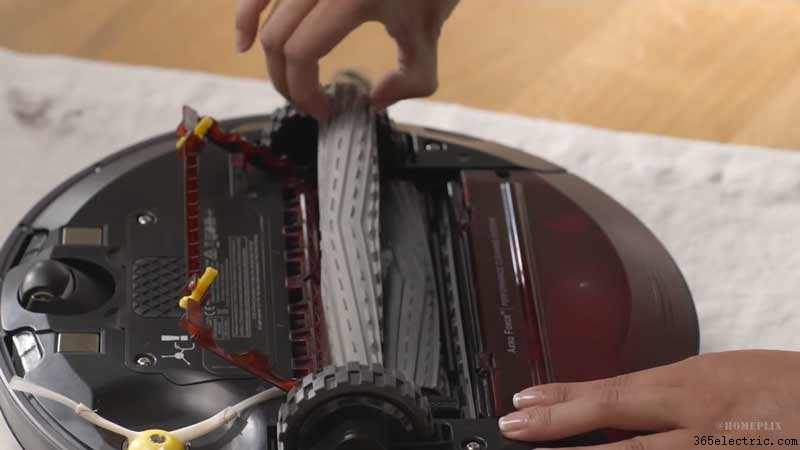
Remove the brush
You will mark a rectangular flap, On the bottom of your Roomba, that should lift open. Under this flap, you will get your cylinder brush, which can be very dirty. Take up this brush.
Remove the bearings
Both sides of your brushes will be small bearings at the end. (On some Roomba models, these bearings are yellow). Take of these bearings and set them safely. Then, using your finger, pull off any hair that has gotten tangled with the bristles and around the ends of your brush.
Use the iRobot Roomba bristle brush
Slide the bristle brush onto the end of your cylindrical brush to remove the iRobot Roomba. Pull the bristle brush down the length of your cylindrical brush just to remove hair, debris, and dust. Remove the hair/debris from the bristle brush with your fingers, and run over this process 2-3 more times.
Remove the rubber roller
The bottom of the space placed in the cylinder brush, you will notice a cylindrical rubber roller. This will slide out. Take apart the yellow bearings, and pull off any dirt/hair from the ends of the rubber roller.
Vacuum the brush, roller, and compartment
Use brush attachments on your vacuum to move the brush and roller all the way to remove dust, dirt, and hair. Move brush and roller aside, and switch your tool. Now vacuum the compartment where the brush and the roller go, giving a careful focus to the gray flap that seals the compartment.
Deep Cleaning the Underside and Motor
Clean the backsides of the wheels. You do not need to take off the rear two wheels in order to clean them. Instead, push the left wheel down and use the crevice tool to vacuum around it. Repeat this on the other side.
Remove the bottom cover
Using your Phillips head screwdriver, open the four small screws that hold the black bottom cover in place. These screws may be a bit hard to remove. Then slide out the bottom cover and set it aside.
Remove the motor unit
Carefully remove the four tiny screws that hold the rectangular motor unit in place. Pull the blue rectangular unit out of the Roomba. Run your vacuum crevice tool over the inside of your Roomba.
Clean the motor with compressed air
Carefully work to remove any dust or debris from the motor unit using a can of compressed air. Pay extra attention to any crevices and openings. However, be very careful not to vex any wires.
Reassemble your Roomba
Place the motor compartment back beneath the Roomba and tightly closed it with the four tiny screws. Pop-out the front wheel back. Next, reinstall the bearings to the rubber roller and brush, and return them to the proper compartment and close the flap. Then place the side-sweeper and secure it with a single screw. Finally, reinsert the collection tray.
How to Clean Roomba Filter
Roomba is so simple to use and it’s even easier to maintain. Just a few quick routine steps will help to keep your robot running at peak performance. Like emptying the bin after every use. This gives your Roomba a nice clean start to every job. The full bin indicator and a notification to your iRobot home app service helpful reminders.
If you share your home with pets, you should clean the filter twice a week to shake off fur dirt, dust, and dander. Homes without pets should clean Roombas filters once a week to make sure all of the robot components can move freely.
Regularly check the extractors, side brush, in front castor and remove any hair or debris. Roomba will let you know if something is wrong and even give you troubleshooting tips to help get it going again.
Use the following procedure to clean or replace the filter.
Step 1
Press and hold the bin release tab to remove the trash bin.
Step 2
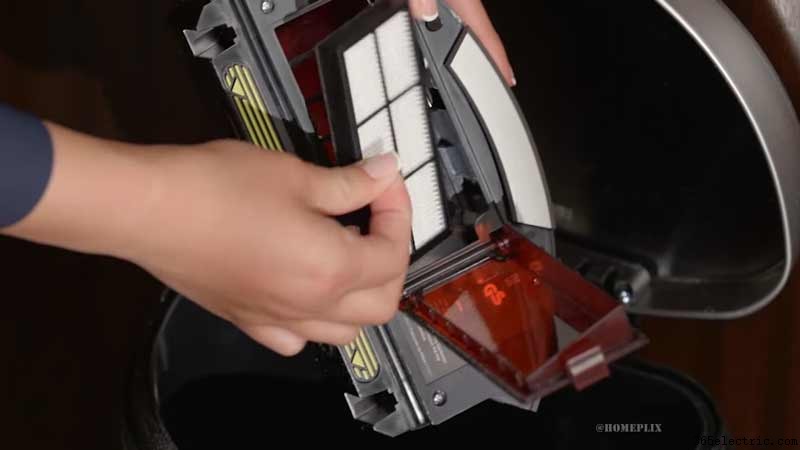
Press and lift the filter door rid the tab to take apart the filter.
Step 3
Take aside filter by grasping the yellow tab.
Step 4
Sweep off debris by tapping the filter against your trash can and then replace the filter. Filters are not designed to be wet washed.
Step 5
Press the side of the filter with the metal lever.
Final Sentences
I know that after reading this article you are ready to give me a 5-star rating. You may definitely diagnose and fixed your Roomba and happy to back up and running your Roomba!
Definitely, if there is something that needs to be fixed you can do so as long as you have the patience and the will to learn.
After reading this article you can run the Roomba troubleshooting or repair and comment back with your results, so we can assist you in finding out the cause and later fix it.