Come collegare un equalizzatore e un crossover per l'audio dell'auto + diagrammi e altro!
Un buon suono nel tuo sistema audio per auto dipende molto dall'attrezzatura che stai utilizzando e da come lo stai usando. Equalizzatori e crossover sono alcuni degli investimenti più utili che puoi fare per il tuo sistema.
In questo articolo, spiegherò come collegare un equalizzatore e un crossover per i sistemi audio per auto. All'interno troverai utili diagrammi, le nozioni di base che devi conoscere e alcune altre informazioni davvero utili!
Qual è il primo equalizzatore o crossover? Differenze equalizzatore e crossover
Quando si utilizzano sia un equalizzatore che un crossover, l'equalizzatore viene collegato prima del crossover. Ci sono diverse ragioni per questo, una delle quali è il ruolo di un equalizzatore rispetto a ciò che fa un crossover.
Gli equalizzatori (anche quelli che possono includere funzioni di crossover opzionali) regolano il contenuto del segnale audio mentre i crossover vengono utilizzati per separare porzioni del segnale audio indirizzate a uno o più amplificatori.
- Utilizziamo equalizzatori per migliorare le frequenze del suono nella musica e regolare il segnale audio stesso.
- I crossover vengono utilizzati per controllare il suono inviato a uno o più amplificatori in base agli altoparlanti che utilizzeremo e per configurare installazioni come sistemi di altoparlanti a componenti a 2 o 3 vie.
Cosa fa un equalizzatore per l'audio dell'auto?
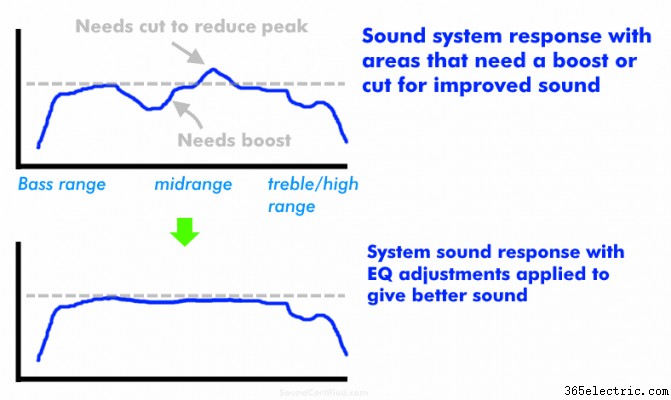
Diagramma che mostra l'idea di base dietro un equalizzatore. Un equalizzatore è utile per aumentare o ridurre piccole gamme di suoni nel sistema audio per migliorare il suono. Ad esempio, un "picco" (area del volume più alto) in alcune frequenze può essere ridotto mentre altre possono essere potenziate.
Gli equalizzatori non sono solo un nome di fantasia per qualcosa di interessante con cui giocare, anche se sicuramente non sono tutti uguali, come si suol dire. Gli equalizzatori sono un dispositivo elettronico che ti consente di migliorare la qualità dell'audio sintonizzando "bande", o intervalli di frequenze sonore, nella tua musica.
Lo fanno fornendo controlli per aumentare o diminuire ("aumentare" o "tagliare") le frequenze del suono per migliorare la risposta in frequenza prodotta dal tuo sistema e dagli altoparlanti.
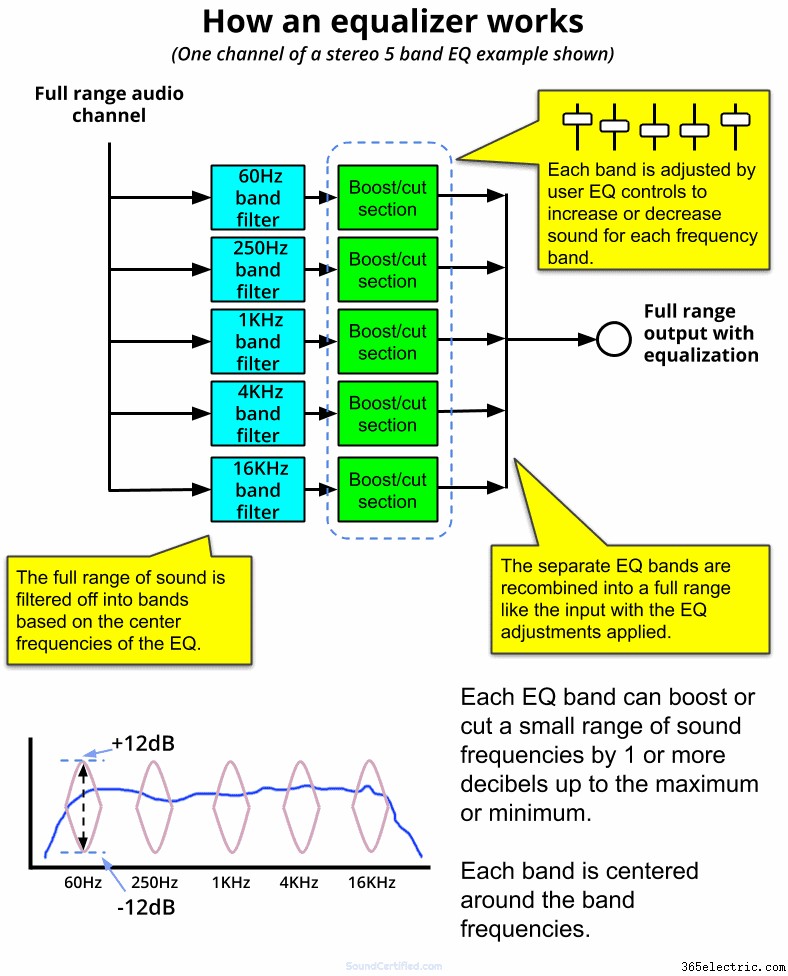
Gli equalizzatori forniscono una serie di controlli (di solito controlli a scorrimento o manopole rotanti) che consentono di regolare il suono a proprio piacimento secondo necessità. Ad esempio:non abbastanza bassi? È possibile alzare una o più manopole nelle gamme delle frequenze più basse (bassi). La musica è troppo dura in alcune aree come la gamma media? Puoi tagliare (diminuire) la gamma di frequenze audio di cui i tuoi altoparlanti stanno producendo troppo.
Qual è lo scopo di un crossover?
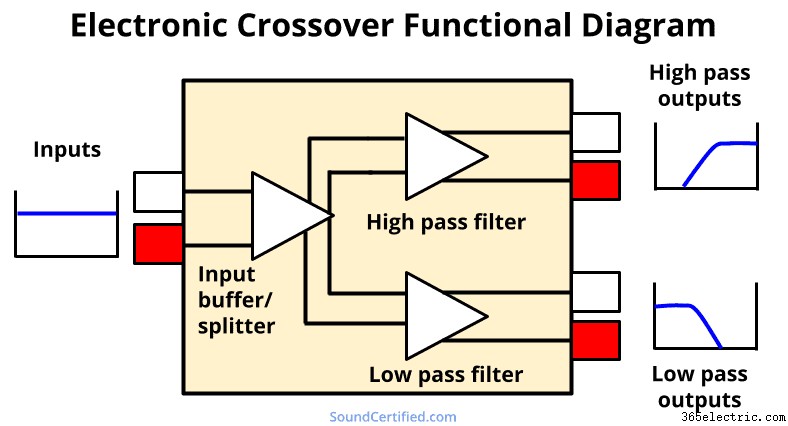
I crossover sono dispositivi elettronici che separano un segnale musicale a gamma completa in ingresso in uno o più segnali passa alto o passa basso. Ti consentono di bloccare le frequenze sonore indesiderate che vanno a determinati altoparlanti per ottenere il miglior suono, prevenire la distorsione e ottenere un suono migliore.
Ad esempio:
- I tweeter dovrebbero essere protetti dai bassi che invierai a altoparlanti più grandi. Pertanto utilizziamo crossover passa-alto con tweeter e altri piccoli altoparlanti.
- I woofer suonano in modo scadente quando si riproducono gamme di suoni a gamma intera o media. Possiamo ottenere un suono molto chiaro e bassi "puri" usando un crossover passa basso per loro.
Oggigiorno i crossover elettronici sono integrati in molti amplificatori per auto. Tuttavia, forse stai utilizzando uno o più amplificatori che non li offrono o hanno una quantità di controllo limitata. Un crossover elettronico separato ti consente più controllo e regolazione di quanto potresti avere altrimenti.
Puoi anche usarli per sistemi audio per auto personalizzati più elaborati.
Un crossover migliora la qualità del suono?
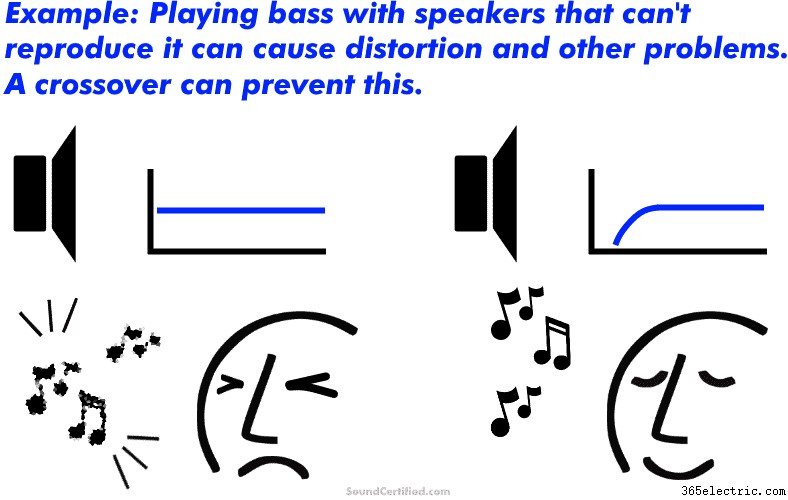
I crossover possono aiutare con la qualità del suono, ma non allo stesso modo di un equalizzatore. Ad esempio, possiamo utilizzare un crossover passa-alto con altoparlanti più piccoli come altoparlanti full-range da 6,5 pollici per bloccare i bassi molto bassi che causano distorsione e gli altoparlanti non possono gestire. Il risultato è un suono migliore senza il terribile suono degli altoparlanti quando sono spinti oltre ciò che possono gestire.
Allo stesso modo, bloccando i suoni indesiderati agli altoparlanti dei bassi o al subwoofer, il risultato è una gamma di suoni "pura" dal suono eccezionale senza asprezze o distorsioni dovute a suoni che non sono stati progettati per riprodurre.
Un sistema di altoparlanti correttamente configurato che utilizza i crossover avrà molto suono migliore di uno senza di esso. Puoi anche pilotare gli altoparlanti con più potenza e volume di quanto potresti altrimenti. Il risultato è una nitidezza del suono molto bella e musica piacevole anche a livelli di potenza più elevati.
Come si collega un equalizzatore all'autoradio? (SCHEMA)
Il collegamento di un'autoradio a un equalizzatore è generalmente piuttosto semplice. La maggior parte sono più o meno le stesse, ma ovviamente possono variare leggermente da modello a modello. Tratterò le basi qui, quindi discuterò dei crossover nella prossima sezione separata.
1. Collegare il cablaggio di alimentazione e telecomando

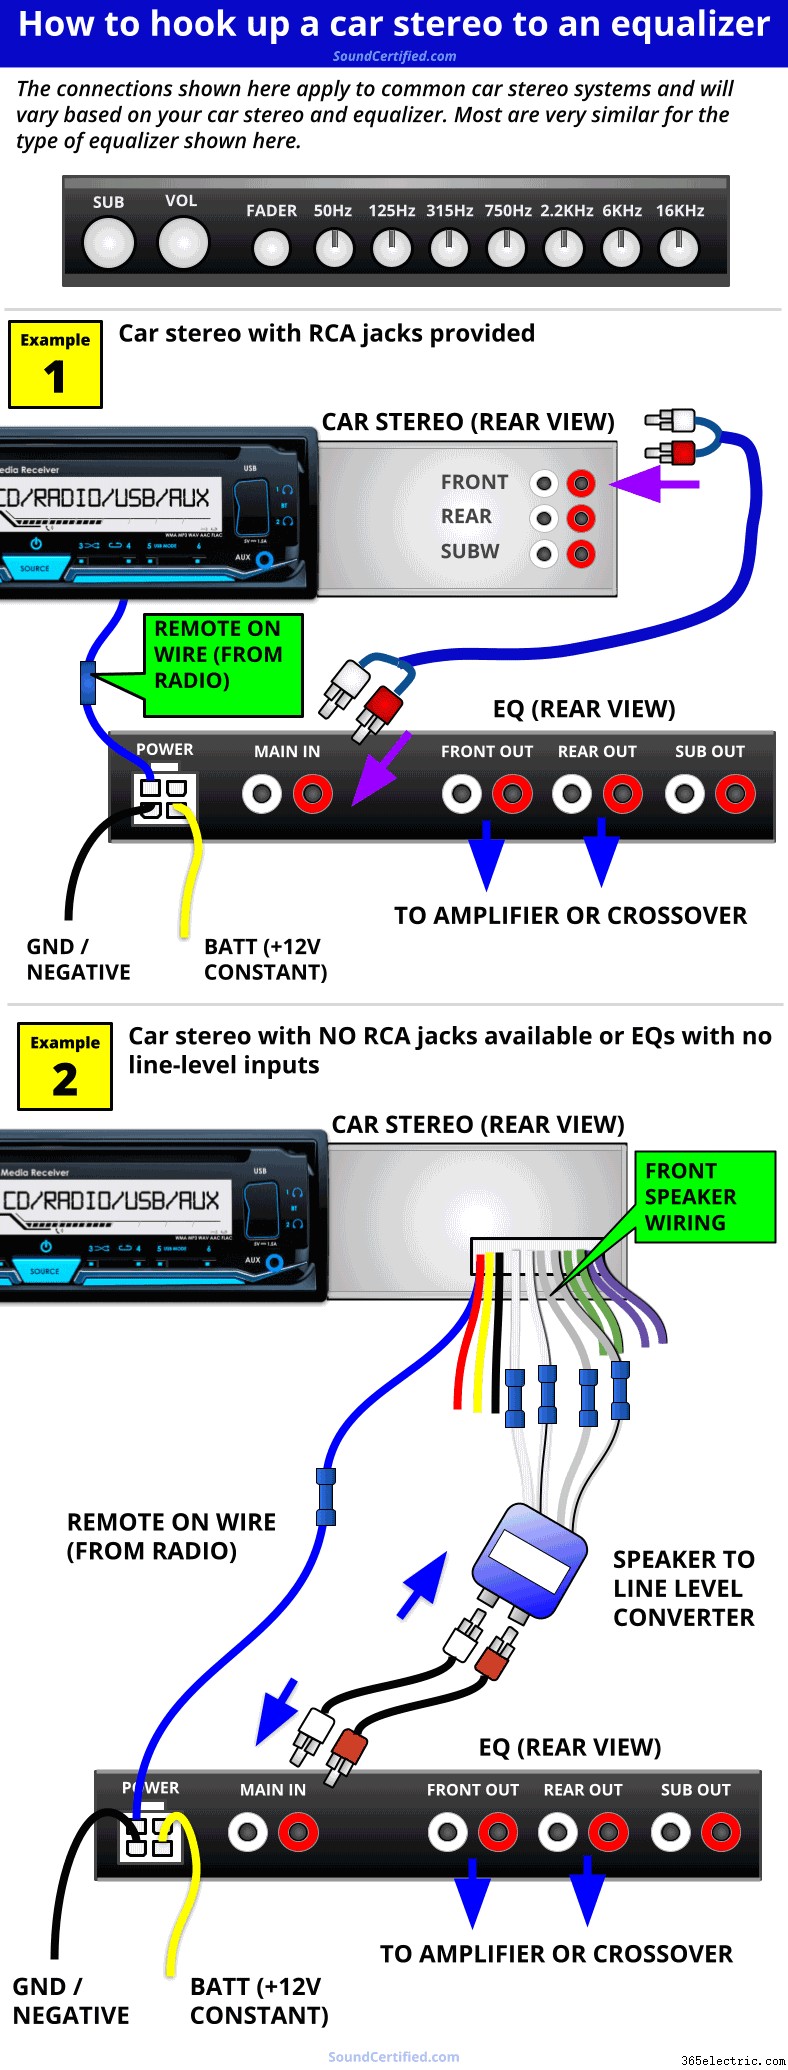
Esempio di un tipico equalizzatore con il cablaggio di alimentazione e il cablaggio di ingresso del livello degli altoparlanti opzionale. La maggior parte degli equalizzatori utilizza tre connessioni di alimentazione:+12 V costante (alimentazione a batteria), cavo di collegamento remoto e terra.
Gli equalizzatori di solito hanno un cablaggio piuttosto semplice che dovrai collegare per l'alimentazione e il controllo di accensione:
- Filo di terra (negativo) – collegarsi alla massa del veicolo (telaio) o anche alla massa della radio.
- Potenza della batteria – collegarsi alla connessione della memoria della radio (+12V BATT) o ad un'altra sorgente a +12V sempre attiva.
- Telecomando su filo – questo accende o spegne automaticamente l'equalizzazione con la radio. Collegalo al cavo di accensione remota della radio per ottenere i migliori risultati (in molti casi è anche più facile che usare un altro cavo).
- *Illuminazione/dimmer [se presente] – Questo non è così comune, ma alcuni equalizzatori hanno un controllo più debole. Assicurati di controllare il manuale dell'utente poiché alcuni attenuano il display EQ o l'illuminazione quando è collegato un segnale di illuminazione positivo. Altri attivano il dimmer con una connessione negativa (o massa). Puoi ignorare questo cavo, se lo desideri:i cavi di controllo dell'illuminazione/dimmer non sono necessari.
Gli equalizzatori generalmente utilizzano solo pochi amplificatori, quindi nella maggior parte dei casi non dovrai preoccuparti di collegarli con una connessione di alimentazione separata come ad esempio un amplificatore per auto. Inoltre, spesso è anche una buona idea utilizzare la stessa connessione di terra della radio poiché il lamento dell'alternatore (rumore del loop di massa) può essere un problema per alcune installazioni.
Una volta collegato il cablaggio di alimentazione, è il momento di avviare e avviare una connessione del segnale audio.
2. Collegare gli RCA di ingresso del segnale dell'equalizzatore
La maggior parte degli equalizzatori utilizza una singola coppia di ingressi RCA che si collegano ai jack di uscita RCA dell'unità principale. Questo perché gli equalizzatori standard utilizzano un unico set di controlli di equalizzazione che funzionano contemporaneamente su entrambi i canali sinistro e destro. Molti includono anche un controllo del fader dalla parte anteriore a quella posteriore, quindi spesso non avrai bisogno di una connessione RCA posteriore dall'autoradio.
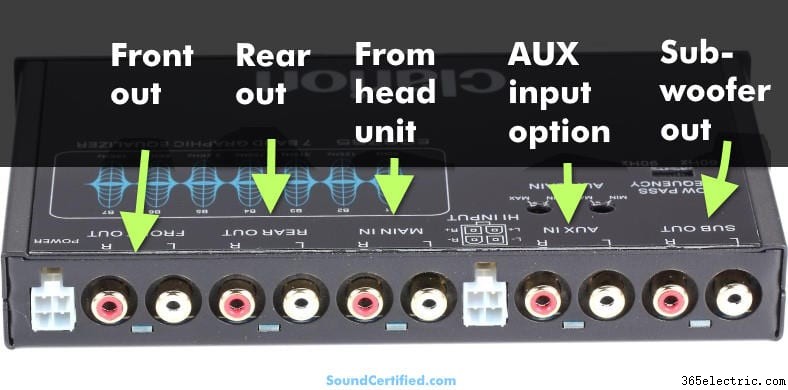
Collegamento dei jack RCA su un equalizzatore per auto:
- Ingressi RCA principali: Collegarli ai jack RCA (anteriore) dell'unità principale, se disponibili. (Se la tua unità principale non ha RCA, non preoccuparti, ne parlerò dopo)
- Uscite RCA anteriori: Collegare agli ingressi RCA principali del crossover se si tratta di un modello solo stereo (jack a 2 ingressi). Se non stai utilizzando un crossover, collegalo agli ingressi RCA anteriori del tuo amplificatore.
- Uscite RCA posteriori: Collegati agli ingressi RCA posteriori del crossover, se disponibili e se ne hai bisogno. Altrimenti, puoi ignorarli e ignorare il controllo del fader sull'EQ. Se non stai usando un crossover, collegalo agli ingressi RCA posteriori del tuo amplificatore.
- Uscite RCA subwoofer (opzionali): Questi sono opzionali e di solito hanno un crossover passa basso integrato nel design dell'uscita. Se non stai utilizzando un crossover tra l'amplificatore.
- Prese RCA di ingresso AUX (opzionali): Alcuni equalizzatori offrono una funzione di ingresso AUX per consentirti di collegare direttamente il jack per le cuffie del telefono, un lettore MP3 e così via. Connect this to a 3.5mm stereo headphone to RCA cable as needed and use the AUX input switch when listening to other sound sources.
Once you’re connected to the car stereo and the crossover you’re ready to install the crossover too.
Connecting a car stereo with no RCA jacks to an EQ
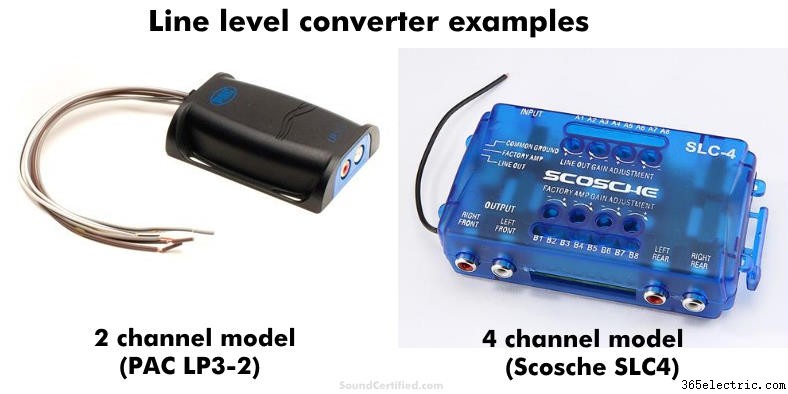
Examples of two good speaker wire line level converters (one for a pair of speaker outputs, one for 4 speaker channels &4 RCA outputs). Line level converters scale down the higher voltage signal from a car stereo to a lower voltage (“line level”) that an EQ, crossover, or amplifier can use without distortion or damage.
The great news is that you can still use an EQ and crossover with a factory or aftermarket car stereo with no RCA jacks. You’ll need a good quality speaker output to line level converter to do this.
Line level converters are designed to allow connecting to an amplifier’s RCA inputs by converting speaker outputs from a stereo (a higher voltage required to drive speakers) to a low-level signal that an EQ, crossover, or car amplifier can use.
È molto importante acquistare un adattatore a livello di linea di qualità e ben progettato per evitare rumori, scarsa qualità del suono e altri problemi. Don’t get the cheapest – instead, get a name-brand model you can rely on (like the examples you see above). You can get a nice one like these for around $15-$20 or less these days.
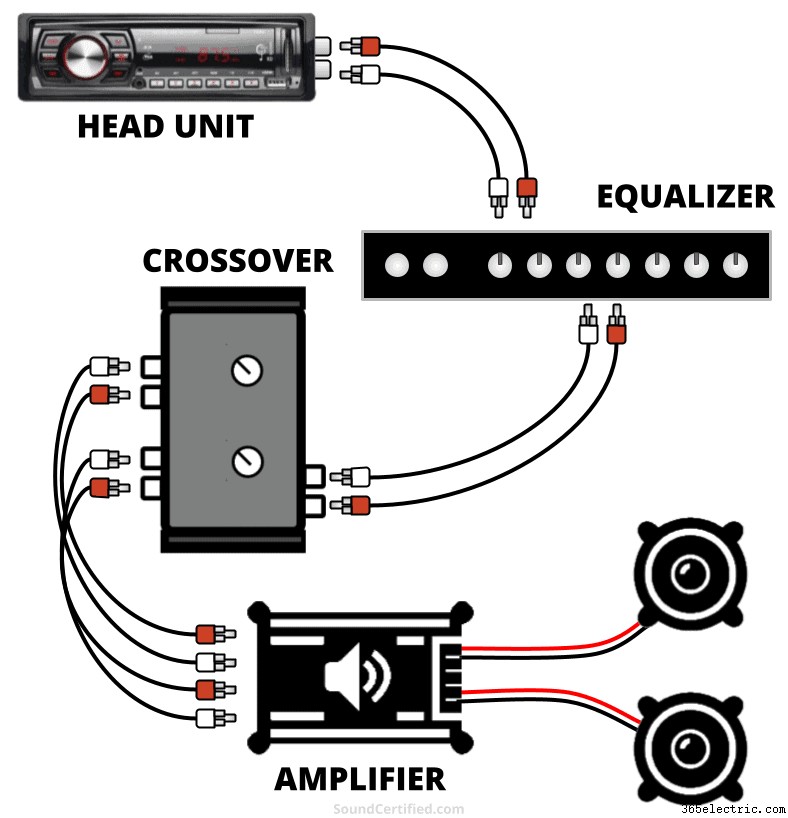
How to wire an EQ and crossover for car audio (DIAGRAM)
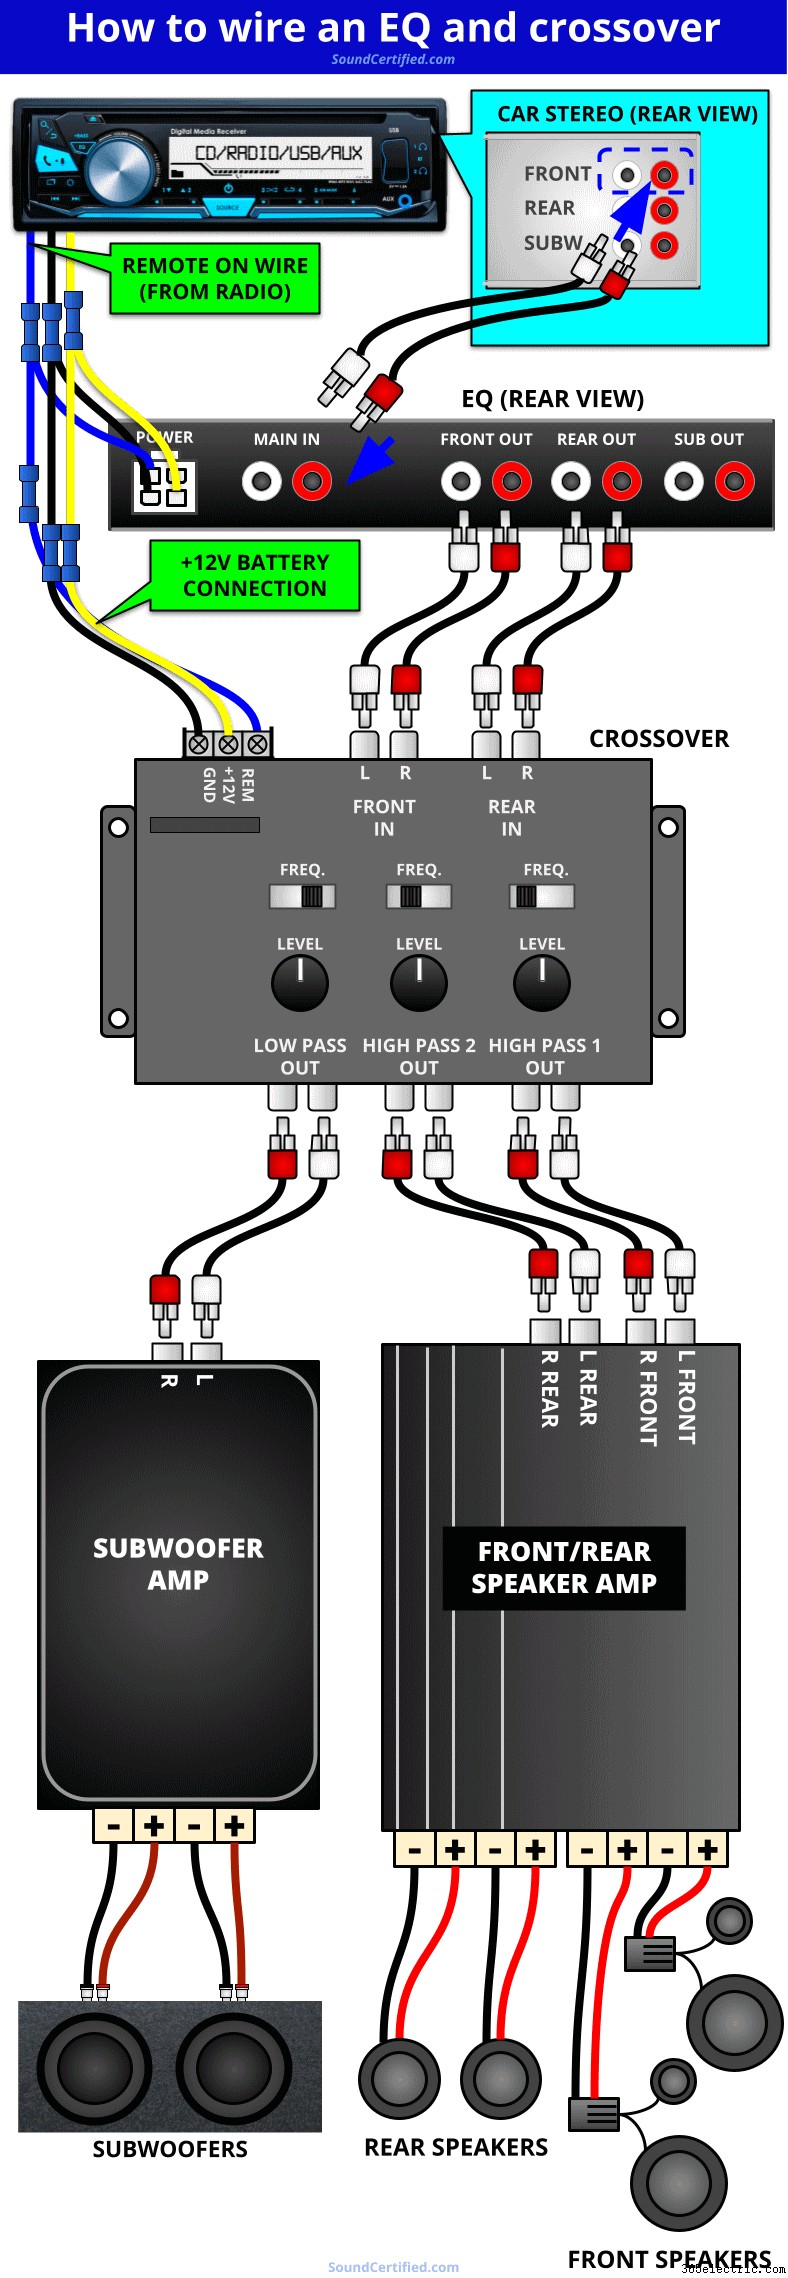
This diagram shows the basic connections for an equalizer and crossover. While the particular equalizer or crossover you have may be slightly different, most have very similar connections.
The diagram above is a guide for how to make the right connections for your equalizer and your crossover. You can expect some slight differences depending on the model you have and the system you’re wanting to install but most should be very similar.
How do you connect a crossover to an equalizer?
To connect a crossover to an equalizer you’ll want to use the front or main RCA outputs of the equalizer for the inputs to the front channels or main inputs on your crossover.
- Full range input(s): the crossover’s main signal input from your car stereo or in this case the equalizer. The equalizer will send a full-range signal which you can then divide as needed for your system using the provided outputs. Some crossovers only have a single pair of inputs while others have front, rear, and sometimes even subwoofer inputs. These additional inputs are usually optional.
- High-pass outputs: these are the high pass (bass blocked) audio outputs for your main amplifier channels such as front or rear speakers. Using the selectable crossover frequency you can block bass and instead send it to subwoofers for better sound &power handling.
- Low-pass outputs: these are for sending only bass to your amplifier used for midbass speakers or subwoofers. Low pass outputs on a crossover usually have a selectable crossover frequency similar to the high-pass outputs, but usually limited to 250Hz or below.
Connecting power to a crossover
Crossovers normally have wiring similar to an equalizer:a ground wire (negative), +12V battery wire, and a remote-on wire. If it’s convenient you can connect the crossover and equalizer wiring to the connections at the radio:
- +12V battery connection:connect to the radio’s memory wire or another power source that has +12V all the time (does not change with the ignition switch).
- Ground wire:connect to the vehicle’s chassis via bare metal or the same ground wire as the car stereo.
- Remote wire connection:connect to the car stereo’s remote wire or alternatively a +12V accessory wire that turns on &off with the ignition.
Can I use a separate crossover and my amp’s crossover?
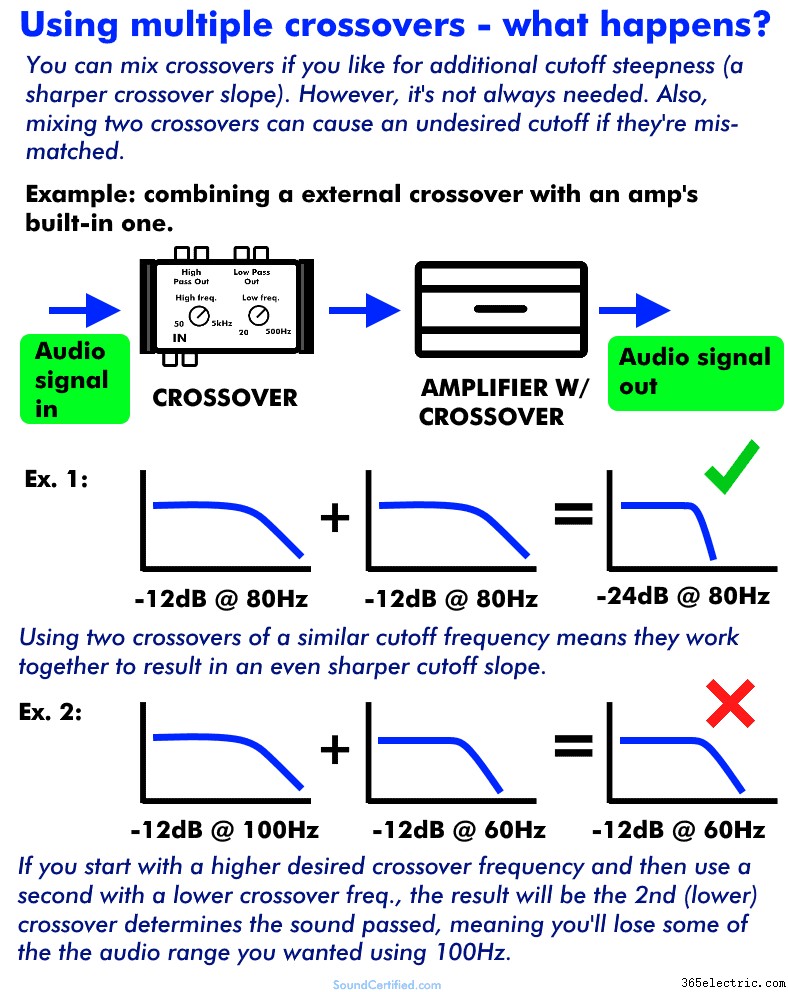
Yes, in many cases you can use an external crossover and the one built into your amplifier or head unit. However, it’s generally not needed in most cases.
These days it’s pretty standard to find -12dB per octave crossovers (also called “2nd order”) in electronic crossovers and amplifiers too. That’s normally a pretty good cutoff steepness for all sorts of speakers including main speakers, tweeters, and subwoofers.
However, if you need an even steeper crossover frequency (say -18dB or -24dB per octave) you can use more than one. There are some things you’ll need to know first:
- You can combine the crossovers for similar cutoff frequencies. The steepness will combine, meaning you’ll get even better filtering of unwanted sound frequencies.
- Mismatched crossovers can mean you’ll have undesirable sound. For example, let’s say you’ve set your crossover to 70Hz and you’re also using an amp’s crossover set at about 50Hz. The end result is the lower cutoff frequency from the amp would block portions of sound you wanted.
When in doubt, always use a 2nd crossover that’s of the same or higher cutoff frequency and you should be ok. As some of today’s car stereos include high or low-pass crossovers, those can be used as well (or instead of the ones built into your amp). They’re also more convenient to change too since they’re right there in the dash.
What are good crossover frequencies for car audio?
Car speakers are somewhat different from home audio in that they often suffer from terrible enclosures which aggravates the problems they have when producing certain sounds. I’ve put together some crossover frequencies below as general guidelines that work well in most cases. You may need to tweak them a bit for your particular system.
For example, small speakers with no real enclosure may have horribly “thin” sound – in that case, you may need to raise the high-pass filter (HPF) frequency even higher to minimize sound problems. Use these as a starting point, see what you get, and go from there.
As a side note, be aware that a crossover can’t compensate for a subwoofer that’s poorly matched to a speaker box. It’s very important for good bass sound to have subwoofers in an enclosure of the right size and type.
Car audio speaker & crossover frequency table
| Speaker/System Type | Crossover Freq. &Type | Notes |
|---|---|---|
| Subwoofers | 70-80 Hz (low pass) | Good low-pass frequency range for subwoofer bass &blocking midrange sounds. Best for pure, clear bass sound that "hits." |
| Car main (full range) speakers | 56-60Hz (high pass) | Blocks low-end bass that causes distortion or speakers to "bottom out." Great compromise between full-range sound and midrange bass capability. |
| Tweeters or 2-way speakers | 3-3.5KHz (high pass, or high/low-pass) | Most 2-way or 1-way (tweeter) crossovers use a frequency near this as most tweeters can't handle sounds below this range. Same for woofers above this range. |
| Midrange/woofer | 1K-3.5KHz (low pass) | Woofers and many midrange speakers do not perform well above this general range. They're poor for treble and a tweeter should be added. |
| 3-way system | 500Hz &3.5KHz (Woofer/tweeter crossover points) | Similar to 2-way systems the upper freq. would be the same. Midrange drivers in a 3-way system often do not perform well below 500Hz or 250Hz in many cases. |
What are some good EQ settings for the best sound?
The simple truth is that there’s not a true “best” equalizer or audio system setting. It depends on your goals, but ultimately, the best settings are those that let you tailor the sound in a way that pleases your ears the most.
Regardless, I do have some general equalizer guidelines that can help you. I’ll make sure to cover those in a separate section below after explaining why an equalizer (EQ) is so helpful and the problems with speaker sound.
To keep things organized I’ll break this down into two approaches:
- Setting your EQ by ear
- Using a real-time analyzer (RTA) and microphone
1. Setting your EQ by ear
Here I’ll share with you some basic steps and EQ settings when doing it by ear. In the section after this, I’ll go into the best way to do so:by tuning your system using the right tools.
Note that tuning audio for car systems by ear is more for correcting the most obvious problems you can hear easily. To really know what’s going on with your system, you’ll need the right tools and approach I’ll share in the sound system car tuning guide below.Getting started
My advice is to do the following before adjusting an EQ:
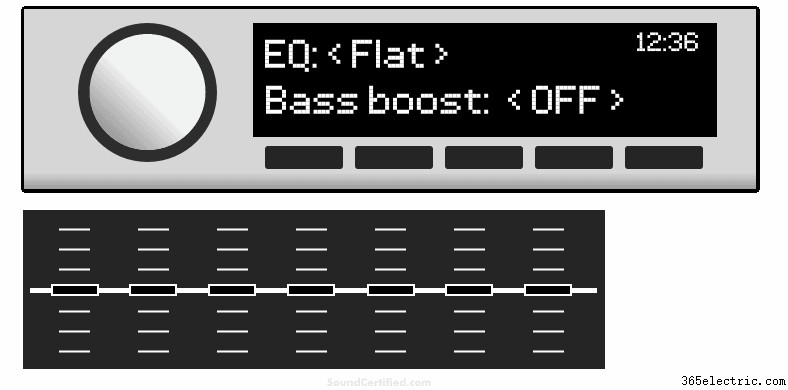
- Disable any special audio modes like bass boost or “music enhancement.” Turn the bass boost, if present, to “flat” or off.
- Set the equalizer band adjustments all to flat. That is, to 0dB level, in the middle of the equalizer display (or to 0dB if it uses a number style control).
For many speaker systems (for example factory speakers with a factory-installed head unit), typically the sound is lacking in 2 or more areas:
- Not enough bass
- Too much midrange
- Not enough treble (high frequency sounds like cymbals and string instruments)
- Music has poor detail and doesn’t sound like the recording should
I recommend doing the following, being sure to use small adjustments with the equalizer and make changes slowly while listening carefully.
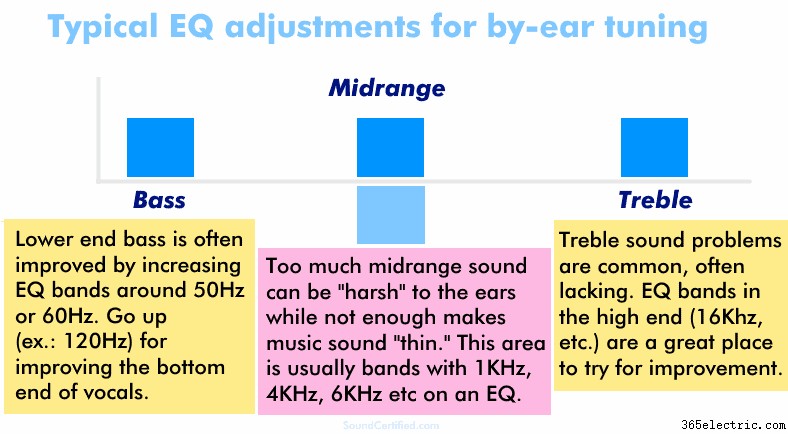
- Increase the bass a bit in the low-end range. This will be a band with a frequency of 60Hz or close to it – this depends on your particular EQ. You can then increase it a bit in the band above it and hear the results (ex.:120Hz band, which is still bass but on the lower end of midrange sound &vocals).
- Increase the treble 6dB or so around the highest band on the upper end of the EQ, then continue increasing by 3dB if you hear an improvement. Continue until it sounds unpleasant to you, then decrease back until it’s better. This is usually a band with 16KHz or similar (some only go to 12KHz, which isn’t good, sadly). Treble can be a problem because speaker placement is less than ideal in vehicles along with poor quality factory-installed speakers, too.
- If you hear “harshness” and the vocals and instruments in music sound like they’re grating on your nerves, you probably need to decrease midrange sound. Start with a band around 1KHz and decrease by about 3dB and listen for improvement. If there isn’t any, set it back to 0, then move up to 2KHz, 4KHz, and so on as needed.
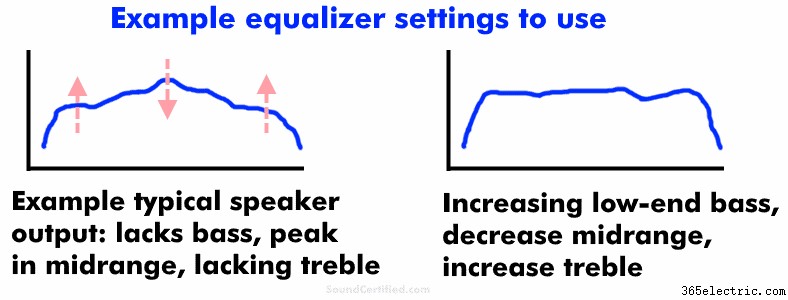
Visualizing adjusting an EQ for the most basic ranges of sound
The idea is to know how the music should sound with everything set up properly and judge your EQ settings by ear using test music.
Our ears are most sensitive in the midrange span of sounds so that’s often one of the biggest problem areas of speakers that need attention. Tweeters very often need some increase at the high end, too. It’s a huge problem with factory-installed tweeters that have a poor response (sound output) at the highest end of the sound range.
2. Using a real-time analyzer (RTA) to tune your EQ
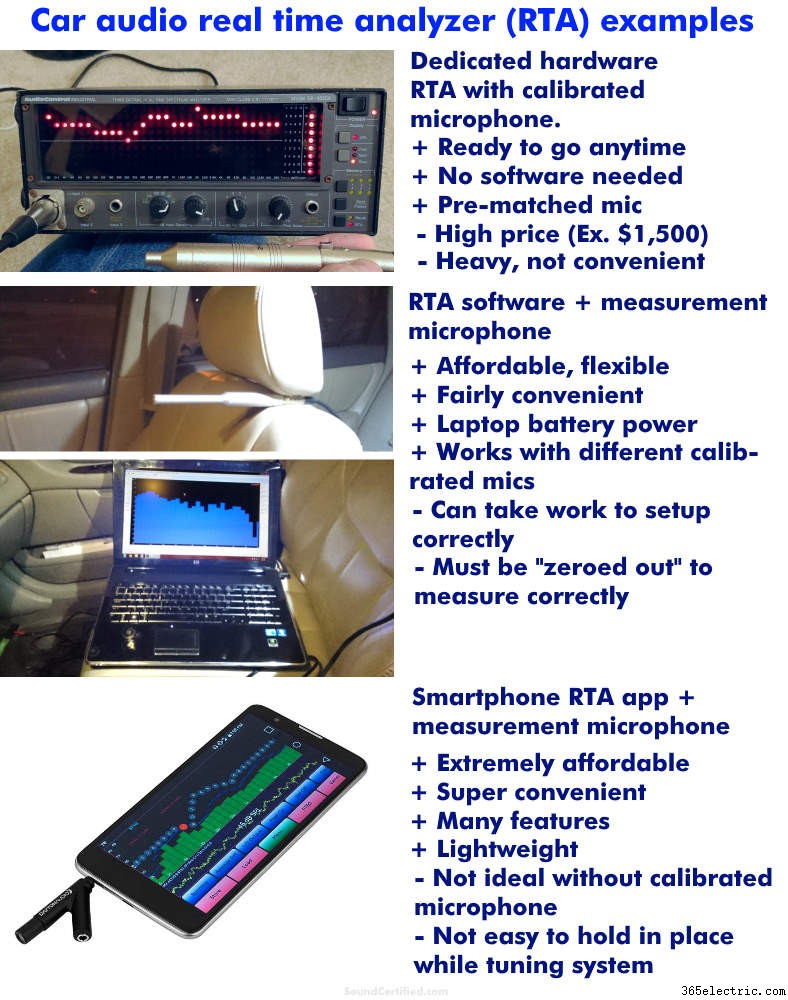
Some examples of your options for measuring and tuning your car audio speaker system. Of the 3, using a laptop and RTA software or smartphone app are the best values for the dollar. Today’s smartphone apps like AudioTool offer many of the same features as much more expensive options.
The best way to tune your system (find the optimal equalizer settings) is to use a measurement tool and find the areas that needed adjusting. To do so, you’ll need a real-time analyzer (RTA) and microphone. There’s simply NO WAY to get the best sound using only some music and adjusting it by ear.
This used to be way too expensive in the past. However, these days you can find get good results using your laptop and RTA software (such as TrueRTA, for example) or use an inexpensive RTA app with your Apple or Android smartphone.
For the sake of keeping things simple, I’ll cover using a smartphone and an RTA app. I recommend AudioTool for Android as it’s very good and while it’s not free, it’s cheap! ($7.99 at this time). Using an app isn’t as accurate as a more expensive setup but it’s enough in most cases to get the job done pretty well.
Using an RTA app and microphone for tuning sound
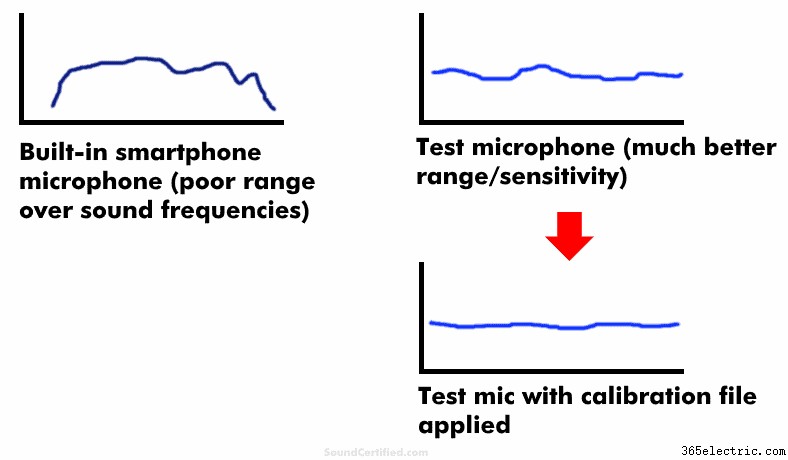
I don’t recommend using a smartphone’s built-in mic for tuning your equalizer settings. Built-in mics have poor frequency measurement performance compared to a real test microphone. Calibrated microphones also include a file to allow them to give a near-perfect measurement if your RTA supports it.
Mentre tu puoi use your smartphone’s built-in microphone to tune your system and set your EQ, I don’t recommend it. Built-in mics have poor performance for measuring sound and your readings won’t be very good. This means you’ll never be able to get the sound quite right sadly.
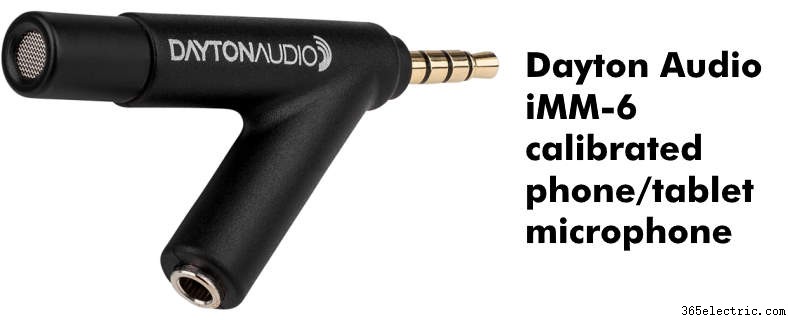
One option is to pick up an affordable calibrated microphone like the Dayton Audio iMM-6 at around $17. As an added bonus, each one includes a unique calibration file to help you get more accurate readings. To use that you’ll need an audio app that supports importing a calibration text file. (Not critical by any means but nice if you can)
More great audio articles to help
Would you love to learn more? Check out some of my other great articles!
- Find out how crossovers work and the science behind them.
- Wrong speaker Ohms rating? Here’s what happens if you use the wrong speaker impedance with a crossover.
- Find out what happens to dB volume &power when you increase speaker impedance.
- Set up your system the right way! Here’s how to set crossover frequencies for car audio.
- Check out my detailed guide to crossovers, slopes, and good crossover frequencies for car or home audio.