Quali sono le migliori impostazioni dell'equalizzatore per l'audio dell'auto? Una guida all'equalizzazione dell'auto
La messa a punto del sistema audio della tua auto con un equalizzatore può essere un pasticcio frustrante e una perdita di tempo se non sei sicuro di cosa fare. A peggiorare le cose, c'è una mancanza di buone informazioni là fuori. Mi piacerebbe aiutare a chiarire le cose!
In questo articolo spiegherò con parole chiare insieme a fantastici diagrammi e immagini:
- Cos'è un equalizzatore, come funzionano e i diversi tipi
- Perché gli altoparlanti e i sistemi audio per auto traggono vantaggio dall'utilizzo di un equalizzatore
- Alcuni dettagli di impostazione dell'equalizzazione consigliati di base per una buona qualità del suono
- Come impostare l'equalizzazione e regolare il sistema nel modo giusto (utilizzando strumenti convenienti che funzionano alla grande)
- Cosa fare se continui ad avere problemi con l'audio
Quali sono le migliori impostazioni dell'equalizzatore? La verità onesta
La verità onesta è che non esiste un vero equalizzatore "migliore" o un'impostazione del sistema audio. Dipende dai tuoi obiettivi, ma in definitiva le impostazioni migliori sono quelle che ti consentono di personalizzare il suono in un modo che soddisfi maggiormente le tue orecchie.
Tuttavia, ho alcune linee guida generali sull'equalizzatore che possono aiutarti. Mi assicurerò di trattarli in una sezione separata di seguito dopo aver spiegato perché un equalizzatore (EQ) è così utile e i problemi con il suono degli altoparlanti.
Una migliore qualità del suono nelle auto significa spendere un po' più di impegno se vuoi goderti la tua musica al massimo delle sue potenzialità. Spiegherò in modo specifico cosa sono e le impostazioni dell'equalizzazione di cui avrai bisogno per risolverlo.
Ma prima di arrivare a questo, capiamo meglio cosa fanno gli equalizzatori e come funzionano.
Cos'è un equalizzatore? Come funziona un equalizzatore?
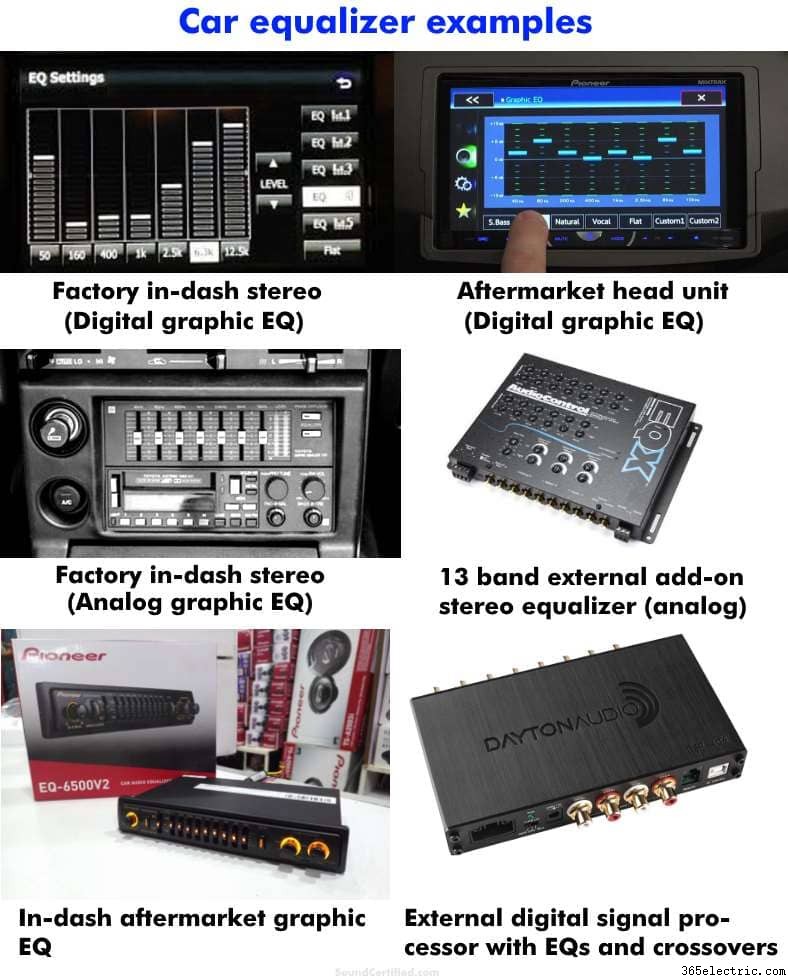
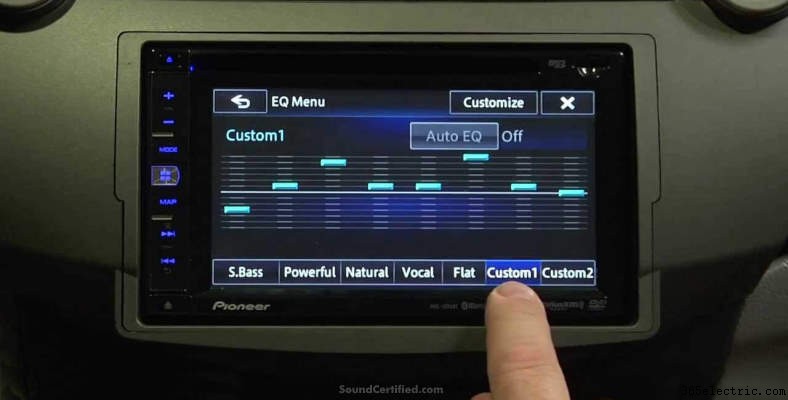
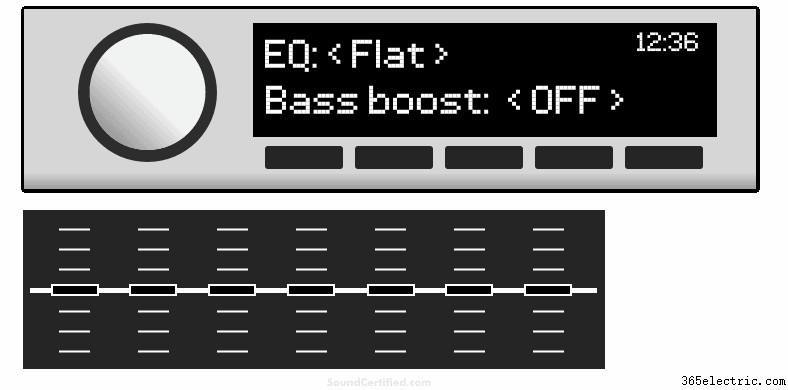
Qui sono mostrati esempi dei tipi più comuni di equalizzatori per autoradio e car audio che troverai. È possibile trovare buoni equalizzatori in alcune unità principali aftermarket. Tuttavia, puoi anche utilizzare un equalizzatore aggiuntivo esterno per ottenere un suono eccezionale durante la tua corsa.
Perché sono necessari gli equalizzatori?
Gli equalizzatori ti consentono di migliorare la qualità del suono del tuo sistema audio per auto aumentando o riducendo in parti le diverse frequenze che devono essere migliorate. L'obiettivo è "smussare" il suono per rimuovere la durezza o le aree in cui il suono è carente. Sono anche estremamente utili se vuoi solo apportare alcune modifiche per ottenere il suono desiderato.
Gli equalizzatori consentono di correggere i problemi con un sistema audio nell'audio dell'auto aumentando (aumentando il volume di) o tagliando (riducendo il volume di) piccole sezioni (segmenti di larghezza limitata) del suono nella gamma delle frequenze del suono musicale. Queste "sezioni" specifiche sono fissate attorno a un punto centrale chiamato frequenza centrale.
Gli altoparlanti per auto, ad esempio, hanno aree in cui producono troppi suoni e non abbastanza altri, quindi avere il controllo sulla risposta in frequenza può fare una grande differenza.
I controlli di base dei bassi (bassa frequenza), della gamma media e degli acuti inclusi in molte unità principali non possono correggere molto, purtroppo. Fortunatamente, l'equalizzazione ci consente di correggere molti di questi problemi.
Cosa fa un equalizzatore?
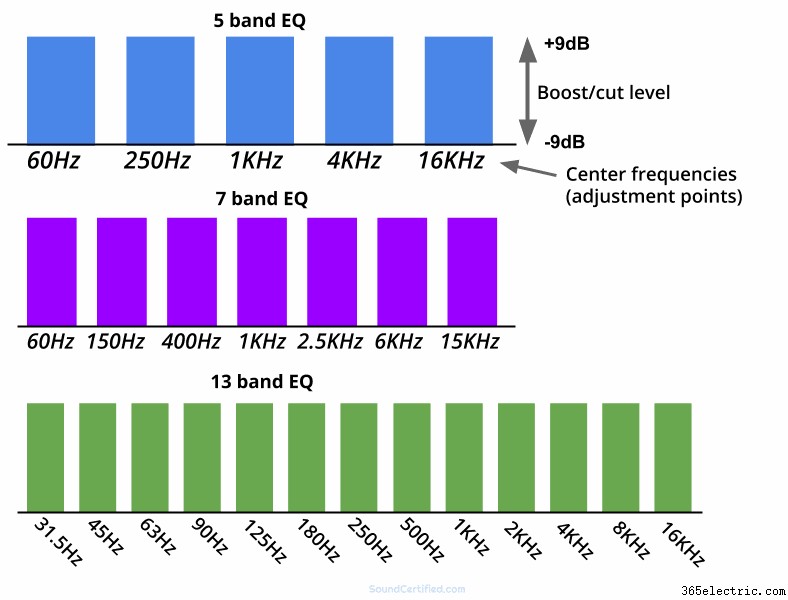
Gli equalizzatori suddividono il segnale musicale in piccole gamme di suoni chiamate "bande". Una banda EQ è una gamma di frequenza del suono basata su una frequenza centrale. Il numero di bande (quantità di slot di regolazione, se vuoi) disponibili determina quanto controllo hai. Più bande, più fini e migliori sono i miglioramenti che puoi apportare.
La quantità di boost o attenuazione che puoi applicare è misurata in decibel (dB) e di solito c'è un intervallo massimo da +/-9dB a +/-18dB. Tuttavia, dipende dal modello e dal design particolari. Gli equalizzatori a 9dB e 12dB sono molto comuni.
Il numero di bande di un equalizzatore aumenta la quantità di controllo che hai sull'intervallo di regolazione del suono audio. Più bande forniscono un mezzo per una migliore regolazione del suono (sarai in grado di correggere meglio i problemi di suono degli altoparlanti durante la sintonizzazione).
Un equalizzatore grafico a 31 bande, ad esempio, offre molto controllo audio, ma la messa a punto di un sistema può richiedere molto tempo. Quando si sceglie un equalizzatore più semplice rispetto a uno con più bande, la scelta migliore è quella con più bande
Come funziona un equalizzatore?
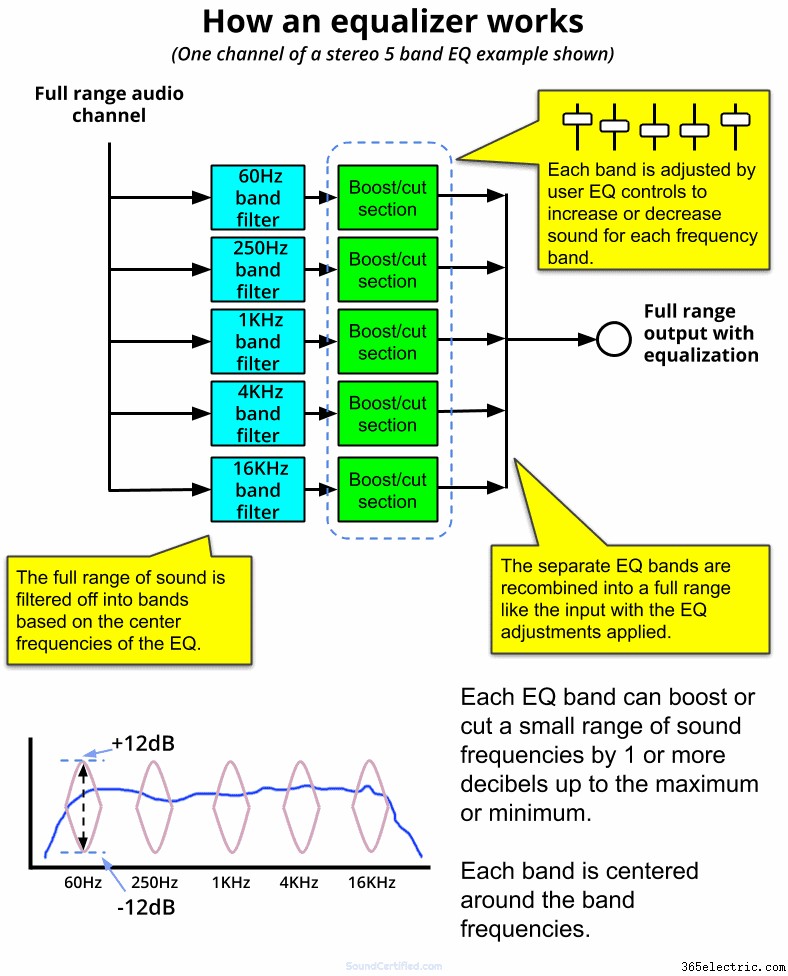
L'equalizzazione viene eseguita dividendo l'intera gamma del suono in sezioni più piccole chiamate bande. Questi sono centrati attorno alle frequenze centrali dell'EQ. Questa sezione del suono viene quindi aumentata o diminuita a piacere per regolare il suono. Le bande vengono quindi ricombinate e riprodotte come gamma completa con le regolazioni dell'equalizzazione incluse.
Gli equalizzatori funzionano prendendo il suono a gamma intera di ciascun canale stereo (o mono, se si tratta di un crossover subwoofer, ad esempio) e dividendoli in "bande" usando i filtri. Ogni filtro dirige le frequenze sonore di quella banda, in base alla frequenza della banda, a un circuito che aumenta o diminuisce il volume di quella gamma a seconda delle tue regolazioni.
Il suono di ciascuno di questi circuiti viene quindi ricombinato e inviato all'amplificatore o al sistema di altoparlanti. Il risultato finale è lo stesso suono in ingresso, ma con le regolazioni dell'equalizzazione applicate, non solo un semplice miglioramento dei bassi e degli acuti!
Alcuni equalizzatori utilizzano un unico set di controlli per entrambi gli altoparlanti anteriori e posteriori (un set di controlli EQ per entrambi i canali stereo), mentre altri hanno canali sinistro e destro separati per una migliore sintonizzazione. Alcuni forniscono canali di equalizzazione sia per gli altoparlanti anteriori che per quelli posteriori.
In alcuni casi, viene fornito un altro set più piccolo di bande per la sintonizzazione dei bassi del subwoofer. Questo è spesso il caso degli equalizzatori digitali come quelli degli autoradio touchscreen.
Equalizzatori analogici vs digitali
Gli equalizzatori analogici utilizzano hardware elettronico come amplificatori operazionali, resistori o circuiti integrati per regolare l'uscita del suono durante la regolazione. Gli equalizzatori digitali (nella maggior parte dei casi) sono diversi in quanto lo fanno nel software utilizzando routine software matematiche.
Sebbene entrambi abbiano i loro pro e contro, gli equalizzatori digitali offrono più funzionalità al giorno d'oggi e consentono di risparmiare denaro e spazio poiché non hanno bisogno dell'hardware aggiuntivo per fare il lavoro. In molti casi includono anche crossover regolabili che migliorano ulteriormente la regolazione del sistema.
Gli equalizzatori analogici in-dash sono talvolta dotati di funzioni di ingresso ausiliarie, mentre i modelli digitali spesso includono preset di equalizzazione, il che rende un gioco da ragazzi salvare e richiamare le impostazioni.
Differenze tra equalizzatore grafico e parametrico
Un equalizzatore grafico ha bande fisse che puoi aumentare o ridurre mentre un equalizzatore parametrico normalmente ha meno bande, ma la frequenza centrale può essere leggermente spostata per un controllo aggiuntivo.
Impostazioni di base dell'equalizzatore per auto consigliate:impostazione dell'equalizzazione a orecchio
In questa sezione, condividerò con te alcuni passaggi di base e le impostazioni dell'equalizzazione quando lo fai a orecchio. Nella sezione successiva analizzerò il modo migliore per farlo:mettendo a punto il tuo sistema utilizzando gli strumenti giusti.
Iniziare con le basi
Ti consigliamo di fare alcune cose prima di provare a regolare un equalizzatore perché avere troppe regolazioni significa che possono lavorare l'una contro l'altra, il che significa che potresti non andare da nessuna parte!
Il mio consiglio è di fare quanto segue prima di regolare un equalizzatore:
- Disattiva qualsiasi modalità audio speciale come l'aumento dei bassi o le impostazioni di "miglioramento". Impostali su "flat", zero o off secondo necessità.
- Imposta tutte le regolazioni della banda dell'equalizzatore su flat. Cioè, a livello 0dB, nel mezzo del display dell'equalizzatore (o a 0dB se utilizza un controllo di stile numerico).
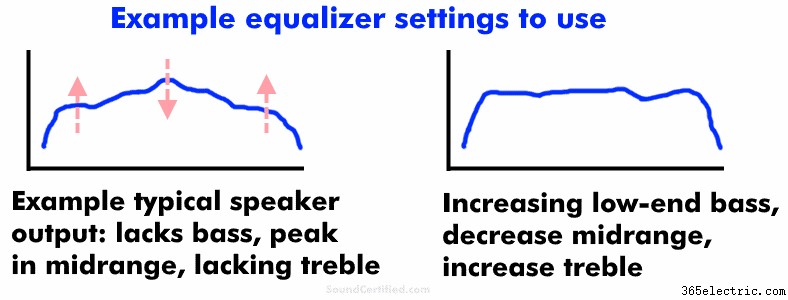
Per molti sistemi di altoparlanti (ad esempio altoparlanti di fabbrica con un'unità principale installata in fabbrica), in genere il suono è carente in 2 o più aree:
- Bassi insufficienti
- Frequenze medie dure o carenti
- Alti insufficienti (suoni ad alta frequenza come piatti e strumenti a corda)
- La musica ha dettagli scadenti e non suona come dovrebbe essere la registrazione
In this case, I recommend doing the following, being sure to use small increments of the equalizer and make changes slowly while listening carefully.
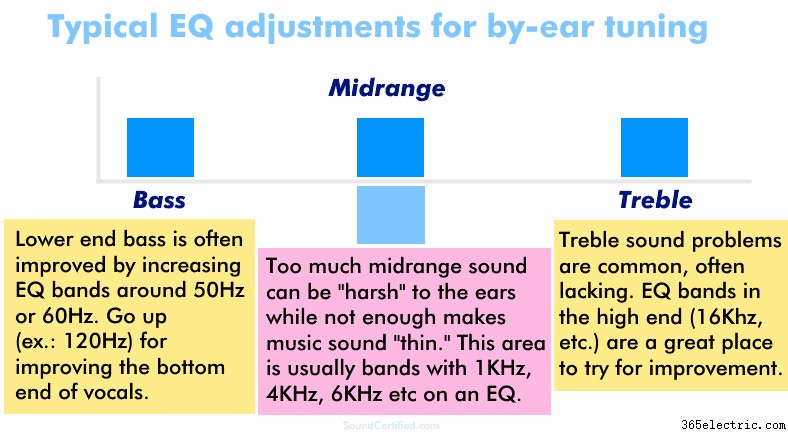
- Increase the bass a bit in the low-end range. This will be a band with a frequency of 60Hz or close to it – this depends on your particular EQ. You can then increase it a bit in the band above it and hear the results (ex.:120Hz band, which is still bass but on the lower end of mid range sound &vocals).
- Increase the treble 6dB or so around the highest band on the upper end of the EQ, then continue increasing by 3dB if you hear an improvement. Continue until it sounds unpleasant to you, then decrease back until it’s better. This is usually a band with 16KHz or similar (some only go to 12KHz, which isn’t good, sadly). Treble can be a problem because of speaker placement is less than ideal in vehicles along with poor quality factory-installed speakers, too.
- If you hear “harshness” and the vocals and musical instrument detail, you probably need to decrease mid range sound. Start with a band around 1KHz and decrease by about 3dB and listen for improvement. If there isn’t any, set it back to 0, then move up to 2KHz, 4KHz, and so on as needed.
The idea is to know how the music should sound with everything set up properly and judge your EQ settings by ear using test music.
I recommend using a music test track to do this. You can buy audio test tracks for download or CDs to buy online. Alternatively, you can use a song you know extremely well that you’ve heard on a high-fidelity system before.The idea is to know how the music should sound with everything set up properly and judge your EQ settings by ear using test music.
Our ears are most sensitive in the mid range frequencies so that’s often one of the first areas that need equalization. Tweeters very often need some increase at the high end, too. It’s a huge problem with factory-installed tweeters that have a poor response (sound output) at the highest end of the sound range.
It’s also a common issue since many car tweeters are mounted in a location where they’re pointing away from you. That’s because tweeters are most effective with a directional installation where they’re facing your ears (called “on-axis”) and not to the side or away from your head.
If not, you’ll hear get a fairly high loss in the treble range in music.
How to tune your system for the best EQ settings

Some examples of your options for measuring and tuning your car audio speaker system. Of the 3, using a laptop and RTA software or smartphone app are the best values for the dollar. Today’s smartphone apps like AudioTool offer many of the same features as much more expensive options.
As I mentioned earlier, without question the best way to tune your system (find the optimal equalizer settings) is to use a measurement tool and find the areas that needed adjusting. To do so, you’ll need a real-time analyzer (RTA) and microphone. There’s simply NO WAY to get the best sound using only some music and adjusting it by ear.
In the past this use to be a serious pain in the neck – if you could even at all find an RTA to use. Until some years ago, real-time analyzers were far too rare and expensive. A dedicated portable unit like the AudioControl SA-3050, for example, often sold for $1,500. They were heavy, limited in functions, and battery power wasn’t even standard!
Thankfully, these days you can find get professional results using your laptop and RTA software (such as TrueRTA, for example) or use an RTA app with your Apple or Android phone.
Of the two, the most affordable and convenient option is to use your smartphone. For the sake of keeping things simple, I’ll cover using a smartphone and an RTA app. I recommend AudioTool for Android as it’s very good and while it’s not free, it’s cheap! ($7.99 at this time).
Using a smartphone app for tuning isn’t as accurate as say a much more advanced (and costly) real-time analyzer tool setup. However, you’ll still get pretty good results you’ll enjoy if you use it properly.Using an RTA app for tuning (and why you need a good microphone)
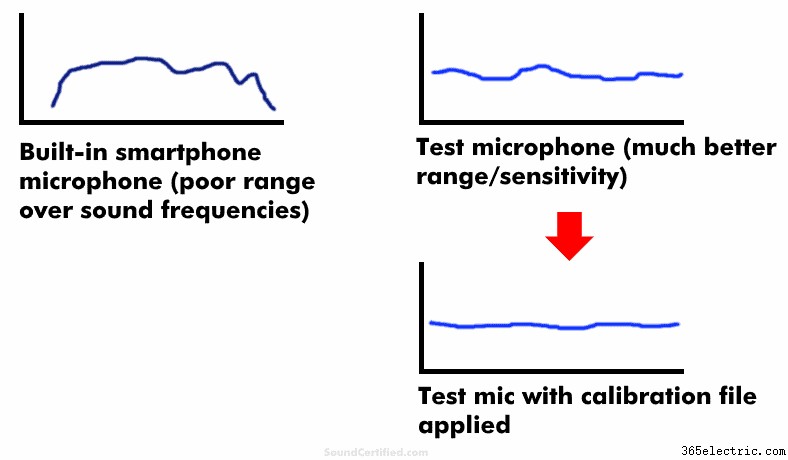
Although you can use your smartphone’s built-in microphone to get you by, I don’t recommend it for tuning your equalizer/sound system. Built-in mics have poor frequency measurement performance compared to a real test microphone. Calibrated microphones also include a file to allow them to give a near-perfect measurement if your RTA supports it.
While you can use your smartphone’s built-in microphone with an RTA app to tune your system and set your EQ, I don’t recommend it. They’re poor for measuring the audio frequency spectrum and your readings will be off – way off in some cases!
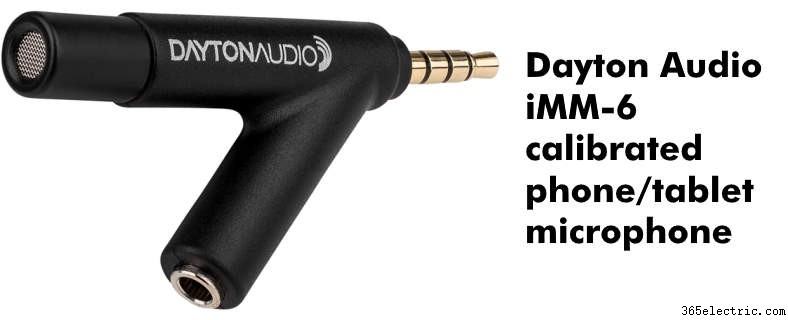
You’re much better off buying an affordable calibrated microphone like the Dayton Audio iMM-6 at about $17. Each one includes a unique calibration file to help you get more accurate readings. You don’t have to use calibration (the mic is already pretty good) but it’s free, so why not get the most out of it?
How to tune a car equalizer
Your goal should be not to get perfect sound but to correct the areas where the speakers have bad peaks or valleys in the sound output. For that, you’ll want more expensive tools and a lot more effort and time.
The most important thing is to have a pretty good idea of what’s going on with the sound output and correct the most troublesome sound points.
To tune your system and measure where you need to make improvements using your EQ, you’ll want to do the following:
- Park your vehicle in a quiet area without outside noise that can interfere with your measurements. Leave the vehicle engine off.
- Set up your RTA to an “octave” mode similar to the number of bands on your EQ. Set the measuring speed to medium or slow. I personally prefer 1/3 octave (31 bands) mode but for those of you with fewer EQ bands, setting it to a smaller number of bands for the RTA display should help.
- Set your equalizer to all-flat (all settings at zero) and any other sound enhancements disabled.
- For systems using amplifiers, be sure you’re not using a bass boost for the subwoofers.
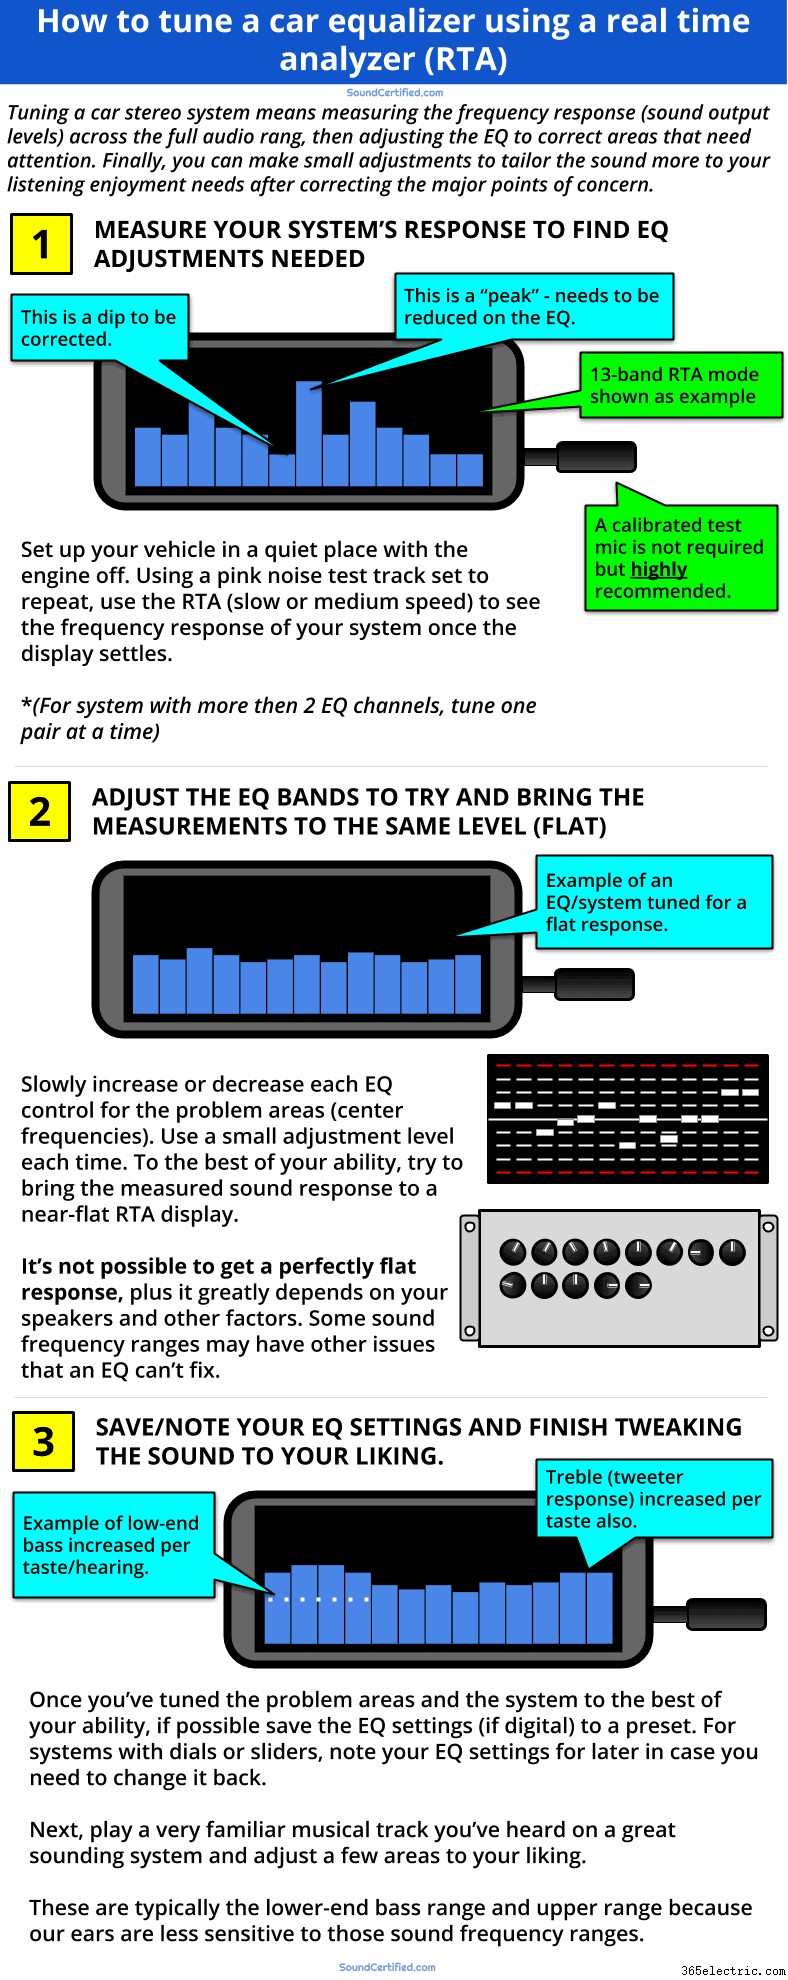
- With the RTA running and your microphone connected (set up the RTA’s mic option if needed), play a pink noise test track for measuring the system’s sound output with the RTA. (You can use an audio file or CD, but it needs to be high-quality and not compressed audio to make sure you’re generating real pink noise that’s not altered and that could result in bad measurements.) Note that some RTA apps can generate noise so you can connect the output to the AUX input of some head units.
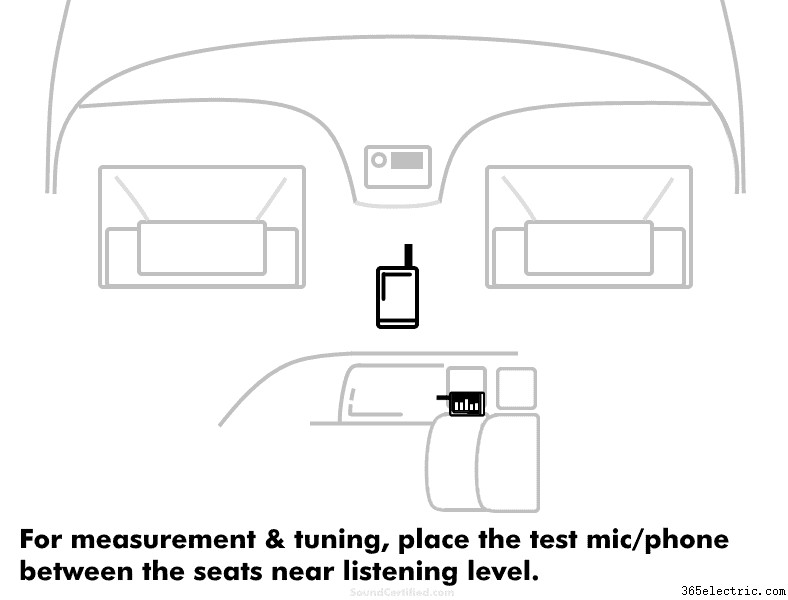
- With the RTA running and held in a middle place between the seats near ear level, note areas where there are dips and peaks in your system’s response.
- Begin adjusting the EQ a small amount for the bands in those spots and carefully watch the changes. Turning the EQ up or down too much for each frequency can cause you to have to constantly compensate by changing other bands as they interact. Do it a little at a time.
- A near-perfectly tuned system would appear as a nearly flat RTA line across the entire audio range. However, that’s not realistic or very acheivable. We’re aiming to get as close as we can to that then make custom adjustments later.
- Once you’re satisfied you’ve got it corrected (it takes a bit of time and patience!), save your EQ settings as a preset if it’s a digital equalizer. For analog (dial or slider type EQs) units, take notes for future reference.
- Final touches:play a music track (with good bass) that you’re VERY familiar with and know the sound on a proper system. Carefully make changes as you need to for what sounds best to you. In my experience, this is increasing the low-end bass (around 60Hz), lower midrange (around 120Hz), and higher frequencies (16 to 20KHz) depending on your hearing and taste.
The best goal isn’t to get perfect sound but instead (1) correct the worst problems in your sound system and (2) adjust the results to get the sound that YOU really enjoy with your music.
After tuning the system, feel free to use your bass booster or other features if you think you like how they sound. However, be aware that a properly tuned system with good speaker performance normally doesn’t need gimmicks to make it sound right.
You should be able to hear sufficient bass when it’s adjusted optimally.
Those are instead for:
- Making up for what your system is lacking (for example, poor subwoofer output
- Occasionally adding that extra slam to your favorite music when you’re in the mood – just not every day
In that case, no amount of tuning can help. You’ll need to work on improving either the installation, the speakers, or both.
Upgrades that make a huge difference when your EQ can’t
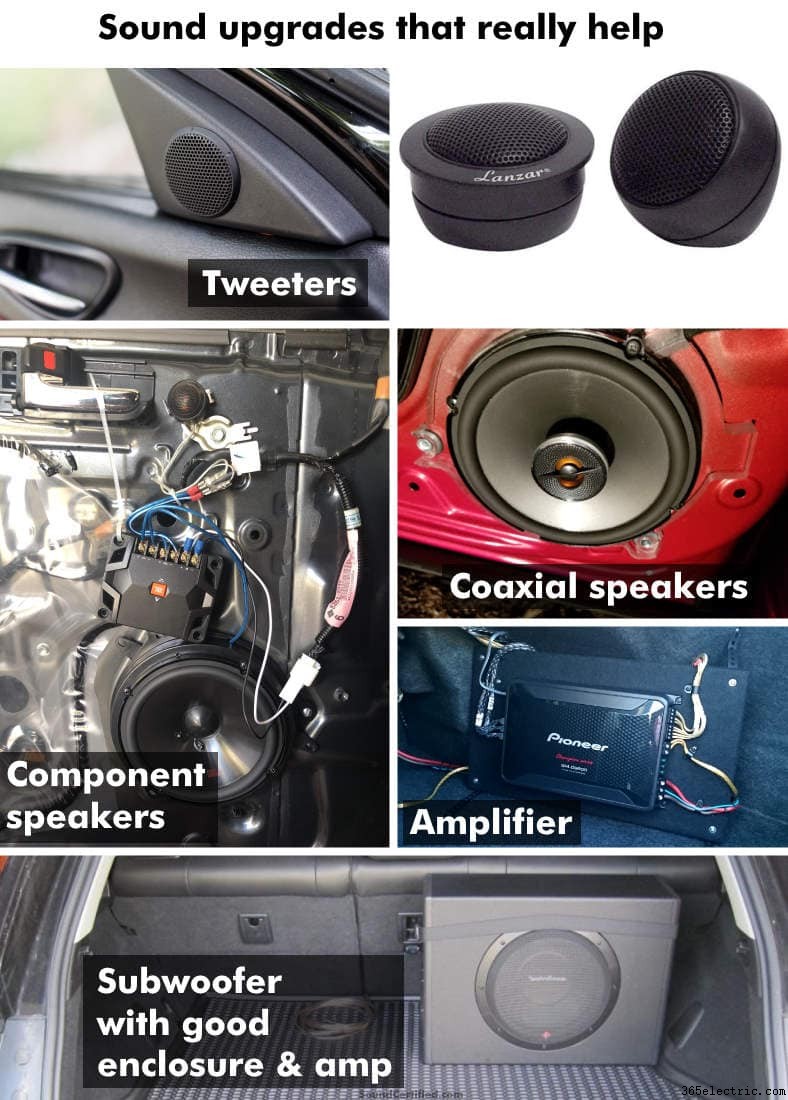
Equalizers are great but they can only do so much. Since they’re limited to a range of +/-12dB to +/-9db of sound adjustment typically, that means for problems exceeding that, you won’t be able to correct it enough.
Some of the biggest problems with car audio systems are very common based on what I’ve seen over the years. It depends a LOT on the particular vehicle, the speakers used, and much more.
In most case it’s due to one or more of the following problems:
- Poor or no low-end bass: needs a subwoofer to be added or better subwoofer to replace the current one
- Poor/very weak treble: Needs tweeters to be replaced and/or added. Also, consider moving tweeters to a better location facing the driver &passenger seats.
- Music sounds “thin” and unnatural (poor midrange): Requires a speaker upgrade as this is a sign of poor speaker performance.
- Distortion during playback especially at high volume: Insufficient power to drive the speakers. Consider driving them with an amplifier or replace a factory amplifier (if equipped) or a higher power aftermarket model.
The good news is that these days you don’t need to spend a ton of money on any of these. Each one can be found (with pretty good quality and sound, I might add!) for around $100 or less. In fact, by replacing all of the main components (a better sounding head unit, front and rear speakers, add a subwoofer for bass, driving speakers with an amp, and so forth) you’ll get great sound that no factory system can match.
More articles you’ll enjoy
I’ve got some other great info to help you learn more:
- Find out here what tweeters do and much more!
- Component vs coaxial speakers:a detailed explanation
- Want some serious power and bass from your subwoofers? Here’s how to bridge an amp.