Guida al calibro dei cavi audio per auto con grafici
Guida al calibro del cavo audio per auto con grafici
Quando si aggiorna l'impianto stereo dell'auto, è importante ottenere il diametro del cavo della giusta dimensione e, sebbene ci siano molti fattori in gioco, questa guida al calibro del cavo ti fornirà informazioni sufficienti per capire quale dimensione ottenere.
Che si tratti del tuo amplificatore, subwoofer, altoparlanti o altri componenti, ottenere la giusta dimensione del cavo è fondamentale per ottenere il meglio dalla tua nuova attrezzatura.
Sbagliare non solo influirà sul suono della tua musica, ma potrebbe danneggiare le tue apparecchiature audio, i cavi elettrici della tua auto e, nel peggiore dei casi, potresti persino innescare un incendio nella tua auto.
In questo articolo esaminiamo i principali tipi di cablaggio dell'autoradio e le diverse dimensioni dei cavi necessari per ciascuno di essi. C'è una tabella del calibro del filo per ogni spiegazione, che dovrebbe darti un'idea abbastanza precisa del calibro di cui hai bisogno.
American Wire Gauge (AWG)
La maggior parte del mondo utilizza l'American Wire Gauge (AWG), che è la misura standard statunitense per il diametro dei conduttori elettrici. Si basa sul numero di fili originariamente necessari per portare il rame alla dimensione richiesta. Quindi, più basso è il numero, più spessa è la sezione del filo.
L'AWG è stato introdotto per la prima volta nel 1857 come standard per sostituire le varie misurazioni utilizzate da diversi produttori. La dimensione del cavo più grande è 0000 AWG, mentre la dimensione standard più piccola è 40 AWG.
Viene utilizzato sia per i fili pieni che per i fili a trefoli, sebbene i fili di rame a trefoli possano essere leggermente più ingombranti dei fili pieni, anche se hanno lo stesso calibro. Anche così, l'utilizzo della guida per il calibro del filo AWG ti porterà allo stesso risultato.
Si discute molto sul fatto che un numero di fili più elevato migliori le prestazioni audio, ma in realtà non si tratta di più fili di filo, si tratta di ottenere il giusto diametro del filo.
Assicurati di proteggere correttamente le connessioni dei cavi
L'uso di una guida per il calibro dei cavi è necessario per ottenere la giusta dimensione, ma anche il collegamento sicuro dei cavi è fondamentale quando si installa qualsiasi apparecchiatura audio in quanto ti garantirà una connessione buona e solida.
Una cattiva connessione può allentarsi rapidamente e, in tal caso, può causare molti problemi al tuo impianto stereo e un mal di testa che non ti serve.
Esistono molti tipi diversi di connettori e alcuni sono migliori per determinati cablaggi elettrici, ma qualunque connettore utilizzi, assicurati di avere una connessione solida.
I connettori a crimpare sono abbastanza buoni. Fondamentalmente, sono un connettore elettrico utilizzato per terminare o collegare fili intrecciati. Il filo andrà nel connettore e fintanto che lo crimpa con alcune pinze, otterrai una presa solida e permanente.
La saldatura è anche un altro ottimo modo per proteggere i cavi elettrici. È un po' più di lavoro, ma finché è fatto bene, con l'attrezzatura di saldatura corretta, è il modo più sicuro per collegare i cavi e le apparecchiature audio.
I fili di saldatura ti daranno la migliore connessione, ma assicurati di fare il lavoro correttamente. Se non l'hai mai fatto prima, ti consiglio di procurarti dei connettori a crimpare, perché connessioni mal saldate possono causare molti problemi.
Una volta collegati i cavi, è sempre una buona idea avvolgere i collegamenti in una guaina termoretraibile. Questo li proteggerà da polvere e sporco e rafforzerà la tua connessione, assicurandoti che i tuoi fili non si spezzino mai.
Quindi, ora che hai tutte le informazioni sullo standard AWG e su come ottenere la migliore connessione per il tuo cablaggio elettrico, è il momento di guardare la guida allo spessore dei cavi per ogni installazione.
Connessioni di messa a terra
I collegamenti di messa a terra sono necessari per tutti i dispositivi elettrici installati in un'auto. Una messa a terra è una connessione elettrica negativa che alimenta l'unità e sarà principalmente collegata al telaio dell'auto. Una cattiva messa a terra è probabilmente la causa più comune dei problemi con l'audio dell'auto, quindi assicurati di farlo correttamente.
I cavi di messa a terra devono essere montati in modo sicuro su metallo pulito, non verniciato o punti di messa a terra dedicati sullo chassis. Un ottimo posto per collegare la messa a terra è sotto il bullone della cintura di sicurezza, in quanto ti darà una connessione sicura al telaio.
I fili di messa a terra dovrebbero essere della giusta misura necessaria per l'applicazione. Quindi, se stai installando un amplificatore da 600 W, il calibro del cavo di messa a terra deve essere in grado di alimentarlo.
In genere, il cavo di messa a terra avrà le stesse dimensioni del cavo di alimentazione di cui parlerò appena sotto, quindi per la guida del diametro del cavo corretto per la messa a terra, segui le dimensioni del cavo di alimentazione.
Cablaggio di un amplificatore in auto
Il tuo amplificatore è una delle apparecchiature audio, se non la più energetica, e più grande è l'RMS che il tuo amplificatore può spingere, più grande sarà il cavo di alimentazione di cui avrai bisogno.
Se utilizzi un cavo di alimentazione troppo piccolo, il tuo amplificatore potrebbe danneggiarsi rapidamente, quindi assicurati di farlo bene.
To work out the wire gauge needed for your power cable you need an idea of how much current your amp will try to consume, and on how long the wiring run from battery to amplifier will be.
To work out the approximate amperes of your amplifier, you need to multiply the number of channels by the RMS per channel. If you have more than one amp, you need to add them all together, and divide that by the efficiency and then the voltage.
There are two common types of amplifiers:D Class and A/B Class. You never get 100% efficiency out your amp, so it throws another spanner in the works. Generally, Class D amps are more efficient and you should get around 75% efficiency, whereas with an A/B amp you will get around 50% efficiency.
So, to work it out:If you have a Class D amplifier, you need the total RMS divided by 0.75 Amp Efficiency divided by 13.8 Volts to get your Current Draw in Amperes.
So, if you have a 600W RMS Class D amp, your math will be 600/0.75/13.8 =57.9710145, which rounded up is 58 amperes.
As you can see in the wire gauge chart below, the gauge needed for an 8 foot power cable would be 8 gauge.
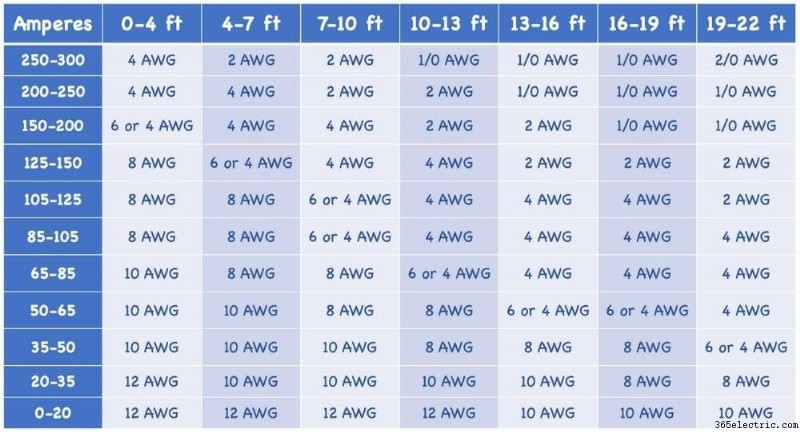
If you have an A/B Class, you need the total RMS divided by 0.50 Amp Efficiency divided by 13.8 Volts to get your Current Draw in Amperes.
So, if you have a 600W amp, your math will be:600/0.5/13.8 =86.956521, which I’d round up to 87 amperes.
As you can see in the wire gauge guide above, the AWG I’d need for a power cable of the same length would be either 6- or 4 gauge wire. I would always round down and go for the bigger wire so I’d get a 4 gauge power cable. Quite a difference from the D Class amp above!
Other Wires Running From Amplifier to Receiver
You can get amp wiring kits with all the wires and connectors in, which are a good idea as you can keep hold of them in case you need to replace any wires further down the line.
All amplifiers will come with a Remote Turn-on Wire, but if you have to replace it, you should get an 18 AWG blue wire.
For the RCA Jacks, you will just need to replace them with some standard RCA male-to-male jacks. These usually come between 22 gauge to 18 gauge, and the more powerful your amplifier is, the better it is to go with the bigger 18 gauge
Speaker Wires
Running speaker wires, whether it’s directly from your head unit or from your amplifier, allows your speakers to receive the audio signal, so they can reproduce those amazing sounds we all love to drive along to.
Speaker wires are typically 2 separate stranded wires molded together, with one strand being the positive + and the other strand being the negative – strand.
There are many different qualities of speaker wire, so it’s a necessity that you get the best you can afford, because cheaping out on speaker wires, will cause you problems and you won’t get the best out of your audio equipment.
Some cheaper wires that claim to be a certain gauge might not be, and instead you’ll be buying more plastic sleeve than wire.
Depending on the speakers you have will determine the wire gauge you need, and below in the wire gauge chart you can work out what is best for you.
Factory speakers will run on pretty much any size wire, as the power demands are minimal. But of course, most people into audio upgrade their car speakers, so getting the right size wire is necessary for you speakers and subwoofers.
Aftermarket speakers need more power, so the electrical wiring that drives the signal to them needs to be bigger than factory speakers.
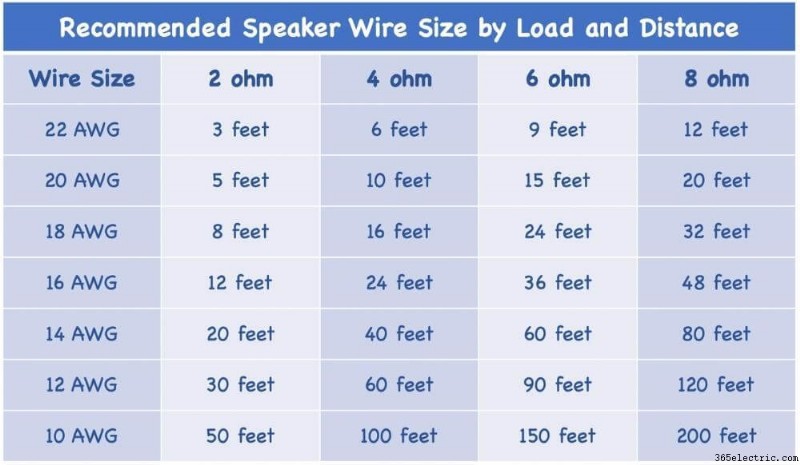
Speaker wires are usually between 18-14 gauge, but to work out the size for yours, you should know the Impedance and distance.
Looking at the chart above:If you are running speakers at 4 ohms and the distance needed is 20 feet, then you are between 18 and 16 AWG. In this case I would always go for the bigger wire, so go for 16 gauge.
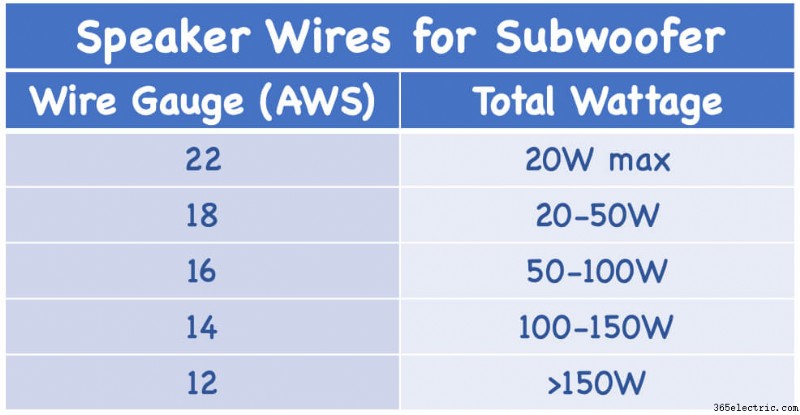
For subwoofers the speaker wire will tend to be a bit bigger. Usually you will need as big as 14-12 AWG, but the calculations are the same as the speaker wires on the wire gauge chart above.
Although another general rule of thumb is to work out its total wattage, and looking at the wire gauge chart here with RMS wattage, you can just go for that size wire.
You can use both wire gauge guides to come up with the wire size you need, but generally speaking you should need something between 16- and 12 gauge speaker wire for your subwoofer. And always go for the bigger wire if you’re getting mixed results.
Crossover Wiring
Using a crossover gives you more control over your sound system, but many people get confused with the electrical wiring.
Crossovers need 12v of power, which many people think it needs a thicker gauge wire, but because crossover demands less current, as a general guide 18 gauge wire is usually fine.
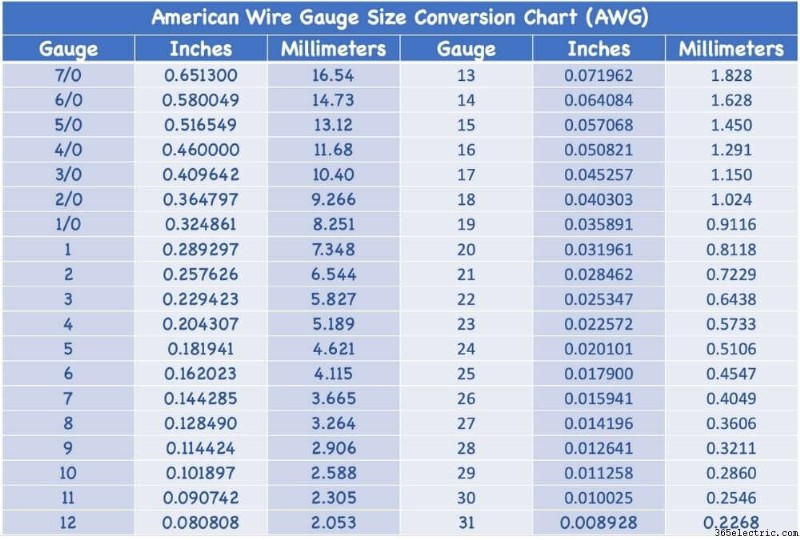
Wire Conversion Chart
All measurements in the wire gauge charts above are imperial, but for anyone who works in metric (most of the world), please find the wire gauge chart below for converting inches to millimeters useful.
Other FAQs About Electrical Wiring Gauge
Why do you need different gauge for different wire lengths?
Basically, resistance increases the longer electrical current has to travel. This is because as it’s travelling the electrical resistance builds up, so the longer it is, the more resistance. And the electrical current can only travel so far before there’s a voltage drop, which is why you need a bigger power cable.
What happens if I go too small?
If you get too small a size wire, it depends, but it’s not good. You might be lucky and just temporarily lessen the quality of of your soundstage, or you could damage your equipment and even set your car on fire.
The problem is determined by the wrong wires you install. That’s why it’s always necessary to know the correct size you need by looking at wire gauge guides.
What happens if If I go too big?
If you go too big, don’t worry too much as it won’t damage anything. But of course if you go too big it will cost you unnecessary outlay as the bigger wires are more expensive.
Also, the bigger the wire, the more room it will take up and the harder it is to bend. So, try and get it right, but too big is definitely better than too small.
What happens if my wires are too long?
When you buy the wires, it’s always a good idea to buy more than enough. However, when you install your audio equipment, don’t leave too much wire hanging out or even rolled behind something, even if it’s hidden.
Cut the wire at the appropriate length, because longer wires add unnecessary resistance and can create impedance. It also leaves your car looking messy.
Choosing The Right Size Wire for The Right Audio Equipment
So there you have it, a wire gauge guide for all the important electrical wiring in your car stereo system.
All the different wire sizes can be confusing, but looking at the charts or even a wire gauge calculator will give you a better understanding of which size to get.
All wiring is important, but pay particular attention to your power leads and do the math correctly for the total amperage and distance, because this is where you could get most problems.
Always ensure you buy good quality wiring, because you don’t want more sleeve than wire. There are some great amp wiring kits out there with all wires needed, so if you need the full bundle one of these is a good way to go.
Last but not least, always make sure you connect all wires with a good solid connection. Whether it’s crimp connectors or soldered connections, it’s up to you, but whichever way, make sure you test the connection with a few good tugs as you wire everything up.
If you have any questions and need more wire gauge guidance, leave a message in the chatbox below and we will get back to you.